Cartography Workshop

Jürgen Hubert

First Post
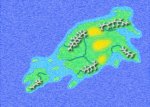
Now open Inkscape again. Create a new layer at the bottom named "BackgroundImage". Go to File->Import and load the map image you have just created. Move it around until the lines of the Inkscape map are directly over the bitmap image.

Now you can place new terrain features directly on top of the main map! You can simply put cities, names, or more intricate features on the map with Inkscape and export it together with the background image, without messing up your existing work and having to do it all over again.

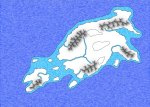
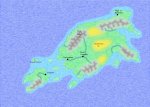
But let's first add some vegetation into the background. Create an additional layer called "vegetation". Since this is supposed to be a simple tutorial, we will only two two different types of vegetation - grassy plains and desert.

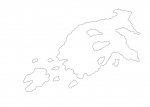
Simply draw lines on the land areas depending how you want to divide the land into different vegetation zones. Then save this layer together with the Coastline layer (as usual, make all other layers invisible before saving) as "VegetationLayer.png"
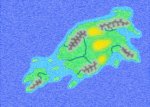
 

Attachments

  • TotalMap1.jpg
    TotalMap1.jpg
    221.6 KB · Views: 732
  • VegetationLayer.jpg
    VegetationLayer.jpg
    30.3 KB · Views: 767

log in or register to remove this ad

Jürgen Hubert

First Post
Now load "VegetationLayer.png" into GIMP.

Let's start with the plains. Select all areas you intend to be plains with the Magic Wand. Now create a new, all-white layer named "Plains". Go to the new layer and bucket fill the selected area with the color 00f817. Deselect everything and apply a Gaussian Blur with 40 px.

Again, pick the background color with the Color Picker and transform it to Alpha. Duplicate the layer and merge it.

Now apply the following:

Filters->Noise->Scatter HSV with 2/70/160/10
Duplicate the layer.
Apply Filters->Generic->Erode to the duplicate, set its transparency to 50%, and merge it with the original.
Layer->Color->Hue-Saturation with 0/-50/100
Filter->Artistic->Softglow with 10/1.0/1.0
Filter->Distorts->Wind with Wind/Lef/Leading/10/10

That's it for the plains! Looks nice, doesn't it?

Now let's switch to the deserts. Go to the zone outline and select the desert regions with the Magic Wand. Create a new white layer named "Deserts" and bucket fill the selection with ffeb42. As before, deselect everything, apply a Gaussian Blur with 40 px, turn the background color to Alpha, dublicate the layer and merge it again.

Now apply the following:

Filters->Noise->Scatter RGB with 0.2/0.2/0.2/0
Filters->Blur->Motion Blur with Linear/15/135
Duplicate the layer.

Apply to the copy:
Layer->Color->Brightness-Contrast with -100/100
Turn the color black to Alpha.
Erode the layer and unify it with the original.

Now merge the Plains and the Desert layers and save them as "VegetationColor.png".

Then add the other layers - Moutains, Rivers, Oceans - that you have created previously. The vegetation must be below all other layers with the exception of the white background! Now you have a finished Background image - save it under the same name as before, and you can immediately use it under Inkscape!


While I like the general effects, they have several downsides:

- It is hard to get the vegetation zones precisely the size you wanted them to be. Does anyone here have any suggestions for this?

- They don't look good in greyscale, either.

If anyone has any ideas how to cope with these, I am all ears.


Apart from that, I created these effects purely through random experimentation with various filtering effects. If anyone has a better combination of effects - or ideas how to create other vegetation types - please tell the rest of us how you did it!
 

Attachments

  • VegetationWork1.jpg
    VegetationWork1.jpg
    35.6 KB · Views: 627
  • VegetationWork2.jpg
    VegetationWork2.jpg
    96.4 KB · Views: 705
  • VegetationWork3.jpg
    VegetationWork3.jpg
    89.6 KB · Views: 637
  • TotalMap2.jpg
    TotalMap2.jpg
    209.3 KB · Views: 884

Jürgen Hubert

First Post
The rest is almost trivial. Go back to Inkscape again and create four new layers called "City Locations", "City Names", "Place Locations", and "Place Names".

Turn all layers except for the background image invisible. To increase contrast for the city and place locations, turn the Opacity of the background image layer to 70% or so (but be careful, because then you'll have to cycle the image through GIMP again to remove the transparency of the image).

Create two small black circles - one with a black filling, and one without. Copy and paste the first one to the "City Locations layer" to all locations where you want cities. Copy the second one to the "Place Locations layer" to all locations where you want to place unique sites.

Now you only need to label these sites with the Text tool in the City Name and Place Name layers. I recommend using different font sizes to distinguish the two - I used a size 12 font for cities and 10 for place names. Export the image as a png, load it into GIMP, add a blank white layer below it and save it again - and you are done!

And if you want to add new cities or locations, or want to move existing ones around, then you can easily do those changes in Inkscape without altering the background image...
 

Attachments

  • FinalMap.jpg
    FinalMap.jpg
    180.7 KB · Views: 973


Artimidor

First Post
As you've mentioned Santharia and Jürgen pointed me to this thread (it's always helpful to learn some other techniques, so thanks for that!), some updates from my side on Santharian map making:

The tutorials on the site are pretty ancient by now (as are my old maps) and I just didn't have the time yet to make a much better tutorial with everything I've learned in the meantime concerning usage of textures etc. But I can give you at least a few glimpses on how things have progressed in Santharia concerning map making.

Personally I prefer handdrawn stuff combined with Photoshop techniques (shadows etc.) and usage of textures plus 3d objects added in. It's a lot of work, but the results are quite satisfying methinks.

As I don't have an advanced tutorial yet, here a some stages of map drawing, which might help you follow the process:

(Click on images to enlarge. Note that the enlarged versions get pretty large!)


Links to further development stages:
- Stage 5
- Stage 6
- Stage 7
- Stage 8
- Stage 9
- Stage 10
- Stage 11

And the final result looks something like this:

The Manthrian Province

Hope that provides at least a bit of inspiration for aspiring map makers :)

Artimidor
Webmaster of the Santharian Dream
 

Hussar

Legend
That's some seriously pretty maps. I've tried your tutorial and found it to be really easy to follow. My artistic skills are somewhat lacking, but, I've kept trying. Thanks for that. And thank you Jurgen for more pointers.


Jürgen Hubert

First Post
Here's an alternate way of creating mountains. It's probably a good idea if you use a nice, strong primary color as a background for this...

Load the Mountains Layer into GIMP.
Apply a Gaussian Blur with 5px.
Use a Magic Wand with Antialiasing, Feather Edges Radius 10, Select transparent areas, Threshold 10 on the empty parts of the layer.
Select->Invert
Create a new Transparent Layer
Bucket Fill with White on the selected areas.
Select->None
Script-Fu->Shadow->Drop-Shadow: 4/4/15/80
Script-Fu->Shadow->Drop-Shadow: 8/8/15/80

Save the results as usual.


This probably doesn't look as good for color layers, but it seems to be somewhat crisper for b&w maps. I'll investigate b&w effects further when I find the time, but like I said, I can use any suggestions...
 

Attachments

  • TestMountains.jpg
    TestMountains.jpg
    12.2 KB · Views: 890
  • BackgroundColor2.jpg
    BackgroundColor2.jpg
    213.5 KB · Views: 935
Last edited:

Remove ads

Top