Cartography Workshop

ZombieButch

First Post
Pbartender said:
I started with a white background in Photoshop, and drew in the roads on a new layer in black using the line tool in various widths (setting up a fine grid, and activating the "snap to grid" feature can also be helpful). Solid filled polygons for the town squares and markets. Then, I just inverted the color of the streets to make it white streets on a white background. Finally I "stroked" the street layer - 1 pixel wide, black, outside edge.

Here's how I'd do the same thing; a little different, same results, with some of the work automated.

First, I'd make a Solid Color layer filled with white, and fill the layer mask with black. I'd give it a Stroke layer style, with a black stroke set to whatever thickness looked good, and maybe an Inner Shadow to give the buildings a bit of depth.

Then I'd set the foreground color to white and draw on the layer mask to create the streets; the Line tool set to Fill Pixels would work dandily, but any drawing tool with Anti-Aliasing disabled would work.

The streets would automatically be both white and stroked (and since it's a Solid Color layer, you can easily change the street color just by double-clicking on the color layer and selecting a different color).

Here's a (very) quick version. The shaky-looking streets were just drawn in by hand via a mouse; I've had a couple of cups of coffee already, so I've got the caffeine jitters!

Quick city map
 

log in or register to remove this ad

Pbartender

First Post
palehorse said:
First, I'd make a Solid Color layer filled with white, and fill the layer mask with black. I'd give it a Stroke layer style, with a black stroke set to whatever thickness looked good, and maybe an Inner Shadow to give the buildings a bit of depth.

Then I'd set the foreground color to white and draw on the layer mask to create the streets; the Line tool set to Fill Pixels would work dandily, but any drawing tool with Anti-Aliasing disabled would work.

Yeah... Layer masks are one aspect of PS I haven't messed with much yet. One of these days, I'll have to start playing around with them.
 

Jürgen Hubert

First Post
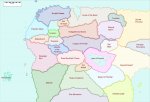
I've worked out a neat effect for displaying different countries and regions in different colors, like you often see it on political maps. Unfortunately, I forgot the files I used to create the map on another computer, so you will have to create this from my description alone, with the final image (which I attached) as a result.

First of all, you need to have some sort of line drawing (created with Inkscape or whatever else you use) that includes (a) all coastlines and major lakes and (b) all political boundaries. For our purposes, these lines must be continuous - so if you normally use some sort of dot or broken line pattern for the boundaries of your nations, switch them to continuous lines and then save them in .png or another bitmap format.

Load the bitmap into GIMP. If your bitmap didn't use transparency, convert all the white parts of the line drawing to transparency (with Layer->Transparency->Color to Transparency). Create a new white layer and move it below the other layers. Create a transparent layer named "Color" and move it to the top.

Now pick the "magic want" tool with a threshold of 0 and select a single country with it on the line drawing layer. If you have islands or other non-continuous regions that are part of the same country, also select them by pressing the shift key and selecting them as well with the magic wand.

Enlarge the selection with Selection->Grow: 1 pixel. Now move to the "Color" layer. Select a color that seems appropriate for the country in question, and use the "bucket fill" tool with the "fill entire selection" option. Now the entire country should be painted in the appropriate color.

Repeat the process with all other countries. Select a nice blue tone for the ocean and lake areas, and do the same with them.

Now the entire "Color" layer should be filled. However, it is quite likely that the colors now have a very high saturation - which might be problematic if you want to add text later on. Simply change the transparency of the "Color" layer (in the "Layer" dialog) until you are satisfied - I used a Transparency of 30%.

You may have noticed that the regional borders of my map have a small strip of "brighter", more saturated color. You can get this effect in this way:

Double the "Color" layer and call the new layer "Borders". Switch to it. Use the "Select by Color" tool and set its threshold to 0 - this way, all parts with the same color will be selected and you don't have to fiddle around with the Magic Wand again. Select all oceans and lakes with it and cut them out (with Ctrl-X, although Edit->Cut will do as well).

Now select a single country with the tool, and shrink the selection (with Selection->Shrink, appropriately enough) with a width depending on how large you want your borders to be (5 pixels are appropriate for a map with the same resolution as in the attachment). Cut out the rest of the selection. If the country lies next to the border of the map, be sure to switch off the "Shrink from Boders" option when shrinking the selection. If it still shrinks from the border, this means that your selection does not entirely reach it - in this case, you need to grow the selection by one or more pixels first, and then shrink the selection later by the same amount in addition to the "standard shrinkage".

Repeat the process with the other countries. Fiddle with the transparency of the "Borders" layer until you are satisfied - and you are done! Now you can re-import the image as an additional Inkscape layer - or use it in whatever other ways you can imagine...
 

Attachments

  • RegionsMap.jpg
    RegionsMap.jpg
    204.5 KB · Views: 260

Jürgen Hubert

First Post
Thanks to the pointers by Grum_l, I think I have figured out how to do some simple forests.

- Create two new transparent layers. Switch the mode (in the layer dialog) of the upper layer to "dissolve". Pick a dark green color and a large brush (like the Circle (19) brush) and use the "Paintbrush" tool with low Rate and Pressure. You will now paint lots of small dots instead of a continuous stroke.

After you are finished, merge this layer with the other transparent layer, which will result in a layer with dots with a "normal" mode. You should now have something like the first attachment.

Copy this layer and apply a Gaussian Blur with 3 px to the copy. Merge the layers again, and it should look like the second attachment.

Repeat the same process with a light green color (see the third attachment).

Create a drop shadow under both of the green dotted layers. These should have a displacement of 4/4 and a blur radius of 10.

The result is a nice, two-layered forest - see the fourth attachment. Feel free to experiment with this process, and tell us about the results!


Hmmm... I wonder how well a small ebook on such mapping techniques would sell at RPGNow?
 

Attachments

  • forest1.jpg
    forest1.jpg
    23.8 KB · Views: 197
  • forest2.jpg
    forest2.jpg
    22 KB · Views: 189
  • forest3.jpg
    forest3.jpg
    20.9 KB · Views: 175
  • forest4.jpg
    forest4.jpg
    20 KB · Views: 277
Last edited:

Ishmayl

First Post
Out of everything so far, I really like this forest tutorial the best Jurgen. That's an excellent way of doing them. Thanks for the tips.
 

ZombieButch

First Post
Jürgen Hubert said:
Hmmm... I wonder how well a small ebook on such mapping techniques would sell at RPGNow?

I'll tell you after it comes out. :D

I've been kicking around the idea for one since last month; the plan right now is to do the book in 5 parts. The first part, just covering some of the basics, will be free; the other sections will cover Overland, Towns and Cities, Interiors, and Dungeons.

I'm also going to record video podcasts of some of the lessons and release them on YouTube and, if I can find some high-volume hosting, on iTunes as well.
 
Last edited:

Jürgen Hubert

First Post
palehorse said:
I'll tell you after it comes out. :D

I've been kicking around the idea for one since last month; the plan right now is to do the book in 5 parts. The first part, just covering some of the basics, will be free; the other sections will cover Overland, Towns and Cities, Interiors, and Dungeons.

“Fantasy Cartography with Adobe Photoshop”? Hmmm. Well, maybe there's still a market for such a book for those who can't afford Photoshop... ;)


ZombieButch

First Post
Jürgen Hubert said:
Unless I can comfortably use it from my computer in my parents' house where I only have a modem connection, I think I will remain sceptical... ;)

That's cool; not everyone can be the target audience.
 

Remove ads

Top