Cartography Workshop

Jürgen Hubert

First Post
I've figured out a new way of creating mountains.

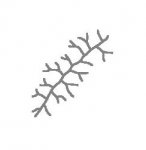
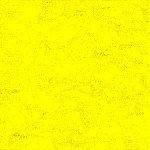
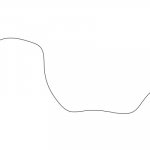
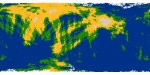
Load a line drawing of the mountain ridges (as detailed in the earlier tutorials) into GIMP. (First Attachment)

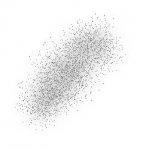
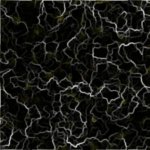
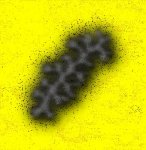
Select the black lines with the "Select by Color" tool. Since line art is probably too small to easily select, just click on the white areas and then use Selection->Invert. Grow the selection by 1 px with Selection->Grow, move to a transparent layer (call it "Baseline"), and bucket fill the selection with a nice, dark gray color. Make the original line art invisible. (Second Attachment)

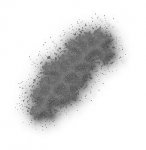
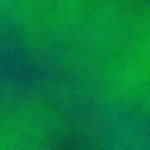
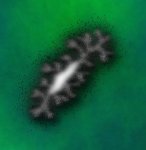
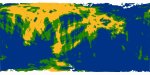
Copy the Baseline layer and and make it invisible, and apply a Gaussian Blur with 50 px to the copy. Copy the blurred layer again, and apply the "Dissolve" mode to the upper layer. Merge these two layers. (Third Attachment)

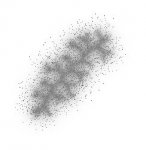
Repeat the process (starting from the Baseline layer), but now only apply a Gaussian Blur of 30 px. Do it again with 10 px. Merge the three layers. (Fourth Attachment)

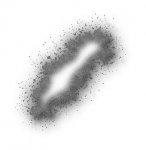
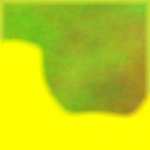
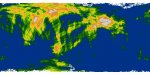
Copy the merged layer. Apply a black Drop Shadow with a Displacement of 8/8, a blur radius of 15, and an opacity of 80% to the upper layer. Apply Filter->Artistic->Oilify with a mask size of 3 to the lower layer. (Fifth Attachment)

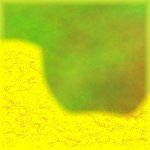
That's basically it - but to top it off, let's give the mountain a snow cover. Go to the line art drawing again. Select the white areas with the "Select by Color" tool. Invert the selection and enlarge it by 10 px. Shrink it again by 30 px. Make the line art invisible again and bucket fill the selection on a new, empty layer with white. Chose Selection->None and apply a Gaussian Blur of 15 px. See the Sixth Attachment for the results.

I think that looks better than the earlier attempts, doesn't it?
 

Attachments

  • Mountains1.jpg
    Mountains1.jpg
    4.8 KB · Views: 150
  • Mountains6.jpg
    Mountains6.jpg
    9.3 KB · Views: 202
  • Mountains5.jpg
    Mountains5.jpg
    9.6 KB · Views: 163
  • Mountains4.jpg
    Mountains4.jpg
    10.8 KB · Views: 142
  • Mountains3.jpg
    Mountains3.jpg
    11.5 KB · Views: 137
  • Mountains2.jpg
    Mountains2.jpg
    5.1 KB · Views: 130

log in or register to remove this ad


Jürgen Hubert

First Post
I've tried out some new ways of creating base terrain. Please tell me what you think.

Fertile Plains:

Fill the area with a not too bright green color (I used 08a653). Create a new layer above it. Fill it with Filters->Render->Clouds->Plasma with a Turbulence of 1. Set the Layer Mode to "Multiply" and set the layer opacity to 50%. (First Attachment)

Deserts:

Fill the area with yellow. Use Skript-Fu->Render->Lava with a Size of 10, a Roughness of 7, and the Default Gradient. (Second Attachment)

Make the black transparent with Layer->Transparency->Color To Alpha. Use Filters->Colors->Colorify to change the color of the remaining bits to a "dirty" orange. (Third Attachment)

Set the Layer Mode to "Dissolve". Use Filters->Distort->Wind with Wind/Left/Leading, a Threshold of 10, and a Strength of 10. Merge the layers. (Fourth Attachment)

What do you think?
 

Attachments

  • Plains1.jpg
    Plains1.jpg
    5.9 KB · Views: 142
  • Desert1.jpg
    Desert1.jpg
    21.2 KB · Views: 142
  • Desert2.jpg
    Desert2.jpg
    7.2 KB · Views: 137
  • Desert3.jpg
    Desert3.jpg
    25.3 KB · Views: 157

Jürgen Hubert

First Post
I redid the mountains and combined them with the plains and desert patterns, but I think I used too dark a gray this time...
 

Attachments

  • MountainsDesert.jpg
    MountainsDesert.jpg
    21.9 KB · Views: 146
  • MountainsPlains.jpg
    MountainsPlains.jpg
    9.7 KB · Views: 160

Jürgen Hubert

First Post
I've been trying to create a better shift between borders. Here is what I came up with.

You start out with a line drawing of the borders between the different vegetation zones. (First Attachment).

Now create a new layer and call it "Color". Go back to the line art drawing. You can select the different vegetation zones by using the Magic Wand on the relevant part in the line art drawing and enlarging it by 1 px. I will use the lower areas for a desert zone, and the upper for a plains zone. Whenever I refer to "selecting" a certain zone, I am referring to this procedure.

Select both of the zones in turn, go to the Color layer, and fill them with the primary color (I choose a "lighter", more yellowish tone for the plains so that it won't contrast with the desert areas as much. (Second Attachment)

Go back to the Line Art layer and select the line by selecting the non-line layers with the "Select by Color" tool and inverting the selection. Grow the selection by 15 px. Go to the Color layer and apply a Gaussian blur of 15 px to it. (Third Attachment).

Select the Plains layer and enlarge it by 15 px. Apply the Plasma filter to it as described above. But before you merge the layer with the Color Layer, apply Skript-Fu->Selection->Blend Borders with a border size of 15 px to it. (Fourth Attachment)

Now repeat the same process with the desert layer, and you are done... (Fifth Attachment)


This seems to work well enough, but it has some problems if your region borders the page border - as you can see here. I suppose you will have to first enlarge the picture and then make sure that your vegetation zones extends 15 px beyond the original size...
 

Attachments

  • Borders5.jpg
    Borders5.jpg
    32.4 KB · Views: 150
  • Borders4.jpg
    Borders4.jpg
    10.6 KB · Views: 131
  • Borders3.jpg
    Borders3.jpg
    2.6 KB · Views: 128
  • Borders2.jpg
    Borders2.jpg
    2.9 KB · Views: 133
  • Borders1.jpg
    Borders1.jpg
    4 KB · Views: 126

Jürgen Hubert

First Post
Thanks to Ra-Tiel, I figured out a nifty new trick for scaleable random maps with coastlines and height lines.

First of all, call up this site and create a random map you feel comfortable with. Use higher scales if you want more detail. (First Attachment)

Load the map into GIMP. Now you need to divide the map into clear, distinct colors representing the ocean, ice caps, and different elevations. For the purposes of this tutorial, I will use three different land heights. First, change Image->Mode to RPG - GIF images like these maps have predefined palettes, and if you continue to use them you will not be able to pick your colors freely.

Use the Select by Color tool and pick a low but non-zero tolerance (I used 32). Select an ocean color with it. Then press the SHIFT key and klick on the other ocean colors until you have all ocean areas in your selection. Bucket fill the selection with a nice blue color. Use the same procedure with the ice caps, but fill it with white. (Second Attachment)

Go back to the Select by Color tool and select a lower tolerance (I picked 16). Select the highest elevations and expand from them (you will need to decide for yourself how much of the land masses should be at these elevations). Fill it with a grey color. (Third Attachment)

Select the next lower elevations and fill them with orange. Fill the remaining land masses and fill them with green. (Fourth Attachment)

Now save the image as a PNG file - not as jpg, since we want the colors as crisp as possible and jpegs always have some weird pixelating effects at boundary areas. Load the image into Inkscape. Select the bitmap, and use Path->Trace Path: Multiple Scans with Color and 8 scans.

And now you have a vectorized map with height lines which you can scale as much as you want, and which you can now use further with Inkscape or export as a new map in a different scale. (Fifth Attachment)

There seem to be some sort of weird effects when the colors you picked are too similar to each other. But I am trying to work them out...

Your thoughts?
 

Attachments

  • RandomMap.jpg
    RandomMap.jpg
    133.6 KB · Views: 166
  • RandomMap2.jpg
    RandomMap2.jpg
    79.4 KB · Views: 135
  • RandomMap3.jpg
    RandomMap3.jpg
    80.4 KB · Views: 142
  • RandomMap4.jpg
    RandomMap4.jpg
    89.2 KB · Views: 146
  • RandomMapFinal.jpg
    RandomMapFinal.jpg
    141 KB · Views: 167

industrygothica

Adventurer
I've been following this thread for a bit and taken a couple of tips here and there. So far this is all I've come up with. Just a random outline with the pencil tool in Photoshop, and water and land layers with some difference clouds and a little noise added.

I'm having an awful time with mountains. I prefer the individual mountain look over the top-view ranges. Any tips?
 
Last edited:

Jürgen Hubert

First Post
industrygothica said:
I've been following this thread for a bit and taken a couple of tips here and there. So far this is all I've come up with. Just a random outline with the pencil tool in Photoshop, and water and land layers with some difference clouds and a little noise added.

I'm having an awful time with mountains. I prefer the individual mountain look over the top-view ranges. Any tips?

No filter tricks, I'm afraid - such mountains would probably have to be done by hand, or by creating icons that you can recycle again and again...


ZombieButch

First Post
industrygothica said:
I'm having an awful time with mountains. I prefer the individual mountain look over the top-view ranges. Any tips?

The short version:

Well, you could create a custom brush shaped like a mountain, and add a bit of Size and Roundness jitter in the brush engine to vary the sizes. You'd have to watch the overlaps, though, since it's like the mountains wouldn't be a solid color, so you'd have some areas where one edge might run into another.

Or, you can make a custom pattern the looks like a mountain range, using the Offset filter to make sure it's seamless. Then add a Pattern fill/adjustment layer and switch the blend mode to Multiply. Fill the pattern layer's layer mask with black, then paint white back on the mask to reveal the mountains wherever you want them to appear.

Or, you could just draw a half dozen mountains (or even use someone elses map with mountains on it that you like) and use the Clone Stamp to duplicate them onto your map; you'd probably need to set the stamp's mode to Multiply while you were at it.

That's three off the top of my head.
 

Remove ads

Top