Cartography Workshop

Jürgen Hubert

First Post
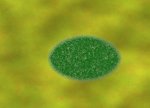
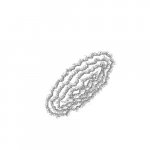
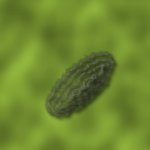
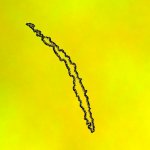
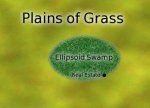
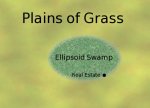
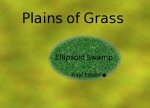
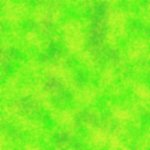
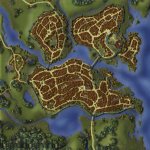
Another neat trick you can do with forests:

Generate the green dots with the airbrush and the dissolve layer as usual. But before you use the Gaussian Blur and the Drop Shadow on them, create another layer above them and fill it with Filters->Render->Clouds->Plasma, with a Turbulence of 7 and a random seed. Set the layer opacity to 50%, the layer mode to Multiply, and merge the layer. Then follow the usual steps (and follow the same procedure with the other green layer)...
 

Attachments

  • ForestPlains.jpg
    ForestPlains.jpg
    71.6 KB · Views: 321

log in or register to remove this ad

Jürgen Hubert

First Post
And now, an idea for creating swamps:

Select the area you have designated as swampy. Enlarge it by 10 px. Fill it with a dark green color. Set the layer to "Multiply" and the transparency to 50%. Use Skript-Fu->Selection->Blend Borders with 10 px on it. Create a new, transparent layer below it and merge the green layer with it (this way, you will have a "normal" layer instead of a transparent one).

Create a white drop shadow below it with a displacement of 0/0 and a blur radius of 4. Copy that shadow and merge the two to intensify the color. Create a black drop shadow below it with a displacement of 1/1 and a blur radius of 2.

I'm quite pleased with how this looks.
 

Attachments

  • Swamp.jpg
    Swamp.jpg
    18.9 KB · Views: 286

Jürgen Hubert

First Post
Here's a new way of doing mountains:

- Create the "base" of the mountain - the area where the mountain soars up from its surrounding area. I used a simple ellipse as the base in this case.

- Use the Script-Fu->Selection->Distress Select script. I used the default settings (Threshold 127, Spread 8, Granularity 4, Smooth 2, Smooth Horizontally & Vertically), though you might want to play around a bit.

- Fill the selection with grey.

- Use Script-Fu->Selection->Fade Outline with 10 px.

- Create a new, transparent layer below the current layer and merge the layers.

- Set the layer mode to "dissolve".

- Cut the current selection.

- Select the inner area with the Magic Wand.

- Repeat the whole process, starting with the Distort Selection script. Repeat it as often as you still have a selection remaining. (First Attachment)

This looks very well for greyscale maps. But how to do it with more colorful maps?

I've come up with the following technique. First, make sure that the individual mountain layers have "Normal" as their layer mode (if neccessary, by using the old technique of creating a transparent layer below them and merging them).

Then create a black drop-shadow for each layer, with the usual 8/8/15 values.

Then put a Gaussian Blur of 5 px on each of the layer. See the second attachment for results.

I think this looks nice, but if someone can thing of an improvement for this process I am all ears...

You should be able to create cliffs in the same way.
 

Attachments

  • NewMountains1.jpg
    NewMountains1.jpg
    21.6 KB · Views: 270
  • NewMountains2.jpg
    NewMountains2.jpg
    12.6 KB · Views: 264


Jürgen Hubert

First Post
And now a way of creating canyons:

Create a selection with the canyon borders. If neccessary, make the borders irregular with the Distress Selection tool. Fill the selection with black.

Invert the selection. Use the "Fade Outline" script, but with the "enlarge selection" option and a lesser width (7 or less) - after all, canyon walls tend to be steeper than mountainsides. Right-click on the layer in the layer dialogue, and choose "apply layer mask" (this way you won't have to merge it with another layer...). Switch the layer mode to "destructive". (First attachment)

Create a white drop shadow with a displacement of -4/-4 and a blur radius of 10. Go to the "base" layer, select the parts outside of the canyon with the magic wand, go to the drop shadow, and cut the entire selection (this removes the parts of the shadow outside the canyon). Now create a black drop shadow with a displacement of 4/4 and a blur radius of 10, and again use the same procedure to remove any parts of the shadow outside of the canyon. (Second Attachment)

Your thoughts?
 

Attachments

  • canyon1.jpg
    canyon1.jpg
    22.2 KB · Views: 212
  • canyon2.jpg
    canyon2.jpg
    21.6 KB · Views: 278

Jürgen Hubert

First Post
Here's another little trick: How to make text stand out from the background.

If you have created the text labels externally (such as with Inkscape), load them into a seperate layer. Otherwise create them locally with GIMP - still using a seperate layer for them.

The black letters are somewhat hard to read on dark background, aren't they? (First attachment)

Even using a different color than black won't neccessarily help, since there are inevitably areas where the text is above relatively bright terrain. So, what to do?

One way is changing the brightness (with Layer->Colors->Brightness-Contrast) of the background terrain so that the background is universally bright. But that means loosing your nice, intense colors. (Second Attachment)

The second way is to create a white "shadow" around the text. First select the text with the "Select by Color" tool. Then put a white drop shadow below it, with a displacement of 0/0 and a blur radius of 20. Copy this drop shadow twice, and merge the copies. (Third attachment)

Much better, isn't it?


EDIT: Whoops, I hadn't noticed that kensanata had already covered that...
 

Attachments

  • Text3.jpg
    Text3.jpg
    24.5 KB · Views: 253
  • Text2.jpg
    Text2.jpg
    20.2 KB · Views: 204
  • Text.jpg
    Text.jpg
    24.2 KB · Views: 237
Last edited:

Jürgen Hubert

First Post
A new way of doing height lines for mountains:

Create a selection for the basic shape of the hill. Go to a transparent layer and fill it with black. (First Attachment)

Use the Script-Fu->Alpha as Logo->Alien Neon script. Use black as the "glow color" and white as the background color. Set the size of the stripes to how far you want your height lines apart. Set the width of the space between stripes to 1 px. The number of stripes represents how many height lines you are going to get. (Second Attachment)

Now apply the layer mask to the layer. Go to the layer with the original black shape (which should be invisble now) and select that shape with the magic wand or "Select by Color" tool. Go back to the "Bands" layer and cut the selection. (Third Attachment)

Optionally, you might wish to change the layer mode to "dissolve". (Fourth Attachment)
 

Attachments

  • heights-1.jpg
    heights-1.jpg
    3.8 KB · Views: 252
  • heights-2.jpg
    heights-2.jpg
    9.4 KB · Views: 265
  • heights-3.jpg
    heights-3.jpg
    6.8 KB · Views: 242
  • heights-4.jpg
    heights-4.jpg
    11 KB · Views: 253
Last edited:

Jürgen Hubert

First Post
Another way of creating plains textures:

- Create a layer with a green background color.

- Create another layer on top of it and fill it Filters->Render->Clouds->Solid Noise. Pick the parameters as you wish.

- Apply Layer->Transparency->Color to Alpha to the layer and pick black as the color.

- Apply Filters->Colors->Colorify to the layer and pick a different green than in the background.

- Switch the layer mode to "Dissolve". Merge it with the Background layer:

- Repeat the process and use a different green and different parameters to bring in some more variety.

- Apply a Gaussian Blur with 5 px to it.
 

Attachments

  • Plains2.jpg
    Plains2.jpg
    11.6 KB · Views: 264

Hjorimir

Adventurer
Pbartender said:
Here's a quick city map I recently made for my Iron Heroes campaign.

I started with a white background in Photoshop, and drew in the roads on a new layer in black using the line tool in various widths (setting up a fine grid, and activating the "snap to grid" feature can also be helpful). Solid filled polygons for the town squares and markets. Then, I just inverted the color of the streets to make it white streets on a white background. Finally I "stroked" the street layer - 1 pixel wide, black, outside edge.

That gave me nice, outlined city blocks with space between for streets, but without having to define specific buildings. I left them in black and white for an engraved wood-cut sort of feel, but from there it would be easy enough to fill in the streets and/or city blocks with whatever color or texture you prefer.
Any chance that you could do a more detailed step-by-step for those of us who have Photoshop (but don't really know how to use it at all)? I really (REALLY) like how that turned out. Even the river is snazzy.

I'll be your best friend!!!
 

Pyrandon

First Post
Thanks for starting this thread, Jurgen! I especially appreciate your interest in exploring multiple techniques for map creation--plus, of course, the discussion you've generated!

Quite some time ago in this thread a few members discussed city maps & creating buildings not one by one, but by using techniques to suggest urban landscapes. This is an issue I tackled myself as well, so I thought you might be interested in the results & how I fumbled my way to them. Attached is an example of one of my city maps in two forms: representational & artistic (the latter being my preferred version).

For those of you who may be interested I have posted a corresponding tutorial here (warning: it's a huge PDF...). The tutorial is for Photoshop, but as you will see, others have begun tailoring it to the GIMP. I hope it helps some of you in some small way!

Thanks for all the inspiration, Jurgen & friends!
 

Attachments

  • Eneini 27-labeled.jpg
    Eneini 27-labeled.jpg
    885.2 KB · Views: 378
  • Eneini 25--final pre-poster.jpg
    Eneini 25--final pre-poster.jpg
    186.7 KB · Views: 356
Last edited:

Remove ads

AD6_gamerati_skyscraper

Remove ads

Upcoming Releases

Top