Creamsteak
Explorer
I've had a couple questions about this come to me in PM and I just wanted to do an example map real quick for some people. This isn't intended to be the end-all be-all of making maps, but the process is pretty quick and dirty and gets you something useful. Maybe others will have other advice for me as well.
Software you'll need
LibreOffice Spreadsheet (or equivalent)
Paint (or equivalent)
Make a Grid
Open a new LibreOffice Spreadsheet document. I labeled some important spots with red text. Left click spot 1. Right click spot 2. Select column width from the menu. Set this to 0.2. Left click spot 1 again. Right click spot 3. Select row height from the menu. Set this to 0.2.
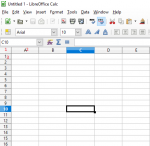
Now you've got a grid.
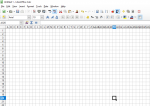
I choose this size for the grid because it has worked well in the past for me.
Import and Scale your Map
Grab some image from the internet that's a map of some sort. In the spreadsheet software. At the top of the spreadsheet menu hit Insert->Picture->From File. Select your map. Note that wherever your cursor has selected in the spreadsheet is where the image will show up. This may be important to remember later on. Ideally select the top corner, A1, if your map's edges will work for this (definite borders). For open ended maps you may want to start somewhere in the middle so you can expand the visual as necessary.
Once your map is in position there is a button on the image panel that may not be enabled by default. It looks like this. "To Background" will set your map behind the grid. This is very useful for where we are going from here.

Note you can zoom in or out on your map by holding control and scrolling your mousewheel up or down.
Now to size your map properly you have the option of scaling your grid size, but I recommend that instead you scale your map till the cells are the size you want. For example, with this map, it's already a 5 foot grid, so my intent is to just shift it till my maps grid lines up roughly (though not exactly) with that.
If you have trouble selecting an image in the background, at the bottom of the toolbar is a cursor icon. This will allow you to touch things that are not "cells" more easily if you have it selected. If you deselect the cursor icon, you'll have an easier time selecting cells.
I recommend resizing using the actual resize tool rather than drag and drop sometimes. To do this, right click the image, select position and size, and remember that our grid is 0.2 in size. You might be able to do some rough math to convert the width/height of a single square in your map to the width/height to make that fit in 0.2 per square. This is the "easier" solution if you can do the work. The other option is to hold shift and drag the bottom right hand corner of the image to resize the image to get what you want. A combination might be necessary. You may want to slightly displace your image to line up with the natural corners of a drawn map, but I find that most drawn maps are hard to get perfect and easy to just get close.
It's a bit sloppy, but the goal here is to be quick, not perfect.

Add Characters
Now we're ready to add characters. The best way I've found to do this is first to get a fairly cropped down image (just faces work well), left click on the cell you want to add it, go to Insert->Picture->From File and then add your image. Now right click the image, resize it to 0.2 by 0.2 (uncheck the keep scale if wanted). Bam. For larger monsters, multiply that to 0.4, 0.6, etc.

Exporting Your Map
So what I do is really quick and dirty. Zoom your map to what you think will look best for what information is pertinent. Hit print screen. Open paint. Control-V. Use the crop tool to cut it down to the relevant part. Save. Upload to Enworld. Magic.
Other Helpful Stuff
You can track hit points and pertinent information in the spread sheet (I often write damage taken under tokens). Possibly initiative order. Invisible target positions. You can add some transparency by setting an image to watermark. This is once-again all about making your job quicker and easier, and since you have a saved spreadsheet you can always pop it open, move a token, etc. You also have all the usual spreadsheet tools to color cells, draw on it, etc.
Software you'll need
LibreOffice Spreadsheet (or equivalent)
Paint (or equivalent)
Make a Grid
Open a new LibreOffice Spreadsheet document. I labeled some important spots with red text. Left click spot 1. Right click spot 2. Select column width from the menu. Set this to 0.2. Left click spot 1 again. Right click spot 3. Select row height from the menu. Set this to 0.2.

Now you've got a grid.

I choose this size for the grid because it has worked well in the past for me.
Import and Scale your Map
Grab some image from the internet that's a map of some sort. In the spreadsheet software. At the top of the spreadsheet menu hit Insert->Picture->From File. Select your map. Note that wherever your cursor has selected in the spreadsheet is where the image will show up. This may be important to remember later on. Ideally select the top corner, A1, if your map's edges will work for this (definite borders). For open ended maps you may want to start somewhere in the middle so you can expand the visual as necessary.
Once your map is in position there is a button on the image panel that may not be enabled by default. It looks like this. "To Background" will set your map behind the grid. This is very useful for where we are going from here.

Note you can zoom in or out on your map by holding control and scrolling your mousewheel up or down.
Now to size your map properly you have the option of scaling your grid size, but I recommend that instead you scale your map till the cells are the size you want. For example, with this map, it's already a 5 foot grid, so my intent is to just shift it till my maps grid lines up roughly (though not exactly) with that.
If you have trouble selecting an image in the background, at the bottom of the toolbar is a cursor icon. This will allow you to touch things that are not "cells" more easily if you have it selected. If you deselect the cursor icon, you'll have an easier time selecting cells.
I recommend resizing using the actual resize tool rather than drag and drop sometimes. To do this, right click the image, select position and size, and remember that our grid is 0.2 in size. You might be able to do some rough math to convert the width/height of a single square in your map to the width/height to make that fit in 0.2 per square. This is the "easier" solution if you can do the work. The other option is to hold shift and drag the bottom right hand corner of the image to resize the image to get what you want. A combination might be necessary. You may want to slightly displace your image to line up with the natural corners of a drawn map, but I find that most drawn maps are hard to get perfect and easy to just get close.
It's a bit sloppy, but the goal here is to be quick, not perfect.

Add Characters
Now we're ready to add characters. The best way I've found to do this is first to get a fairly cropped down image (just faces work well), left click on the cell you want to add it, go to Insert->Picture->From File and then add your image. Now right click the image, resize it to 0.2 by 0.2 (uncheck the keep scale if wanted). Bam. For larger monsters, multiply that to 0.4, 0.6, etc.

Exporting Your Map
So what I do is really quick and dirty. Zoom your map to what you think will look best for what information is pertinent. Hit print screen. Open paint. Control-V. Use the crop tool to cut it down to the relevant part. Save. Upload to Enworld. Magic.
Other Helpful Stuff
You can track hit points and pertinent information in the spread sheet (I often write damage taken under tokens). Possibly initiative order. Invisible target positions. You can add some transparency by setting an image to watermark. This is once-again all about making your job quicker and easier, and since you have a saved spreadsheet you can always pop it open, move a token, etc. You also have all the usual spreadsheet tools to color cells, draw on it, etc.

