My 5e Greyhawk Campaign

Turgenev

Hero
I'm currently running a 5e game set in the World of Greyhawk so I thought I would share my various campaign info (that includes location, maps, NPCs, monsters, and miscellaneous write-ups).

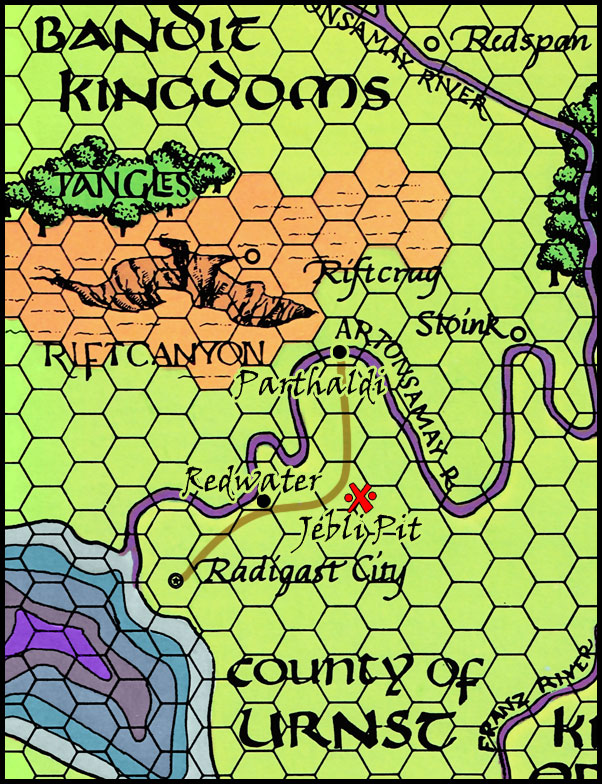
The campaign is currently centred on the free town of Parthaldi that is on the banks of the Artonsamay River between the County of Urnst to the south and the Bandit Kingdoms to the north. Below is a screen cap from the wonderful Darlene Greyhawk map with a few new locations and road added by me.

Parthaldi-Location.jpg


I'm running this game for only a handful of players (immediate family) so far we have an half-orc eldritch knight and a half elf bard (college of lore). I round out the party with two NPCs, a cleric of Pelor and a rogue (assassin). I sometimes switch out the NPCs depending on what is going on with their back stories.

For example, recently the rogue had prior engagements so had to remain in town (the PCs don't know that she was asked by her guild to assassinate a troublesome merchant) so they had a kensei join them for a few adventures but he has moved.

The campaign started when the PCs were travelling to Parthaldi and they came across a merchant caravan that had been ambushed by goblins. They found a dying bodyguard who asked the PCs to rescue his charges who had been abducted by the goblins along with the caravan's riches. The party was able to track down the goblins and learnt that the goblins had a base nearby known as the Jebli Pit (Jebli is gnomish for goblin).

The party encountered yellow skinned goblins from the Twistedspine tribe who originated from the Raker Mountains. These goblins, under the command of the Warblabe Hobgoblin legion, are trying to expand their area of influence. These goblins are proficient beast masters and in addition to giant rats and worgs, they had two 'great beasts' (actually dimetrodons) painted with clay ointments in the tribes colours of red and orange.

That's a good place to end this post. More to come soon.

Cheers,
Tim
 

log in or register to remove this ad

Turgenev

Hero
The Jebli Pit - Level 1

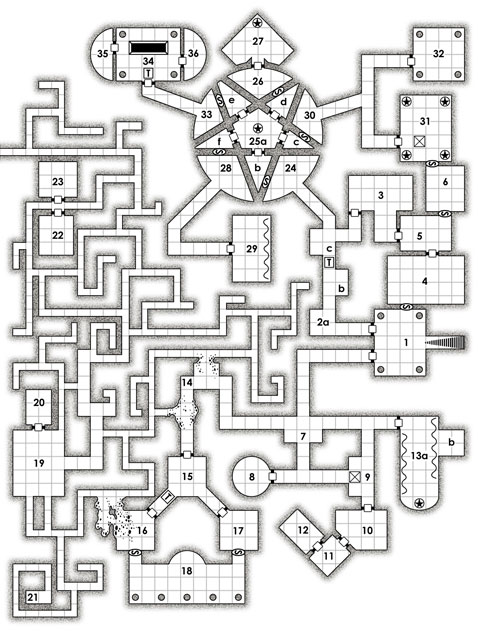
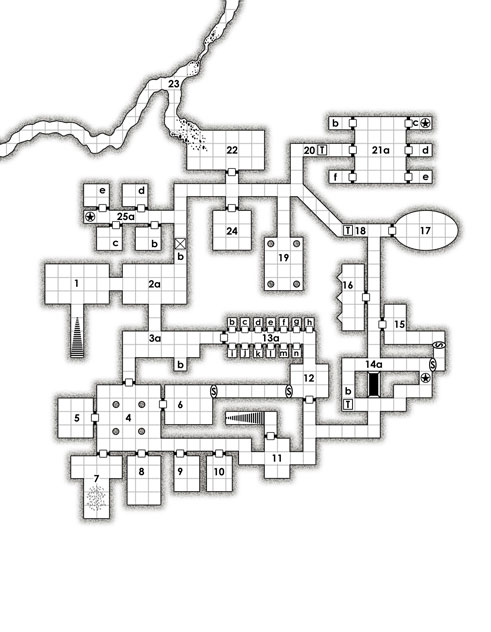
Here is the map for the first level of the Jebli (goblin) Pit. Click to enlarge. I used this as one of my Friday Freebie maps but it originated from my campaign.


Dungeon Background

The dungeon was originally built by a cult of Asmodeus known as The Devil's Hand. It is a name that they shared with their dungeon. The cult was forced to flee when their dungeon was invaded by goblinoids. Since the cult was driven from the dungeon, it has been known simply as the Jebli Pit (“Goblin pit” in Neblin).

The Devil's Hand has begun to return to their dungeon. They spent five years waiting for the right moment. The stars are right and the cult leader (Ebenezer Black) has sworn to return to their refuge to reclaim their lost territory. His command was heard by the cult's followers and they have begun returning to their true seat of power.

Meanwhile the goblins had begun to change the dungeon to suit their needs (well, until the PC party arrived who put a dent in the goblin and cult's plans).

Dungeon Key

1. Entrance Chamber: Has a falling net trap over the bottom of the stairs.

2. a) Goblin Guard Post: It was the goblin guard post until the PCs showed up and killed a bunch of them. When the party left the dungeon and came back at a later date, they found three of the goblins had been crucified upside down and spiked up against the eastern wall. These goblins were punished by their hobgoblin masters for not stopping the PCs the first time.

2. b) Pit Trap: 20 foot deep pit. It hasn't been activated in some time so it is covered with a thick layer of dust.

3. a) Goblin Training Hall: They practice their combat and animal training here.

3. b) Giant Rat Nest

4. Goblin Hall

5. Food Storage

6. First Chosen Barracks: This room has been ransacked and only shredded remains are left. It used to be the private room for Gakshuk, the First Chosen of Maglubiyet (Goblin Cleric 2). Since being killed, various "normal" goblins have ransacked and destroyed the room as a sign of revenge against a rival who once dominated them but proved to be weak when he was killed by the party. I plan on posting my write-ups for him and his followers in a later post.

7. Goblin Battlebeast Pens: What the goblins call battlebeasts are actually dimetrodons.

8. Goblin Barracks

9. Torture Chamber: Dried blood and fragments of humanoid flesh coats the floor and walls. Unknown to the goblins, under the coating of past sacrifices is a pentagram drawn in human blood. The Cult of Asmodeus originally used this room for their own sacrifices. The symbol of Asmodeus (three black triangles on a red background) still decorates the southern wall.

10. Chosen of Maglubiyet Barracks: The followers of the First Chosen, Gakshuk, use this quarters as their barracks.

11. Delve Deeper: This post guards the stairs to the second level. The door was originally locked and there were goblins on guard duty here. Since the party's most recent return to the dungeon, they found this room to have slaughtered goblins lying on the floor and the door had been bashed open from the other side (from minotaur skeletons from the 2nd level).

12. Guard Post: Now empty since the previous goblins had abandoned it.

13. The Cells: The goblins used these to keep their captives (including the two human merchants that the party were searching for). Cells d and e had zombies in them. The zombies originated from the 2nd level and were rounded up and locked away. A futile effort since unknown to the goblins there is a strange spire that animates the dead on the 2nd level.

14. a) Open Pit: 10' x 20' and 10' deep with spikes on the bottom.

14. b) Poison dart trap

14. c) Statue: A white marble statue of Asmodeus blocks the corridor.

15. Webbed Chamber: The door is missing its top half. The room is filled with massive webs. An occult symbol has been painted on the eastern wall. The symbol consists of three inverted triangles arranged in a long triangle (the symbol of Asmodeus). A pair of giant spiders have turned the room into its lair. Hidden in a webbed chest are 1,000 sp, 110 gp, 4 50gp gems, potion of greater healing, potion of hill giant strength, and a bone scroll case containing a spell scroll (2nd level cleric spell: Aid).

16. Hell Furnace: There are three groves in the western wall, each with a single bright orange and red flame. The whole room is bathed in bright light. Exposure to any of the flames causes 1d10 burning damage. Constitution saving throw versus DC 15. Failure means the wound cannot be healed by magic.

17. Judgment Chamber: This chamber has a iron door (AC 19, 18 hp). Strength DC 20 to force the door open. The metal door will slam shut if it isn't restrained in some way. Once closed, it won't open again until a minute has passed and judgment has been delivered (via the enchanted smoke has its effect). Along the bottom of the chamber walls are eight small holes. When the door is closed, smoke and fumes will flood the chamber. A Constitution saving throw versus DC 16 is required. Those that make their saving throws will gain fire resistance for 24 hours. Those that fail become vulnerable to fire for the next 24 hours. Once blessed with resistance against fire, the creature cannot use the fumes again until a month has passed.

18. Giant Spider Webs: Hidden in the webs, about a foot above, the floor is a +1 light crossbow bolt snagged in the web strands.

19. Webbed Chamber: Webs stretch from pillar to pillar. A human skeleton lies on the stone floor in the centre of the room. It is devoid of any clothing or items. The bones have been chewed on by some creature(s) (by ghouls actually).

20. Flaming Oil Trap

21. a) The Devil's Hand Treasury: The chamber is now empty.

21. b) Trapped Door: Poison dart trap on the door.

21. c) Devil Statue: A crimson red statue of a Pit Fiend devil stands at the back of this small room. Its wings are swooped forward with its arms raised into the air. Its eyes burn with flames and its mouth is open. The statue breathes fire on those who step into the room. The trap activates when more than 20 pounds of weight is placed on the pressure plate, causing the statue to release a 20-foot long line of fire. Each creature in the line of fire must make a DC 14 Dexterity saving throw, taking 11 (2d10) fire damage on a failed save, or half as much damage on a successful one.

21. d) Poisonous Gas Trap: The Gas is activated when the door is opened. All within 10' of the door must make a DC 15 Constitution saving throw or else take 11 (2d10) damage on a failed save and half on a successful one.

21. e) Treasure Chest: Hidden under a mouldy tarp is a hardwood chest with iron braces (AC 17, 12 hp). The chest is locked and the bone key is in the possession of Ebenezer Black (cult leader). The chest is the treasure of the Devil's Hand. It is one of the main reasons why Ebenezer is so keen to return to the dungeon. Inside the chest are 23 cp, 1100 sp, 80 gp, black velvet mask stitched with silver thread (20 gp), gold locket with a painted portrait inside (25 gp), 1 small gold bracelet (30 gp), a Bard spell scroll (level 1) Heroism in a bone scroll case, and a ring of feather falling. The portrait in the locket is of a young (early 20s) human woman with long black hair and is wearing lots of jewellery. She is the Lady Zenadra Del Rooz, a baroness from the Duchy of Ernst.

21. f) Locked Door: Empty room.

22. Ghouls: A pair of ghouls have entered this room via the goblin tunnel (see #23). They are searching for a new source of food.

23. Goblin Tunnel: The tunnel that leads north continues until they reach a goblin warren about a mile away. The south end tunnel eventually leads outdoors in a small wood.

24. Occult Library: The heavy wooden door to this room is locked and trapped with a poison needle. The valuable tomes that were once in the library were removed by the cult (who still have them).


Turgenev

Hero
I should mention that this is my first 5e campaign. I'm a grognard when it comes to older versions of D&D but a relative newbie for 5e. I'm a tinker DM by nature but I'm holding off house ruling because I want to get a feel for 5e as it is. So far I'm enjoying it.

I'm doing something slightly different for this campaign. I tend to write-up lots and lots of notes ahead of actually running an adventure (such as detailed key descriptions). While I have worked out background details (such as notes about the town of Parthaldi, the monster factions in the Jebli Pit, spies from the Bandit Kingdoms, etc.) when I go to run my adventures, I'm mostly winging it.

Cheers,
Tim
 

Turgenev

Hero
The Twistedspine Goblins

This clan of orange and yellow-skinned goblins originate from the Rakers Mountains. Their leader was Boss Barfball until recently. With the slaughter of the Chosen of Maglubiyet (along with the First Chosen, Gakshuk) by the party's hand, the goblins became weak. Hobgoblins from the Warblood Legion have stepped in to take control of the tribe. These hobgoblins serve the warlord, Grashgak Warblade.

Here is my write-up for the Chosen of Maglubiyet. Click on image for the PDF.


Brakko the Heretic

In the last game session, the party have allied themselves with a lone goblin known as Brakko the Heretic. I've presented Brakko as a bit of a cheeky rogue with a big chip on his shoulder about how he was treated by his tribe. His bullying goblin nature has bubbled to the top a couple times against defeated foes so that should be a warning to the party not to completely trust him. I'm using him as a means to relay background info about the dungeon and its monster factions.

Here is my write-up for Brakko the Heretic. Click on image for the PDF.


Cheers,
Tim


Turgenev

Hero
Nice work what font are you using from the 1E material?
The font in my PDFs is Arial. That's my default font. I like it because I find it easy on the eyes/easy to read. The font I use on my maps for key numbers is Century Gothic (and I use Futura for titles and the like).

Cheers,
Tim
 

Turgenev

Hero
Last Session Recap

Last Session Recap:

In the last gaming session, the party returned to the Jebli Pit for the fourth or fifth time. I don't run static dungeons. As creatures get eliminated, other creatures often move in and the power structure of the dungeon may change as factions ebb and wane. The dungeon was originally constructed by the cult of Asmodeus known as the Cult of the Devil's Hand. They were chased from the dungeon when adventurers tried to smash their cult.

They have regained strength in numbers (and power) and have come back to the dungeon to retake it. They have been helped by the party's attacks against the goblins. Once the goblins were weakened, the cultists were able to run the rest of the lower levels. The inner circle of the Devil's Hand are a bunch of warlocks.

The party has allied itself with a renegade goblin called Brakko the Heretic (see post #5). They were expecting to see him when they arrived at the Jebli Pit but he was no where to be seen. They didn't worry about it. They proceeded through the now abandoned upper level and made their way to the second level.

They travelled southward and came across a cultist ceremony (in level 2, area #13 a). A well placed Chromatic Orb took out most of the cultists since the party had the surprise. The head cultist, Athasa the Witch, survived and fought on against the party. She called out for help and an ogre mercenary came charging out from behind a tapestry.

The ogre and the witch were eventually slain but the remaining cultist was able to make his way to a secret door and get away. This occurred while the ogre was alive so the party had to take care of the ogre (thus giving the cultist time to get away). After all of the cultists were dead, the party searched the bodies and the room. They eventually found a secret compartment at the base of a statue. Inside was a dagger of black iron in a scabbard of devil hide. This is the cult's sacrificial relic, it is known as the Devil's Hand, and now the party now have it.

The Devil's Hand:


The cult will know that the party have their dagger and they have become a target. The cult will pull out all stops to get their dagger back. The party continue searching the second level and find a cultist's room (Athasa the Witch) and a cell. Inside the cell they discover Brakko the Heretic. They free him from his chains and let him go. They tell him to get away. When I'm Brakko, I try to speak with a high pitch nasally voice and Brakko is obsessed with silver. He is always asking for silver from the party. When the party first met him they save his bacon after he was being chased by two minotaur skeletons. They saved him again. I might turn saving the goblin renegade as an inside joke of sorts. Every time the party encounter him, they end up saving him in one way or another.

Athasa the Witch PDF:


As the party continue to explore the 2nd level, they encountered three hell hounds. A couple of well-placed fire breaths and the party weren't feeling so invincible as they did after the first combat. Two of the hell hounds ended up running away. The cultists are using the hell hounds to clean out the goblin infestation of the level. The party has retreated to the secret corridor on the first level to rest and recuperate.
 

Turgenev

Hero
The Jebli Pit Level 2 (WIP)


Jebli Pit Level 2 (work in progress)

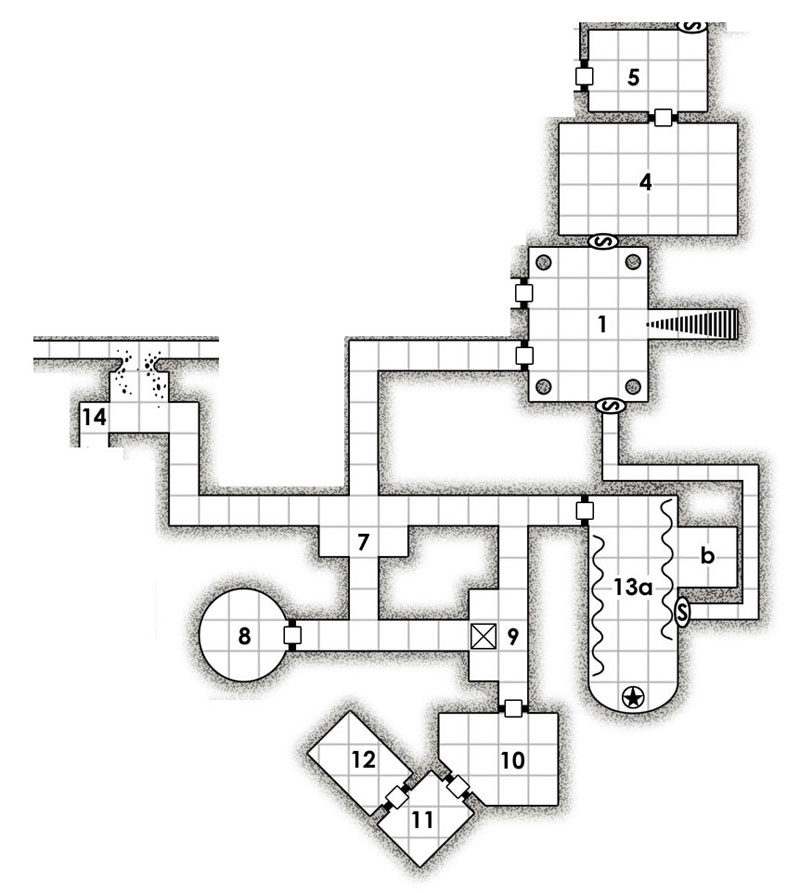
I haven't figured out what is in each room but here is what I have so far. I ended up using this map for one of my Friday Freebie maps (Dec 7, 2018) but I've made a minor change since then. I've added a secret door connecting areas 1 and 13 a). I'll probably make other changes as the party explores the level.


Here is the area the party has explored.

goblin-lair002-PC.jpg


Dungeon Key (so far)

1. Entry Landing: The chamber has a strong musty odour. There are black stone pillars with carved runes in each corner.

4. Twisting Emerald Spire: In the centre of the chamber is a nine foot tall twisting spire carved from a single emerald vein. The spire weighs over a ton and is worth an estimate of 20,000 gp. The emerald spire pulses with an eerie green glow that bathes the whole chamber. The dead in this room reanimates after 1d6 rounds. The spire also absorbs life energy. Touching its surface causes 13 (2d10+2) necrotic damage.

5. Sacrificial Holding Cell: The cult keep prisoners in this chamber that they plan on sacrificing in the name of Asmodeus. Brakko the Heretic was initially held in this chamber but he escaped his bonds and led the minotaur skeletons into Area 4 running into the party. So this was the first time they had saved this goblin's life.

7. Empty Chamber

8. Torture Chamber: Above the door is a single word written in Infernal. The word is 'agony.' Inside the circular chamber are a series of sharp spikes around the centre of the room on both the floor and the ceiling. A captive is placed in chains in the centre and then hoisted up into the top spikes. Then the victim is lowered into the bottom spikes. Currently the chamber has a deceased elf held up into the top spikes. [DM Note: I now have to figured out who this elf was. ;)]

9. Covered Pit Trap: The covered pit is 20 ft deep.

10. Athasa the Witch's Quarters: There is a large wooden frame in the south-eastern corner stuffed with straw and covered in blankets. There is a desk against the north-western corner. The party searched the room and found some treasure hidden under the 'mattress' in a small coffer. Inside was 112 gp and a 1000 gp diamond.

11. Empty Guard Post

12. Cell: Written in Infernal above the metal door and along its sides is the following: "All who enter are captives of Asmodeus." The party was able to read the writing because the thief had the Devil's Hand dagger on her possession. The party debated for a while if they should open the door. They were worried about some sort of enchantment or something worse being behind the door. When they did open the door, they found Brakko the Heretic inside. Again they have rescued this goblin from danger. Brakko immediately asks the party for silver after they free him. They told him no but they told him he could loot the bodies in the temple (area 13 a). They went their separate ways.

13. a) Temple of Asmodeus: Tapestries show many cultists in red robes with black triangle symbols on their chests. This room had six cultists (standard cultists from the Monster Manual), Athasa the Witch who was leading the worship. They were all chanting and singing in Asmodeus' name. As described in the last post, the party attacked and surprised them and got the best of them (with one exception who got away).

13. b) Side Chamber: Grunk, an ogre mercenary sits in this small side chamber. The cult is paying him gold to keep watch on the temple. During ceremonies, he sits in the side chamber since he doesn't worship Asmodeus. Worship is too esoteric for his simple mind.

That's all for now. I know the next batch of cultists is going to include twin brother and sister tiefling warlocks called Torment and Despair. Standard cultists were too weak against the party so I will probably tweak them to boost them up a bit.

Cheers,
Tim
 

Remove ads

AD6_gamerati_skyscraper

Remove ads

Recent & Upcoming Releases

Top