Menu
News
All News
Dungeons & Dragons
Level Up: Advanced 5th Edition
Pathfinder
Starfinder
Warhammer
2d20 System
Year Zero Engine
Industry News
Reviews
Dragon Reflections
White Dwarf Reflections
Columns
Weekly Digests
Weekly News Digest
Freebies, Sales & Bundles
RPG Print News
RPG Crowdfunding News
Game Content
ENterplanetary DimENsions
Mythological Figures
Opinion
Worlds of Design
Peregrine's Nest
RPG Evolution
Other Columns
From the Freelancing Frontline
Monster ENcyclopedia
WotC/TSR Alumni Look Back
4 Hours w/RSD (Ryan Dancey)
The Road to 3E (Jonathan Tweet)
Greenwood's Realms (Ed Greenwood)
Drawmij's TSR (Jim Ward)
Community
Forums & Topics
Forum List
Latest Posts
Forum list
*Dungeons & Dragons
Level Up: Advanced 5th Edition
D&D Older Editions, OSR, & D&D Variants
*TTRPGs General
*Pathfinder & Starfinder
EN Publishing
*Geek Talk & Media
Search forums
Chat/Discord
Resources
Wiki
Pages
Latest activity
Media
New media
New comments
Search media
Downloads
Latest reviews
Search resources
EN Publishing
Store
EN5ider
Adventures in ZEITGEIST
Awfully Cheerful Engine
What's OLD is NEW
Judge Dredd & The Worlds Of 2000AD
War of the Burning Sky
Level Up: Advanced 5E
Events & Releases
Upcoming Events
Private Events
Featured Events
Socials!
EN Publishing
Twitter
BlueSky
Facebook
Instagram
EN World
BlueSky
YouTube
Facebook
Twitter
Twitch
Podcast
Features
Million Dollar TTRPG Crowdfunders
Most Anticipated Tabletop RPGs Of The Year
Tabletop RPG Podcast Hall of Fame
Eric Noah's Unofficial D&D 3rd Edition News
Top 5 RPGs Compiled Charts 2004-Present
Adventure Game Industry Market Research Summary (RPGs) V1.0
Ryan Dancey: Acquiring TSR
Q&A With Gary Gygax
D&D Rules FAQs
TSR, WotC, & Paizo: A Comparative History
D&D Pronunciation Guide
D&D in the Mainstream
D&D & RPG History
About Morrus
Log in
Register
What's new
Search
Search
Search titles only
By:
What's New?
Latest activity
Register
Menu
Log in
Register
Install the app
Install
Upgrade your account to a Community Supporter account and remove most of the site ads.
ShortQuests -- individual adventure modules! An all-new collection of digest-sized D&D adventures designed to plug in to your game.
JavaScript is disabled. For a better experience, please enable JavaScript in your browser before proceeding.
You are using an out of date browser. It may not display this or other websites correctly.
You should upgrade or use an
alternative browser
.
Media added by Knightfall
Navigation
EN World Live
5
General
172K
Browse albums
Trending media
Media 'gun-to-head-nodding.gif' in category 'General'
QuentinGeorge
Feb 6, 2025
Comments: 0
Media 'meme James Franco First Time.gif' in category 'General'
RealAlHazred
Jan 6, 2024
Comments: 0
Media 'Erol Otus box art.jpg' in category 'General'
Fifth Element
Mar 28, 2022
Comments: 0
Media 'map-02.001-myth-drannor.jpg' in category 'General'
S3PTI4N77
Nov 25, 2025
Comments: 0
Media 'neuron activated.jpg' in category 'General'
W'rkncacnter
Feb 12, 2024
Comments: 0
1
2
3
…
Go to page
Go
17
Next
1 of 17
Go to page
Go
Next
Last
Filters
Show only:
Loading…
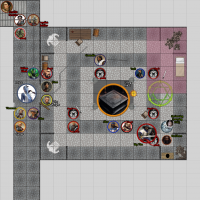
The Parley.png
Media owner
Knightfall
Date added
Mar 24, 2026
Reaction score
0
Comments
0
Crossed Candles Loot.png
Media owner
Knightfall
Date added
Feb 21, 2026
Reaction score
0
Comments
0
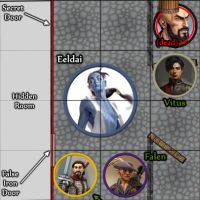
Around Bluffside_Updated.jpg
Media owner
Knightfall
Date added
Jan 4, 2026
Reaction score
0
Comments
0
Around Bluffside.jpg
Media owner
Knightfall
Date added
Dec 27, 2025
Reaction score
0
Comments
0
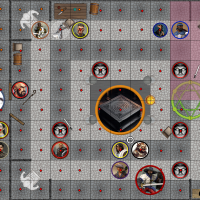
Round 9 - Guard Post (Updated 2).png
Media owner
Knightfall
Date added
Dec 3, 2025
Reaction score
0
Comments
0
Round 9 - Guard Post (Updated).png
Media owner
Knightfall
Date added
Dec 1, 2025
Reaction score
0
Comments
0
Round 9 - Bottom Half of Map (Updated).png
Media owner
Knightfall
Date added
Dec 1, 2025
Reaction score
0
Comments
0
Round 9 Starts - Tim Delays and Moves.png
Media owner
Knightfall
Date added
Nov 30, 2025
Reaction score
0
Comments
0
Round 9 Starts - Tim Moves No Delay.png
Media owner
Knightfall
Date added
Nov 30, 2025
Reaction score
0
Comments
0
Round 9 Starts - Guard Post.png
Media owner
Knightfall
Date added
Nov 26, 2025
Reaction score
0
Comments
0
Round 9 Starts - Bottom Half of Map.png
Media owner
Knightfall
Date added
Nov 26, 2025
Reaction score
0
Comments
0
Round 9 Starts - Top Half of Map.png
Media owner
Knightfall
Date added
Nov 26, 2025
Reaction score
0
Comments
0
Round 9 - 5-ft. step for Tim.png
Media owner
Knightfall
Date added
Nov 24, 2025
Reaction score
0
Comments
0
Round 8 - Vitus is Up Next.png
Media owner
Knightfall
Date added
Nov 24, 2025
Reaction score
0
Comments
0
Round 8 - Rockhorn is Up Next.png
Media owner
Knightfall
Date added
Nov 22, 2025
Reaction score
0
Comments
0
Bluffside_Map_large_markup.jpg
Media owner
Knightfall
Date added
Nov 19, 2025
Reaction score
0
Comments
0
Round 7 - Guard Post.png
Media owner
Knightfall
Date added
Nov 19, 2025
Reaction score
0
Comments
0
Round 7 - Bottom Half (Vitus is Next).png
Media owner
Knightfall
Date added
Nov 19, 2025
Reaction score
0
Comments
0
Round 7 - Top Half (Vitus is Next).png
Media owner
Knightfall
Date added
Nov 19, 2025
Reaction score
0
Comments
0
Round 7 - Bottom Half of Map.png
Media owner
Knightfall
Date added
Nov 16, 2025
Reaction score
0
Comments
0
Round 7 - Top Half of Map.png
Media owner
Knightfall
Date added
Nov 16, 2025
Reaction score
0
Comments
0
Round 6 - Bottom Half of Map.png
Media owner
Knightfall
Date added
Nov 10, 2025
Reaction score
0
Comments
0
Round 6 - Top Half of Map.png
Media owner
Knightfall
Date added
Nov 10, 2025
Reaction score
0
Comments
0
Round 6 - Rockhorn is next.png
Media owner
Knightfall
Date added
Nov 9, 2025
Reaction score
0
Comments
0
Round 6 - After Tim Attacks and Kellam Moves.png
Media owner
Knightfall
Date added
Nov 9, 2025
Reaction score
0
Comments
0
Round 6 - Starting Point.png
Media owner
Knightfall
Date added
Nov 3, 2025
Reaction score
0
Comments
0
Round 5 - Falen's Turn.png
Media owner
Knightfall
Date added
Nov 3, 2025
Reaction score
0
Comments
0
Temple of Straevok.png
Media owner
Knightfall
Date added
Nov 3, 2025
Reaction score
0
Comments
0
Guard Post for the Gate of Scales.png
Media owner
Knightfall
Date added
Oct 27, 2025
Reaction score
0
Comments
0
Round 5 - Vitus goes here.png
Media owner
Knightfall
Date added
Oct 24, 2025
Reaction score
0
Comments
0
Round 5 - Before Vitus and Spritewing Act.png
Media owner
Knightfall
Date added
Oct 24, 2025
Reaction score
0
Comments
0
Round 5 - The Loyalists Act.png
Media owner
Knightfall
Date added
Oct 24, 2025
Reaction score
0
Comments
0
Imninon, Soul Stolen_HF.png
Media owner
Knightfall
Date added
Oct 23, 2025
Reaction score
0
Comments
0
Kellam Black_HF.png
Media owner
Knightfall
Date added
Oct 23, 2025
Reaction score
0
Comments
0
Round 5 - The Genie Opens The Door.png
Media owner
Knightfall
Date added
Oct 18, 2025
Reaction score
0
Comments
0
Round 5 - Tim Misses - Kellam Casts.png
Media owner
Knightfall
Date added
Oct 18, 2025
Reaction score
0
Comments
0
Round 5 - Big Tim is Next.png
Media owner
Knightfall
Date added
Oct 16, 2025
Reaction score
0
Comments
0
Vinny's Current Spells.jpg
Media owner
Knightfall
Date added
Oct 15, 2025
Reaction score
0
Comments
0
Thug Archer Fires At Big Tim.png
Media owner
Knightfall
Date added
Oct 9, 2025
Reaction score
0
Comments
0
Where We Left Off.png
Media owner
Knightfall
Date added
Oct 8, 2025
Reaction score
0
Comments
0
Roan Lizard Hills Battle_Rnd1_End of Round.png
Media owner
Knightfall
Date added
Apr 26, 2025
Reaction score
0
Comments
0
Revised Battle Map_Foe Is Next.png
Media owner
Knightfall
Date added
Apr 15, 2025
Reaction score
0
Comments
0
Roan Lizard Hills Battle_Rnd1_Aureus is Next.png
Media owner
Knightfall
Date added
Apr 8, 2025
Reaction score
0
Comments
0
Roan Lizard Hills Battle_Maur is Next.png
Media owner
Knightfall
Date added
Mar 28, 2025
Reaction score
0
Comments
0
Roan Lizard Hills Battle_Rnd1.png
Media owner
Knightfall
Date added
Mar 27, 2025
Reaction score
0
Comments
0
Roan Lizard Hills Battle.png
Media owner
Knightfall
Date added
Mar 14, 2025
Reaction score
0
Comments
0
Taint-Absorbing Items.jpg
Media owner
Knightfall
Date added
Feb 21, 2025
Reaction score
0
Comments
0
The Gloom_Ver2.png
Media owner
Knightfall
Date added
Feb 13, 2025
Reaction score
0
Comments
0
Gloom of Angrboda.jpg
Media owner
Knightfall
Date added
Feb 1, 2025
Reaction score
0
Comments
0
Labyrinth Fight3-Rnd4_Before Vitus Acts.png
Media owner
Knightfall
Date added
Aug 6, 2024
Reaction score
0
Comments
0
Labyrinth Fight3-Rnd4_Rockhorn is Next.png
Media owner
Knightfall
Date added
Jul 30, 2024
Reaction score
0
Comments
0
Fight in the Hills_Rnd1_Maur is Next.png
Media owner
Knightfall
Date added
Jul 5, 2024
Reaction score
0
Comments
0
Fight in the Hills_Rnd1_Phar is Next.png
Media owner
Knightfall
Date added
Jun 28, 2024
Reaction score
0
Comments
0
Labyrinth Fight3-Rnd4 Starts.png
Media owner
Knightfall
Date added
Jun 26, 2024
Reaction score
0
Comments
0
Labyrinth Fight3-Rnd3 Ends.png
Media owner
Knightfall
Date added
Jun 26, 2024
Reaction score
0
Comments
0
Fight in the Hills_Rnd1 Starts2.png
Media owner
Knightfall
Date added
Jun 23, 2024
Reaction score
0
Comments
0
Fight in the Hills_Rnd1 Starts.png
Media owner
Knightfall
Date added
Jun 23, 2024
Reaction score
0
Comments
0
angus_init_vs the brood.jpg
Media owner
Knightfall
Date added
Jun 20, 2024
Reaction score
0
Comments
0
Labyrinth Fight3-Rnd3_Falen is Next.png
Media owner
Knightfall
Date added
Jun 17, 2024
Reaction score
0
Comments
0
Soul Stolen_ver1.png
Media owner
Knightfall
Date added
Jun 17, 2024
Reaction score
0
Comments
0
Labyrinth Fight3-Rnd3_Rockhorn and Akos Move.png
Media owner
Knightfall
Date added
Jun 17, 2024
Reaction score
0
Comments
0
Labyrinth Fight3-Rnd3_If Akos Moves to the Doorway_ver2.png
Media owner
Knightfall
Date added
Jun 16, 2024
Reaction score
0
Comments
0
Labyrinth Fight3-Rnd3_If Akos Moves to the Doorway.png
Media owner
Knightfall
Date added
Jun 16, 2024
Reaction score
0
Comments
0
Fight in the Hills.png
Media owner
Knightfall
Date added
Jun 9, 2024
Reaction score
0
Comments
0
Brooding Skeleton_HF.png
Media owner
Knightfall
Date added
Jun 9, 2024
Reaction score
0
Comments
0
Area Around Ralix's Cross.png
Media owner
Knightfall
Date added
May 22, 2024
Reaction score
0
Comments
0
Labyrinth Fight3-Rnd2_Falen's Grease spell.png
Media owner
Knightfall
Date added
May 21, 2024
Reaction score
0
Comments
0
Labyrinth Fight3-Rnd2-Tim's Next.png
Media owner
Knightfall
Date added
May 9, 2024
Reaction score
0
Comments
0
Labyrinth Fight3-Rnd2-Rockhorn's Next.png
Media owner
Knightfall
Date added
May 7, 2024
Reaction score
0
Comments
0
Labyrinth Fight3-Rnd2_Vinny's Stone Shape.png
Media owner
Knightfall
Date added
May 7, 2024
Reaction score
0
Comments
0
Labyrinth Fight3-Rnd2_Falen sees.png
Media owner
Knightfall
Date added
May 6, 2024
Reaction score
0
Comments
0
Labyrinth Fight3-Rnd2.png
Media owner
Knightfall
Date added
May 5, 2024
Reaction score
0
Comments
0
Labyrinth Fight3-Rnd1.png
Media owner
Knightfall
Date added
May 2, 2024
Reaction score
0
Comments
0
Portal Room Fight2-Rnd8-Bugbear's Blasphemy.png
Media owner
Knightfall
Date added
Apr 26, 2024
Reaction score
0
Comments
0
Tim's attack roll for round 8.jpg
Media owner
Knightfall
Date added
Apr 25, 2024
Reaction score
0
Comments
0
Portal Room Fight2-Rnd7-End-Rnd8-Start.png
Media owner
Knightfall
Date added
Apr 25, 2024
Reaction score
0
Comments
0
Portal Room Fight2-Rnd7-Falen and Vitus are Next-Full Map.png
Media owner
Knightfall
Date added
Apr 20, 2024
Reaction score
0
Comments
0
Portal Room Fight2-Rnd7-Falen and Vitus are Next.png
Media owner
Knightfall
Date added
Apr 19, 2024
Reaction score
0
Comments
0
Tim's Will save.jpg
Media owner
Knightfall
Date added
Apr 16, 2024
Reaction score
0
Comments
0
Tim's Attacks for Round 7-1.jpg
Media owner
Knightfall
Date added
Apr 16, 2024
Reaction score
0
Comments
0
Tim's Attacks for Round 7-2.jpg
Media owner
Knightfall
Date added
Apr 16, 2024
Reaction score
0
Comments
0
Portal Room Fight2-Rnd6-End-Rnd7-Start.png
Media owner
Knightfall
Date added
Apr 14, 2024
Reaction score
0
Comments
0
Portal Room Fight2-Rnd6-After Redcap.png
Media owner
Knightfall
Date added
Apr 10, 2024
Reaction score
0
Comments
0
Portal Room Fight2-Rnd6-Akos is Next.png
Media owner
Knightfall
Date added
Apr 7, 2024
Reaction score
0
Comments
0
434697530_830228545789519_646480133990632555_n.jpg
Media owner
Knightfall
Date added
Apr 7, 2024
Reaction score
0
Comments
0
Portal Room Fight2-Rnd5-End-Rnd6-Start.png
Media owner
Knightfall
Date added
Apr 5, 2024
Reaction score
0
Comments
0
Portal Room Fight2-Rnd5-Falen-is-Next.png
Media owner
Knightfall
Date added
Mar 29, 2024
Reaction score
0
Comments
0
Portal Room Fight2-Rnd5-Minimap.png
Media owner
Knightfall
Date added
Mar 27, 2024
Reaction score
0
Comments
0
Portal Room Fight2-Rnd4-End-Rnd5-Start.png
Media owner
Knightfall
Date added
Mar 25, 2024
Reaction score
0
Comments
0
Portal Room Fight2-Rnd4-Falen-is-Next.png
Media owner
Knightfall
Date added
Mar 21, 2024
Reaction score
0
Comments
0
Portal Room Fight2-Rnd4-Akos and Vitus are Next.png
Media owner
Knightfall
Date added
Mar 17, 2024
Reaction score
0
Comments
0
Portal Room Fight2-Rnd3-End-Rnd4-Start.png
Media owner
Knightfall
Date added
Mar 16, 2024
Reaction score
0
Comments
0
Portal Room Fight2-Rnd3-Falen-is-Next.png
Media owner
Knightfall
Date added
Mar 15, 2024
Reaction score
0
Comments
0
Antimagic Field Mishap Square Selection.png
Media owner
Knightfall
Date added
Mar 13, 2024
Reaction score
0
Comments
0
Portal Room Fight2-Rnd3-Akos and Vitus are Next.png
Media owner
Knightfall
Date added
Mar 11, 2024
Reaction score
0
Comments
0
Portal Room Fight2-Rnd3-Start.png
Media owner
Knightfall
Date added
Mar 6, 2024
Reaction score
0
Comments
0
Port Shifted to this Room.png
Media owner
Knightfall
Date added
Mar 5, 2024
Reaction score
0
Comments
0
Portal Room Fight2-Rnd2-Falen is Next.png
Media owner
Knightfall
Date added
Feb 29, 2024
Reaction score
0
Comments
0
Portal Room Fight2-Rnd2-Akos and Vitus are Next.png
Media owner
Knightfall
Date added
Feb 25, 2024
Reaction score
0
Comments
0
Big Tim-Rd2.jpg
Media owner
Knightfall
Date added
Feb 25, 2024
Reaction score
0
Comments
0
1
2
3
…
Go to page
Go
17
Next
1 of 17
Go to page
Go
Next
Last
Top