Computers, Projectors, and Battle Maps.

falcarrion

First Post
I looked at laptop coolers and I was wondering if this was a good one (I'd get 2 of them)? Amazon.com: Antec USB-Powered Notebook Cooler: Electronics

I don't know much about coolers, so I'm not sure which one would be good to help cool down a TV.

I'll tweak my stand a bit to allow more air to circulate in/out of it. Thanks for the tips.

What about protecting the padding from the TV? Do you think the pads will be fine touching the back of the tv like this or should I wrap the padding in electrical or duct tape, or something like that?

I haven't seen anything on your tv setup latley. Just wondering how it is going.
 

log in or register to remove this ad

Oryan77

Adventurer
I haven't seen anything on your tv setup latley. Just wondering how it is going.

I actually finished the entire setup and we have used it twice so far. I haven't posted new pics yet because I want to paint the pvc pipes black first and I'm waiting until we get moved into our new house later this month.

But the setup is really cool. I'm no engineer and I'm not an expert handyman or anything. But I think I did a pretty good job setting this up.

I bought a sheet of plastic board and cut it to about the same size as the tv. I mounted my padded pvc pipe frame to it. I used velcro to attach one of the laptop fans to the plastic board. I took the fans out of my other laptop fan case and velcro'ed them to the plastic base so they would sit directly underneath the vents on the upper part of the tv. The fans are powered by the tv via USB. Having all of this attached to the plastic board allows me to easily move everything around all at once.

I had a sheet of plexiglass cut to be a little bit bigger than the tv. I then stuck 4 clear rubber bumpers near the corners of the plexiglass. I also stuck several round felt pads around the plexiglass so the glass can lay directly on top of the tv frame without rubbing on the frame. The bumpers fit in each corner of the tv screen on the inside of the frame to keep the plexiglass from sliding around. The bumpers are just short enough where they don't touch the tv screen.

I wanted to still use the tv normally so my wife could watch it whenever I play xbox on our other tv. One concern was that it would be a pain if I always had to screw the base back onto the tv so it will sit on the real tv stand. I thought about mounting it on the wall with those wall brackets, but the mount would not fit in the pvc stand and I think it would cause the tv to sit higher than the stand anyway. But then I recently stumbled across this wall mount when I was looking at tv stands:

Ultra Slim Wall Mounts

I bought one and the hanger piece fit so perfectly on the tv that I didn't even need to adjust my pvc pipe at all! I haven't hung it on a wall yet because I'm waiting for my move before I start messing with the mounts.

I also learned how to use Map Tool and I made my own maps for the Forge of Fury adventure. That program is amazing! Not only is the tv battlemap really nice, but Map Tool allows us to go a whole other direction with our gaming. Having fog of war, sight distances, and actual lighting for using torches and various light sources is a real trip. Even being able to use the initiative tracker makes things easier. I can even show world maps and handouts within Map Tool and it's cool to see it appear on the tv rather than me passing around sheets of paper.

We still used my miniatures (seeing a creatures actual size in 3d makes it worth keeping the minis). What we did was use tokens within Map Tool so they reveal the fog of war and project lights and vision lines. Tokens underneath miniatures also helps me keep track of which mini was which when it comes to remembering who took damage. They also help keep track of creature placement for when we zoom in or out of the map. All we have to do is realign the tokens underneath the miniatures and we're good to go.

The only let down is that my players have not been able to play much at all since November. One guy had to quit last summer due to work, but I heard he was finished with that project and wanted to get back into the game (he doesn't know about our new setup yet). Then yesterday, another player just told me he has to bail until he can get a new job. He has been working a 2nd temp job on the weekend since his full time job cut down his hours. But now he has been let go from the full time job and needs to spend the entire weekend working at his temp job to pay the bills. So who knows how long he'll be stuck in that rut. As of now, I'm down to 2 players and not sure when we'll have enough players to run a game and try out our new setup. That's how things go though when it comes to being an adult and trying to play D&D. Uhg.
 

falcarrion

First Post
I recently found something you might want to add at another day. Wiress hdmi system. I figured it would help eliminate you having to run cables from your computer to the tv.


Oryan77

Adventurer
I recently found something you might want to add at another day. Wiress hdmi system. I figured it would help eliminate you having to run cables from your computer to the tv.

That's cool, I've never even heard of wireless HDMI. I already have to plug/unplug two usb cables for the fans, and then there is the power cord for the tv. I bought an HDMI cord for only $13 at Frys. The cord isn't really a big deal since the laptop has to sit right next to the tv anyway so the players can use it. But still, wireless HDMI is pretty cool.

Yay for learning MapTool! I hope you enjoy it as much as I have.

Man, it's a great program. I even like how well it is supported. I've asked a couple questions on their forums and it takes them no time to respond. That's a great bunch of guys that are working on it.

If you have any tips on features I might want to look into that I may not have seen on their video tutorials, let me know. I'm not sure what all is possible with macro's and that type of stuff. But I'm not against implementing something if it improves the game.
 

OnlineDM

Adventurer
You're ahead of where I am with lighting and vision blocking layers - I've never bothered with any of that. I've done a lot with macros, though, and I highly recommend them for monster attacks, hit points and condition tracking.

You can see my MapTool Education Central right here; if you just want sample macros, those are here.
 

Oryan77

Adventurer
You're ahead of where I am with lighting and vision blocking layers - I've never bothered with any of that. I've done a lot with macros, though, and I highly recommend them for monster attacks, hit points and condition tracking.

If you're using a projector, you really should setup vision lines. It will also allow the tokens to auto reveal fog of war as they move, keeping you from doing it yourself and it is very precise.

The vision is one of the things I love most about Map Tool. It's a bit of initial work plotting out the lines, but once you get the hang of it, you can do it pretty fast. It's also really neat seeing your light sources revealing only the areas they are meant to reveal. It looks really nice on the screen.

A questions for you:

I really like the idea of your Toggle Visibility, Toggle States, & Summon / Dismiss companion macros. How do you use them though? I read that it creates a button, is that button in some other window or does it appear next to a token when you mouse over it? Just wondering how the whole macros thing works and the tutorials I've seen don't really explain any other macros besides dice rolling.
 

OnlineDM

Adventurer
If you're using a projector, you really should setup vision lines. It will also allow the tokens to auto reveal fog of war as they move, keeping you from doing it yourself and it is very precise.

The vision is one of the things I love most about Map Tool. It's a bit of initial work plotting out the lines, but once you get the hang of it, you can do it pretty fast. It's also really neat seeing your light sources revealing only the areas they are meant to reveal. It looks really nice on the screen.

Well, I don't use tokens for the PCs with the projector, just the monsters. I could do as you've done and have tokens beneath each PC, but it honestly hasn't felt like it's worth the effort. Maybe it is and I should explore it!

However, it could certainly work great in my online game; I just haven't made the effort to set up the vision blocking layers and so on. Really, it's pretty easy to just manually reveal what the players can see by removing the fog of war (either online or with the projector), so that's what I've been doing.

I really like the idea of your Toggle Visibility, Toggle States, & Summon / Dismiss companion macros. How do you use them though? I read that it creates a button, is that button in some other window or does it appear next to a token when you mouse over it? Just wondering how the whole macros thing works and the tutorials I've seen don't really explain any other macros besides dice rolling.

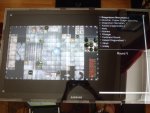
A screen shot might help here:
MacroScreenShot.jpg


You can see that there are three windows shown in this image - the Map window at the top, the Campaign window at the bottom left, and the Selection window at the bottom right.

The Campaign window has all of the state toggling macros (prone, cursed, marked, dazed, etc.) as well as a Visibility toggle (it works like the state toggles, slightly different from the monster visibility on my macro page). If I want to toggle the state on a token (or a bunch of tokens at once) I select the token(s) and then click the appropriate toggle button. The Troll is currently marked by Faebs (the blue X) and cursed by Fudrick (the orange skull).

The Selection window has the macros for the Troll (each token, including the PCs, has a bunch of macros on their token window). So, this is where you see the attacks, hit point tracking, initiative, etc. (including the Visibility button at the bottom right). For the PCs, you would also see Second Wind, Short Rest, special abilities like Healing Word, and so on.

The macros themselves don't CREATE buttons - they ARE buttons. You right click in either the Selection window or the Campaign window and select "Add New Macro." You name it, give it a grouping (if you wish), a sort order, a button color and a text color, and then you paste the macro code into the big code box for that new button. Et voila - a cool new macro!

I highly recommend using a campaign template that has the campaign macros and properties and states built in. My projector campaign template is here, if you want to use it.
 

Raddu

Explorer
Masterplan and a 40" Samsung

Oryan inspired me and I went looking for a similar TV. I found the 40" LED UN40C5000QFXZA for $500 (575 after shipping & tax), refurbished.

I went to Home Depot and bought a 36x24 piece of acrylic for about $23 bucks. I also bought some felt pad that I cut into .5inch strips to line the acrylic for $3 and a plastic cutter for another $3. I bought a pack of rubber feet for $3 too. I bought a laptop cooler with 4 fans for $21.

I got a VGA cord to connect my computer to the TV for $7 from a local computer store. Instead of making the PVC stand I found some sort of wire stand like thing from the GoodWill store for $1.99.

So for a total of $637 I have a working system as you can see from the images.

However, I'm not done. I'm going to make a table like the Uber-geek table with slight modifications that will hold the tv and be relatively flush with the table with additional customization to prevent spillage and the like.

The felt around the edge is really ugly, but it will be hidden once the table's done.

Image 2 is the corner of the tv, you can see where I added the rubber bubble/feet per Oryan's suggestion that without them the felt will allow the acrylic to slide. So that worked well. The rubber doesn't touch the screen.

The 3rd image shows the laptop cooler under the tv, it fits perfectly and is plugged in by USB to the TV.

All pictures were taken in my living room with windows open on a sunny day. So when we game it'll be darker and the images look real nice.

The program I'm using is Masterplan
 

Attachments

  • PB032175.JPG
    PB032175.JPG
    3.1 MB · Views: 153
  • PB032176.JPG
    PB032176.JPG
    2.8 MB · Views: 129
  • PB032178.JPG
    PB032178.JPG
    3 MB · Views: 130
  • PB032182.JPG
    PB032182.JPG
    3 MB · Views: 132
  • PB032187.JPG
    PB032187.JPG
    3.1 MB · Views: 135

Remove ads

Top