Returning to painting [new stuff up!]

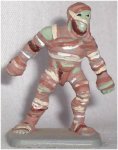
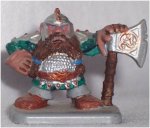
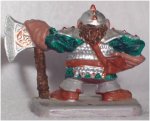
Next installment: More HeroQuest minis! This time, the sorcerer and champion.

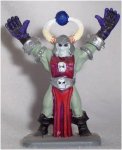
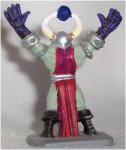
On the sorcerer, I would have liked to do more with the sickly green skintone. maybe get some highlights and "low-lights" going on. Maybe I'll do that now that I'm painting again. I was and am fairly happy with the two skull ornaments and the coloration on the red surcoat thing.

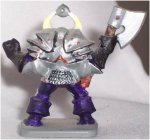
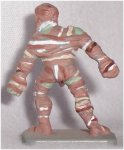
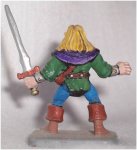
On the champion, what can I say but armor, armor and more armor. :) Although the black gloves and dark purple pats were ok, I liked the copper touches and th skull ornament.
 

Attachments

  • HQsorcfront.jpg
    HQsorcfront.jpg
    32 KB · Views: 89
  • HQsorcback.jpg
    HQsorcback.jpg
    29.9 KB · Views: 95
  • HQchampfront.jpg
    HQchampfront.jpg
    42.3 KB · Views: 85
  • HQchampback.jpg
    HQchampback.jpg
    36.8 KB · Views: 81

log in or register to remove this ad

But wait, there's more!

Now shambling this way is our resident HeroQuest Mummy. Also a pic of the same mini pained by another artist for comparison. I saw the second pic first and, as much as I said "hey, nice paint job!" I also said "that's not what _I_ want, I want more color." So here ya go.
 

Attachments

  • Azrealmummy2.jpg
    Azrealmummy2.jpg
    5.2 KB · Views: 92
  • HQmummyback.jpg
    HQmummyback.jpg
    17.8 KB · Views: 119
  • HQmummyfront.jpg
    HQmummyfront.jpg
    18.5 KB · Views: 94

I realise that this may not be the right place for this post but, seeing as how I'm getting back into painting and will be needing more minis to practice on, I was wondering if there was anybody out there who would be willing to let me paint their oh-so-precious minis.
All I would want is postage paid plus maybe a dollar or so, depending on the mini.
You've seen the general quality of my work and, depending on the mini, could pry get it done fairly quickly but, no time limits please, my days are fairly full as-is.
So, any takers?
 

but that's not all!

Enough of the bad guys! How about some heros?! Well, first up is a stout dwarf, clad in mail and ready with his favorite axe. Fight on!
 

Attachments

  • HQdwarffront.jpg
    HQdwarffront.jpg
    29.8 KB · Views: 92
  • HQdwarfback.jpg
    HQdwarfback.jpg
    30 KB · Views: 79

Suggestion - When you are doing armor and blades in silver here is a quick and dirty way to do them and gain a bit of depth in the process:

When using this method you will want to do most of the armor and blades first -

1. Paint the area black and let the paint dry.
2. Drybrush silver across the armor and blade.

I think you will be impressed with the results and it is really very quick.

Another way to do quick and dirty armor:
1. Paint the area silver.
2. Make a wash of black paint and add a very small drop of Elmer's glue. Wash the silver.
3. Go back with your silver and apply high-lights.

Keep on painting - looks good!
 

I been meaning to try that. will pry do do on my next fig who has a weapon or armor. I know that technique works really well for chainmail. Whats the glue for though?

Next up, the Elven warrior. On this mini I liked the boots, belt and hair. Eyes are horrific and need to be re-done...
 

Attachments

  • HQelffront.jpg
    HQelffront.jpg
    21.9 KB · Views: 90
  • HQelfback.jpg
    HQelfback.jpg
    21.3 KB · Views: 70

I am finishing up a set of 3 minis (should be ready to post pics soon) and was wondering if there would be any interest in a "in progress" series...


Hey There,

I'm going to take a guess and say that you basecoat in white. If you want to improve the sense of depth try basecoating with black. Any bright colour areas will need to be painted white first with a heavy drybrushing (what I call a wetbrushing) with good coverage on the top and not so good in the cracks and crevaces. You'll find it will make a HUGE difference in the detail of the model. Also if you miss a spot it just looks like shadow instead of a an obvious white spot.

Another trick is don't paint right to the seem between colours. This will leave a bit of a black line that makes the two areas seem seperate rather than merged together.

Faces are a little trickier, I generally coat with a darker fleshtone (Vallejo has some really good ones) and then drybrush a lighter tone on top highlighting the cheeks, nose and brow. On male models I generally don't do anything with the lips. But for female models you can go with just about any colour you want depending how exotic you want. In general, though, use darker shades of red.

Your metalics are a little too solid. I use a drybrush of either Chainmail or Gunmetal on a black basecoat and then highlight the edges with silver. If you really want to get fancy you can find guides on how to do non-metalic metals but I find the process to be generally more time intensive than I like.

For your finishes I would suggest you get a bottle of gloss varnish to coat the areas you want to be shiny and then use a matte spray varnish to seal the model. It's a matter of preference though. Personally I think gloss varnishes make the model look plastic.

In general, if you want to see a marked improvement without being a great artist, basecoat in black and master drybrushing. If you can do these, and be reasonably neat, then anyone can paint a good looking model.

Jack
 

Jack of Shadows said:
Hey There,

I'm going to take a guess and say that you basecoat in white. If you want to improve the sense of depth try basecoating with black. Any bright colour areas will need to be painted white first with a heavy drybrushing (what I call a wetbrushing) with good coverage on the top and not so good in the cracks and crevaces. You'll find it will make a HUGE difference in the detail of the model. Also if you miss a spot it just looks like shadow instead of a an obvious white spot.
Currently I usea grey primer (it's what I have) but was thinking of trying black once I get more.

Jack of Shadows said:
Another trick is don't paint right to the seem between colours. This will leave a bit of a black line that makes the two areas seem seperate rather than merged together.

Faces are a little trickier, I generally coat with a darker fleshtone (Vallejo has some really good ones) and then drybrush a lighter tone on top highlighting the cheeks, nose and brow. On male models I generally don't do anything with the lips. But for female models you can go with just about any colour you want depending how exotic you want. In general, though, use darker shades of red.

Your metalics are a little too solid. I use a drybrush of either Chainmail or Gunmetal on a black basecoat and then highlight the edges with silver. If you really want to get fancy you can find guides on how to do non-metalic metals but I find the process to be generally more time intensive than I like.
Yes, I know the metallics are vey flat and basic. Thus far I have not learned how to shade metallics. I'm working on that and non-metallic. The 3 I am trying to finish are painting in a pseudo-NMM that I rather like the results of. Once they're finished I will post (hopefully tomorrow or maybe day after).

Jack of Shadows said:
For your finishes I would suggest you get a bottle of gloss varnish to coat the areas you want to be shiny and then use a matte spray varnish to seal the model. It's a matter of preference though. Personally I think gloss varnishes make the model look plastic.

In general, if you want to see a marked improvement without being a great artist, basecoat in black and master drybrushing. If you can do these, and be reasonably neat, then anyone can paint a good looking model.

Jack
I know I need to work on drybrushing and I know I need to work on blending as well.
I appreciate all the comments especially ideas on what to try and to work on. This is one of the reasons I returned to painting.
 

Remove ads

Top