If you really do make a cheat sheet for cones it would help me out a lot, and I would name my unborn 4th kid after you (im still working on kid 1 though).
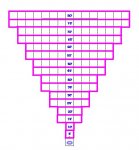
There's two different versions of everything because if you look closely the text of the DMG is not describing the same thing as the pictures in the DMG -- so I drew up a version for each. In addition it has 3rd-Edition style cones, centering on crosshairs versus centering on squares, meteor swarms, etc.
That having been said, in actual gameplay I personally use a universal compass with a marker on the battlemap, which is a lot easier to draw out and leave on the map without needing to move any miniatures.
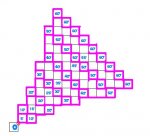
If over half the square in question is within the effect of the spell, I believe. At least, that's the way it makes sense to me and that's the way I'm doing my diagrams.
3.0 cone straight ahead. I centered the spell effect on the middle of the line in front of him because it made sense for me to do so. I believe there is some rule that states all spells must originate from a grid intersection. If that is the case, this diagram is not 100% accurate. I still like it.
3.5 cone straight ahead. 3.5 specifies the origin of the spell must be a point. It also allows the character to choose which of the points of his square he gets to cast it from. 3.0 simply specified that the cone begins "at a point directly in front of the caster."
Casting diagonally marginally increases the area of the spell. I was rounding the distances slightly up. The rule for character movement in 3.5 is the first diagonal move costs 1 square of moment, while the second costs 2. I used this appoximation when doing the chart.