I'm talking like a 3 inch mirror, and a base board that's like 3" longer in front of the projector than the projector itself.
Not a whole lot bigger. And camera tripods fold up. So one trip, especially if you put it all in a duffel bag.
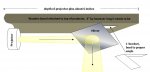
the further benefit of my design is that the projector itself sits at its traditional angle, so the heat rises from the top, rather than into the rest of the machine.
Not a whole lot bigger. And camera tripods fold up. So one trip, especially if you put it all in a duffel bag.
the further benefit of my design is that the projector itself sits at its traditional angle, so the heat rises from the top, rather than into the rest of the machine.