as a builder type person, here's my take on the problem:
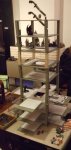
As I understand you want a tower, that looks like a + sign when I assume, seen from the side (if + when looked from above, even easier).
One method is to print out each floor map at 1" scale. Cut out the excess paper (the outside).
for a short tower, use plywoood or foamcore (I assume plywood), cut in the same shape as each floor. Glue the floor paper to the wood.
At this point, you can stack them, to build the tower. If you want a more "realistic" shape, use a thicker material (or glue them together in layers).
The result, is a flat map, with a 3d reveal.
To maintain alignment (especially with a taller tower. Get dowels make pegs to align them. I recommend doing it as pegs, rather than running the dowel all the way through, as the dowel will interfere with game play.
Whereas, drilling a hole on the surface (not all the way through), and having the pegs extend from the bottom, will not. Use more than 2 pegs per level, so each level can rest on it's own if you need to play multi-level. Build a base-board to accept the 1st floor (and incorporate any extra exterior ground-level terrain.
Paint the outside BEFORE you glue on the floorplans. This avoids damaging them.
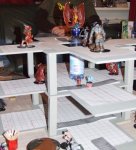
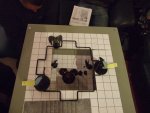
As for doing the fog-of-war, your mileage will vary. Doing that style can slow down game play (you have to describe more, and the players will be more cautious).
My solution, which will also add height, is to cut "over-floors" from the same material, that are then sub-cut along room boundaries.
Let's pretend you're using 3/4" plywood.
You cut out 2 identical shapes for the first floor. Glue the floorplan to the first piece, cut the second piece along the floor plan room boundaries.
Pre-game, set the floor-pairs up such that the floor plans are covered.
Place the first floor down, and remove the first "room" block. When the players move to the second floor, put the blocks back, so you can put the next floor up.
A flatter version is to use paper "covers" instead, which means you don't have to re-cover everything as you put new floors on (allowing for a re-visit and explore floors dynamic).
A big concern is that building a custom set piece will take a lot of time, and be of limited re-use. Not impossible, but the more specialized, the less re-use (otherwise your players will groan every time they end up at Mount Doom). Using a modular map system to build the tower out of might be a better investment.
As I understand you want a tower, that looks like a + sign when I assume, seen from the side (if + when looked from above, even easier).
One method is to print out each floor map at 1" scale. Cut out the excess paper (the outside).
for a short tower, use plywoood or foamcore (I assume plywood), cut in the same shape as each floor. Glue the floor paper to the wood.
At this point, you can stack them, to build the tower. If you want a more "realistic" shape, use a thicker material (or glue them together in layers).
The result, is a flat map, with a 3d reveal.
To maintain alignment (especially with a taller tower. Get dowels make pegs to align them. I recommend doing it as pegs, rather than running the dowel all the way through, as the dowel will interfere with game play.
Whereas, drilling a hole on the surface (not all the way through), and having the pegs extend from the bottom, will not. Use more than 2 pegs per level, so each level can rest on it's own if you need to play multi-level. Build a base-board to accept the 1st floor (and incorporate any extra exterior ground-level terrain.
Paint the outside BEFORE you glue on the floorplans. This avoids damaging them.
As for doing the fog-of-war, your mileage will vary. Doing that style can slow down game play (you have to describe more, and the players will be more cautious).
My solution, which will also add height, is to cut "over-floors" from the same material, that are then sub-cut along room boundaries.
Let's pretend you're using 3/4" plywood.
You cut out 2 identical shapes for the first floor. Glue the floorplan to the first piece, cut the second piece along the floor plan room boundaries.
Pre-game, set the floor-pairs up such that the floor plans are covered.
Place the first floor down, and remove the first "room" block. When the players move to the second floor, put the blocks back, so you can put the next floor up.
A flatter version is to use paper "covers" instead, which means you don't have to re-cover everything as you put new floors on (allowing for a re-visit and explore floors dynamic).
A big concern is that building a custom set piece will take a lot of time, and be of limited re-use. Not impossible, but the more specialized, the less re-use (otherwise your players will groan every time they end up at Mount Doom). Using a modular map system to build the tower out of might be a better investment.
")