• NOW LIVE! Into the Woods--new character species, eerie monsters, and haunting villains to populate the woodlands of your D&D games.

Coolest. Gaming Set-up. Evar.

If you have not visited DLA's website lately (or indeed, ever) you might have missed the fact that we've been in a content and tool update release phase during May.

More importantly, we are also in the midst of beta testing our rideable horse system for NWN, tweaking content for BioWare, and otherwise going nuts. And my top scriptor and best 3d artist were both just hired by BioWare which has left a bit of a hole.

In the midst of all of that - we are trying to get our new community forums up (this brings in forums from 3 to 4 other NWN community websites into our own and merges them with DLA's) as well as get new support sub-pages up for - amongst other things - the Digital Projection home page and guide.

So, as it turns out - scripting issues with *invisible henchmen* in NWN and a host of other issues are effecting this a lot. I will get it up and out though and have about 2/3rds of my first draft done. "Soon".

So many things to do - so little time...
 

log in or register to remove this ad

Adjustable Light Stand w/ Boom

I finally found an adjustable stand with an adjustable arm that might work for the video projector on the go. I haven't purchased this equipment yet as I just discovered it today.

First, the stand:
Light Stand

Second, the adjustable arm w/ counter-weight:
Boom Arm

The stand is adjustable from ~4.5 ft (1.4m) to 13 ft (3.9m). The stand itself weighs only 6 lbs (2.7kg) and is strong enough to hold over 25 lbs (11.3kg).

The boom arm is adjustable from 4 ft (1.4m) to 6.9 ft (2.1m) and comes with an 11 lb (4.9kg) counter-weight to offset the weight of the object attached to the end of the arm.

The total cost of the light stand with the boom arm is around $130 USD ($109 EUR). It's not a cheap solution, but I think we've established that nothing about this setup is cheap. :)

Something to consider if you're like me and don't have a permanent location to mount your projector or need to be able to take it with you.
 

BeerSkunk said:
I finally found an adjustable stand with an adjustable arm that might work for the video projector on the go. I haven't purchased this equipment yet as I just discovered it today.

If you go for a setup like this be sure to get a weight for the bottom of the stand. This will really help prevent it from getting knocked over. Sandbags are the usual method in photo studios.

A background stand might be more portable and more stable. I found quite a few on Ebay for very reasonable prices. I'd use sandbags on a setup like this also.
 

I found a solution that works for me on holding the projector up. Hooks. These are heavy duty hooks that screw into the sheetrock ceiling. Not the most elegant solution. But it works really well. I'll have some photos of my next gaming session up here after the 16th. I've run 2 other sessions since I got it set up this way, but keep forgetting the digital camera. I'll remember this time.
 

SirJalore said:
I found a solution that works for me on holding the projector up. Hooks. These are heavy duty hooks that screw into the sheetrock ceiling. Not the most elegant solution. But it works really well. I'll have some photos of my next gaming session up here after the 16th. I've run 2 other sessions since I got it set up this way, but keep forgetting the digital camera. I'll remember this time.

Hooks and chains work really great. That was my first suspension rig. Hooks can be very unobtrusive in a main living area also. Nobody ever notices hooks in the ceiling. Just make sure they're secured well. Unless you're screwing directly into a stud, I'd suggest using a swag hook.
 

I'm glad to see that other people are still working on this and offering up solutions. Just today I brought home a retail clothing fixture that is adjustable floor to ceiling. I'm going to give this a try. If it doesn't work, my other two ideas were the tripod w/boom or using hooks. Since it is being used in the dining room, I don't think I can get away with using hooks, which is a damn shame since that is by far the cheapest route. But after springing for a projector, what is a few more dollars?

When I do get things up and running I will post pics. I've had the projector for two months now and have yet to use it gaming. Watched a lot of movies though.
 
Last edited:

Toscadero said:
Since it is being used in the dining room, I don't think I can get away with using hooks

I wouldn't rule it out. Lots of people have hooks in their ceilings for hanging plants, lighting fixtures, etc. I bet nobody notices if you put hooks up in your dining room, especially if they are the same color as the ceiling.

If it doesn't work out, the small holes are really easy to patch.
 

Boredflak said:
I wouldn't rule it out. Lots of people have hooks in their ceilings for hanging plants, lighting fixtures, etc. I bet nobody notices if you put hooks up in your dining room, especially if they are the same color as the ceiling.

If it doesn't work out, the small holes are really easy to patch.

Tell me about it. We just finished remodelling the kitchen and dining room. I can't build cabinets, but I did save money by doing my own lighting changes. We took out an old boxed lighting fixture and installed can lights. The old fixture left several good sized holes to patch. In addition, the original installers drilled their holes wrong to begin with. The incorrect holes were hidden until the box lighting was removed.

The hooks would be unobtrusive, but I think this fixture is going to work. It installs/deinstalls pretty quick. It is firm and steady and leaves no trace when taken down. If I get it up and running this weekend I will post pics. Have to figure out how to hang the projector from the thing.
 

Our group had our first session last night with the new set up. Everyone loved it. We are using a Dell 1100MP which I got for $699.00. The projector is hooked to a retail clothing fixture that runs from floor to ceiling with aluminum straps picked up at Home Depot. For now we are projecting onto a piece of white foam core. We are going to grid the foam core for better measuring. I told the guys that the first one to spill salsa or coke on the foam core gets a free ride since we can flip it over. Next guy springs for a new piece of foam core.

We are currently playing WFRP. We are using the Paths of the Damned: Ashes of Middenheim book. I mapped out a section of Middenheim, the sewers and a Skaven den in a set of caverns for the adventure last night. The Neverwinter Nights toolset was used for the maps. I've only played a small part of Neverwinter Nights and lightly experimented with the toolset. Regardless, the maps came out fine. The chimneys in the city had smoke pouring out and the sewers and caverns had water dripping sounds, etc. The players really freaked when they were in the caverns and a rock cave in sound effect went off. The toolset is really as easy to work with as Steel Wind makes it out to be.

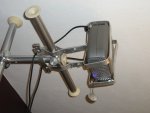
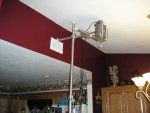
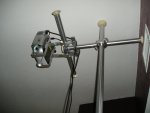
The set up takes about 10 minutes and the same amount of time for the tear down. My wife is happy because the projector stores in a cabinet and the fixture goes to the garage until next meeting. I've attached some pictures. Only one of the actual foam core with a map as we couldn't figure out how to turn off the flash and it kept ruining our pictures.
 

Attachments

  • P1010020.JPG
    P1010020.JPG
    64.3 KB · Views: 276
  • P1010021.JPG
    P1010021.JPG
    62.1 KB · Views: 274
  • P1010022.JPG
    P1010022.JPG
    56.3 KB · Views: 390
  • P1010025.JPG
    P1010025.JPG
    53.5 KB · Views: 243

Nice output on the Dell 1100mp! And the suspension rig is nice too. Well done.

On the NWN map? Hit F11 :) That will go full screen. You'll be much happier with the output. If you prefer to mouse it = its the "Full Screen" option under the view menu.

There is no reason you need the tree menus to the left and right of your battlemap. The arrow controls can remain on the bottom for you to navigate with.
 

Into the Woods

Remove ads

Top