

The original module is somewhat lacking in three points: The first are the hooks. They aren't that imaginative and can't be easily combined, as this would effectively split the party into different subgroups. But that can be worked around via feeding them the hooks one after the other instead giving them all out at once. And this weaving can make the hooks more interesting, too.
The second point is that the first two encounters are too alike. They feel more as a repetition than two truely distinct entities. The third point is that the encounter with Irontooth seems to kill half of the parties. I've seen an analysis that the indiviual monsters are acceptable for a first-level group, but not combined. As I don't want to reduce the number of opponents there (a lair should be heavily guarded) the solution I chose is to bring the party up to level 2 before they fight.
As the amount of XP isn't sufficient to do that with the included encounters (only half of the XP with the mentor hook award) I decided to add some additional encounters in the front and to fix the other mentioned faults, too. So this is my take on KotS - feel free to comment, especially on the DCs and other rulings. This is after all my first game in 4e.
Overview:
The new startpoint is Fallcrest from the DMG. I use the suggestion that both Fallcrest and Winterhaven are in the same campaign world and relatively near to each other. I decided to use Nimozaran the Green to bring the party together.
Nimozaran isn't that rather lonely man described in the DMG but is part of a group named "The Seekers". The group's main interest is to recover old treasure, art and knowledge from the former Nerath empire and finances part of their operations by selling some of their discoveries which either don't find any use or can be copied easily (books are a prime example). The wizard uses for this purpose also Naerumar's Imports.
Nimozaran works with the human explorer Kenric Degol. Kenric departed already with three helpers to a ruin lying in the west of Fallcrest for excavations. As the wizards both fears that Kenric is over his head and suspects some bigger and valuable findings in the ruins, he sought some extra guards for protection and found our heroes. Their task is to bring some extra supplies and return with Kenric, his men and the treasures. Quest XP: 100 per character. Also Nimozaran promises all treasure found except unique items as a reward. For communication purposes the wizards supplies the party with an enchanted mirror, working like a cell, with the exception that Nimozaran is always the person on the other side (for this adventure only).
The group sets out and finds the ruins, which are now occupied by goblins. These goblins captured Kenric and his companions and want them to sell to Bloodreaver clan. Once the players defeated the goblins (encounters detailed below), they find clues about this transaction and others like the one done with the cult of Orcus somewhere in the north. The party should contact Nimozaran with this information.
Nimozaran knows about the rumor of the death cult near Winterhaven, which seems to be true with the new evidence. And this is not all: Douven Staul of the "Find the Mentor"-hook is a friend of the Green Wizard and has sent a letter that he plans an excavation of a dragon burial site near Winterhaven. Nimozaran fears that the goblins might attack the working place of Douven and sends the party both to ensure the safety of Douven and to take care of the death cult, if possible.
As the party is already west of Fallcrest the easiest is to ignore King's Road, avoiding Kobold Hall alltogether. On the road the party has an unrelated fourrth encounter. After the distraction has been dealt with, the first encounter of KotS is modified as follows. Taking the idea of another board member, Ninaran helps with the abduction of child. She leads the kobolds to the kid which put him/her into a bag and transport it towards the cave. It is then when the party crosses the path and attacks. (The area is dense wood with some rocks and grants cover at many places.) Ninaran, hidden under a heavy cloak, flees, hides the cloak and returns to help the party, denying afterwards to have seen a suspicious figure.
After the attack, she suggests to lead the party to the kobold cave. Hopefully, the party decides to visit Winterhaven first, so they can not only deliver the child back, but also talk to Lord Padraig. He says that the characters without having shown their worthiness first he won't ask them to take on the kobolds and that the party should find another quest first. While Lord Padraig doesn't know about Douven Staul, rescuing him is enough to convince him, assuming the party reached level 2.
The rest of the adventure works more or less the same. Below are all the encounters listed which are required to get to Winterhaven. The first encounters have some crude maps associated to them. Monsters are taken from KotS to minimize differences from the MM, when possible:
Goblin Warrior (Level 1 Skirmisher, XP 100, KotS p. 39), Goblin Sharpshooter (Level 2 Artillery, XP 125, KotS p. 38), Goblin Cutter (Level 1 Minion, XP 25, KotS p. 44), Hobgoblin Soldier (Level 3 Soldier, XP 150, KotS p. 64), Hobgoblin Grunt (Level 3 Minion, XP 38, KotS p. 64), Young White Dragon (Level 3 Solo, XP 750, MM p. 84).
Encounters:
There is a Skill Challenge to get to the excavation site after Stalker0 system found here :
The characters receive a map from Nimozaran, but the party doesn't travel there by an easy road. While the destination isn't particularly hidden, unqualified nature travellers need more time to reach the mansion in ruins. The complexity is simply 3 successes/3 failures and the DCs are 14 for easy, 18 for medium and 23 for high. The allowed skills are:
Nature: The most used skill for this task. Success shows you the direction via star constellations and plant growth, as the seemingly easiest way to go from A to B. Failure results in going into the wrong direction or choosing more difficult terrain and dead-ends.
Endurance (Secondary to Nature): If you beat this skill, you manage to keep up with strenuous trekking and don't need so many rests otherwise.
History: You remember an old travel route which fell decades ago into ruins. While overgrown, the route makes it easier to get to your destination.
Athletics (helpful): With this skill you can climb on trees and rocks which helps you to determine your overall direction.
Failure of this skill challenge results that the hobgoblins of the Bloodreaver clan show up, before the party can have an extended rest.
The Area:
The excavation site consists of an old ruined mansion, surrounded by a big wall. It was a big second-story house, but the ceiling caved in long ago, making the upper level of the house unusable. The explorers looked for treasures in the basement, when they were attacked by the goblins.
The goblins made the mansion to their temporary base and let the prisoners dig for further treasures. This resulted in a change of plans: Instead taking the prisoners directly to the hobgoblin clan Bloodreavers, the goblin group sent two of their people to the next slaver group with the message, to come to them. Of course, in their greed the goblins overlooked that the slavers may want to take the treasures for themselves...
First Encounter:
The heroes arrive at the excavation site. There is an outlook - Goblin Sharpshooters - for each gate in the wall (both of which are no more functional). Should the party decide to use Stealth, the goblin use their passive Perception 12 with a -2 penalty if the party is more than 10 squares away. Otherwise they'll notice the party one round after the players moved within 10 squares of their position (assume an arbitrary square on the south/north wall). To notice the outlooks, the party has to beat the Stealth +12 of the sharpshooter who is assumed to take ten (DC 22).
As the sharpshooters have superior cover, their Stealth checks provide them with sufficient protection that beating only the normal DC requires area attacks to have normal hit chance. The uncertainty of their position can be represented by using a 3x3 square of which an arbitrary square holds the goblin. The goblin gains also Combat Advantage against anyone, who can't see him, while any attack rolls from the party suffer from -5 penalty. See PHB page 281 to resolve attacks targetting a square instead a creature.
Once one of the outlooks noticed the party, he calls out for alarm. The second sharpshooter arrives in the second round at the same wall, with its move action already used up. The other goblins below move into an ambush position in the main hall and warn the ones in the basement. The basement staff doesn't come to help, because they want to prevent the escape of the prisoners and aren't enough people to split up.
The goblins in the first story are distributed over the rooms. In the dining room there are two warriors and two cutters. In the living room there are two cutters, as well in bedroom 5. In case of 5 characters, the other warrior and two cutters are in beddroom 1. In case of 6 characters, the last warriors and two cutters are in bedroom 4. It takes them 3 rounds to gather all in the main hall and prepare a few tables as makeshift-cover. Should the party enter the main hall before the three rounds are over, not all goblins will benefit from cover.
Tactics:
The sharpshooters try to kill the party and to prevent that anyone enters the mansion. Two cutters man the main door one square behind it, protecting themselves with tables (shown in map), with the warriors behind them as second line and throw javelins. Once all characters are in the mansion, the sharpshooters descend in one round into the main hall.
Should the party consist of more than 4 characters then the extra goblins leave the building and go around the mansion to flank the party. This takes two, three rounds.
4 players can earn 600 XP:
2 Goblin Sharpshooters: 125 XP each.
2 Goblin Warriors: 100 XP each.
6 Goblin Cutters: 25 XP each.
5 players can earn 750 XP:
2 Goblin Sharpshooters: 125 XP each.
3 Goblin Warriors: 100 XP each.
8 Goblin Cutters: 25 XP each.
6 players can earn 900 XP:
2 Goblin Sharpshooters: 125 XP each.
4 Goblin Warriors: 100 XP each.
10 Goblin Cutters: 25 XP each.
Features of the Area
The Second Story: The contents of the rooms rot since the ceiling caved in and are worthless. The few things capable to withstand the weather have been looted long ago.
The First Story: The goblins have searched the rooms, but came also here too late. The rooms have been converted for use in a makeshift manner. The main hall especially has been turned into a stopping point for attackers.
Treasure: The goblins have only 7 gp and 16 sp.
Second Encounter:
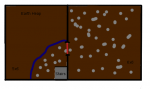
The goblins in the basement will always be prepared against the players. The basement consists of two rooms which have emptied to allow the excavations. The room with the stairs contains a faily big heap of dirt, people can still stand on and in which some treasure has been buried (being another reason why the goblins below don't go upstairs). It takes a balance check of DC 15 to get on it and counts as obstacle for people on the floor. The obstacle area is marked with blue.
The second is basically a big pit, where the explorers are kept as slaves. The red line marks where the floor drops 5 feet down. A character has to succeed a Perception check of DC 15 to notice the height difference. If a character moves normally while knowing of the lack of earth, he can jump down without going prone when succeeding an Athletics check with a DC of 10. Not knowing or running while knowing increases the DC to 15. Not knowing and running increases the DC to 20. The entire basement is difficult terrain.
Tactics:
Depending, how much you want to challenge your players, the positions of the goblins are different. Really difficult, with a potential for a TPK is put all goblins around the stairs and force the party to enter one by one the room. The unlucky first has either to fight three enemies at once or to bull rush one of three into another space to make the stairs free for the next one. Despite being capable to bull rush enemies into border square of the earth heap (Athletics check DC of 15 to prevent ending prone), this tactic doesn't work very well, as the first receives due to the bull rush enough opportunity attacks to go down. The only chance for the player are using area attacks or breaking up the formation like through setting a few squares on fire.
An easier way is to split the enemies up due to a prisoner revolt. Kenric and his men notice that the party comes down. They managed to free themselves and attack in the right moment via thrown dirt-filled buckets the goblins standing in front of the door. Two of the goblins have to move into the digging room and fight the prisoners who can use only improvised weaponry like shovels. This adds to the urgency to remove the obstacles so the prisoners don't die. For the more dramatic inclined GMs this is a good opportunity to spice things up via a short "cutscene".
Once the prisoners are freed they explain that they have been forced to work on the excavation and that the slavers, to whom they wold have been sold, will arrive shortly.
4 players can earn 500 XP:
2 Hobgoblin Soldiers: 150 XP each.
3 Goblin Warriors: 100 XP each.
5 players can earn 650 XP:
3 Hobgoblin Soldiers: 150 XP each.
3 Goblin Warriors: 100 XP each.
6 players can earn 800 XP:
4 Hobgoblin Soldiers: 150 XP each.
2 Goblin Warriors: 100 XP each.
Features of the Area
Big Heap of Dirt: The result of the excavations in the other room.
Treasure:
Razor Armor (Level 2, 520 gp)
Jutting spikes and sharp edges cover each scale set into this armor.
Armor: Scale
Enhancement: AC +1
Property: When an enemy scores a melee critical hit against you, that enemy takes 1d10 + Dexterity modifier damage.
The armor is hidden in the earth heap. One of the explorers saw the hobgoblins hiding it, so should at least one of the survive they can tell the party where to look for.
8 gp and 13 sp.
Some books which should belong to Kenric.
Other small, pretty much worthless trinkets.
Third Encounter:
Here the players have to deal with the Bloodreaver clan. Depending on if they succeeded the Skill Challenge to reach the excavation site quickly the party can have an extended rest. Otherwise they have to deal with the new arrivals without their dailies. As the players can use the same tactics as the goblins to defend the mansion, the tactics for the enemies has to be adjusted on the fly. But basically the goblins try to take the characters out as fast as possible.
4 players can earn 614 XP:
2 Hobgoblin Soldiers: 150 XP each.
2 Goblin Warriors: 100 XP each.
3 Hobgoblin Grunts: 38 XP each.
5 players can earn 752 XP:
2 Hobgoblin Soldiers: 150 XP each.
3 Goblin Warriors: 100 XP each.
4 Hobgoblin Grunts: 38 XP each.
6 players can earn 904 XP:
2 Hobgoblin Soldiers: 150 XP each.
3 Goblin Warriors: 100 XP each.
8 Hobgoblin Grunts: 38 XP each.
Treasure: Amulet of Health Level 3, 117 gp, 45 sp and 2 healing potions.
Amulet of Health (Level 3, 680 gp)
This golden amulet increases your defenses and resists poison.
Item Slot: Neck
Enhancement: Fortitude, Reflex, and Will each by +1
Property: Gain resist 5 poison.
The leader also has note with a map which details that after they fetched the prisoners, they should go to the Keep on the Shadowfell and get another batch of slaves from the Cult of Orcus. The players should contact Nimozaran and sent to Winterhaven. Kenric and his people insist on going back to Fallcrest alone, so the party can help as soon as possible.
Fourth Encounter:
This can happen anytime on the way. A young white dragon will attack the party. Adjust its level by one, if the party has 4 or 6 members. Increase/decrease its attack rolls, defenses, and AC by 1. The treasure has been rolled into the third encounter already. For the map you could use the King's Road map and pretend that the road is grass.
The second point is that the first two encounters are too alike. They feel more as a repetition than two truely distinct entities. The third point is that the encounter with Irontooth seems to kill half of the parties. I've seen an analysis that the indiviual monsters are acceptable for a first-level group, but not combined. As I don't want to reduce the number of opponents there (a lair should be heavily guarded) the solution I chose is to bring the party up to level 2 before they fight.
As the amount of XP isn't sufficient to do that with the included encounters (only half of the XP with the mentor hook award) I decided to add some additional encounters in the front and to fix the other mentioned faults, too. So this is my take on KotS - feel free to comment, especially on the DCs and other rulings. This is after all my first game in 4e.
Overview:
The new startpoint is Fallcrest from the DMG. I use the suggestion that both Fallcrest and Winterhaven are in the same campaign world and relatively near to each other. I decided to use Nimozaran the Green to bring the party together.
Nimozaran isn't that rather lonely man described in the DMG but is part of a group named "The Seekers". The group's main interest is to recover old treasure, art and knowledge from the former Nerath empire and finances part of their operations by selling some of their discoveries which either don't find any use or can be copied easily (books are a prime example). The wizard uses for this purpose also Naerumar's Imports.
Nimozaran works with the human explorer Kenric Degol. Kenric departed already with three helpers to a ruin lying in the west of Fallcrest for excavations. As the wizards both fears that Kenric is over his head and suspects some bigger and valuable findings in the ruins, he sought some extra guards for protection and found our heroes. Their task is to bring some extra supplies and return with Kenric, his men and the treasures. Quest XP: 100 per character. Also Nimozaran promises all treasure found except unique items as a reward. For communication purposes the wizards supplies the party with an enchanted mirror, working like a cell, with the exception that Nimozaran is always the person on the other side (for this adventure only).
The group sets out and finds the ruins, which are now occupied by goblins. These goblins captured Kenric and his companions and want them to sell to Bloodreaver clan. Once the players defeated the goblins (encounters detailed below), they find clues about this transaction and others like the one done with the cult of Orcus somewhere in the north. The party should contact Nimozaran with this information.
Nimozaran knows about the rumor of the death cult near Winterhaven, which seems to be true with the new evidence. And this is not all: Douven Staul of the "Find the Mentor"-hook is a friend of the Green Wizard and has sent a letter that he plans an excavation of a dragon burial site near Winterhaven. Nimozaran fears that the goblins might attack the working place of Douven and sends the party both to ensure the safety of Douven and to take care of the death cult, if possible.
As the party is already west of Fallcrest the easiest is to ignore King's Road, avoiding Kobold Hall alltogether. On the road the party has an unrelated fourrth encounter. After the distraction has been dealt with, the first encounter of KotS is modified as follows. Taking the idea of another board member, Ninaran helps with the abduction of child. She leads the kobolds to the kid which put him/her into a bag and transport it towards the cave. It is then when the party crosses the path and attacks. (The area is dense wood with some rocks and grants cover at many places.) Ninaran, hidden under a heavy cloak, flees, hides the cloak and returns to help the party, denying afterwards to have seen a suspicious figure.
After the attack, she suggests to lead the party to the kobold cave. Hopefully, the party decides to visit Winterhaven first, so they can not only deliver the child back, but also talk to Lord Padraig. He says that the characters without having shown their worthiness first he won't ask them to take on the kobolds and that the party should find another quest first. While Lord Padraig doesn't know about Douven Staul, rescuing him is enough to convince him, assuming the party reached level 2.
The rest of the adventure works more or less the same. Below are all the encounters listed which are required to get to Winterhaven. The first encounters have some crude maps associated to them. Monsters are taken from KotS to minimize differences from the MM, when possible:
Goblin Warrior (Level 1 Skirmisher, XP 100, KotS p. 39), Goblin Sharpshooter (Level 2 Artillery, XP 125, KotS p. 38), Goblin Cutter (Level 1 Minion, XP 25, KotS p. 44), Hobgoblin Soldier (Level 3 Soldier, XP 150, KotS p. 64), Hobgoblin Grunt (Level 3 Minion, XP 38, KotS p. 64), Young White Dragon (Level 3 Solo, XP 750, MM p. 84).
Encounters:
There is a Skill Challenge to get to the excavation site after Stalker0 system found here :
The characters receive a map from Nimozaran, but the party doesn't travel there by an easy road. While the destination isn't particularly hidden, unqualified nature travellers need more time to reach the mansion in ruins. The complexity is simply 3 successes/3 failures and the DCs are 14 for easy, 18 for medium and 23 for high. The allowed skills are:
Nature: The most used skill for this task. Success shows you the direction via star constellations and plant growth, as the seemingly easiest way to go from A to B. Failure results in going into the wrong direction or choosing more difficult terrain and dead-ends.
Endurance (Secondary to Nature): If you beat this skill, you manage to keep up with strenuous trekking and don't need so many rests otherwise.
History: You remember an old travel route which fell decades ago into ruins. While overgrown, the route makes it easier to get to your destination.
Athletics (helpful): With this skill you can climb on trees and rocks which helps you to determine your overall direction.
Failure of this skill challenge results that the hobgoblins of the Bloodreaver clan show up, before the party can have an extended rest.
The Area:
The excavation site consists of an old ruined mansion, surrounded by a big wall. It was a big second-story house, but the ceiling caved in long ago, making the upper level of the house unusable. The explorers looked for treasures in the basement, when they were attacked by the goblins.
The goblins made the mansion to their temporary base and let the prisoners dig for further treasures. This resulted in a change of plans: Instead taking the prisoners directly to the hobgoblin clan Bloodreavers, the goblin group sent two of their people to the next slaver group with the message, to come to them. Of course, in their greed the goblins overlooked that the slavers may want to take the treasures for themselves...
First Encounter:
The heroes arrive at the excavation site. There is an outlook - Goblin Sharpshooters - for each gate in the wall (both of which are no more functional). Should the party decide to use Stealth, the goblin use their passive Perception 12 with a -2 penalty if the party is more than 10 squares away. Otherwise they'll notice the party one round after the players moved within 10 squares of their position (assume an arbitrary square on the south/north wall). To notice the outlooks, the party has to beat the Stealth +12 of the sharpshooter who is assumed to take ten (DC 22).
As the sharpshooters have superior cover, their Stealth checks provide them with sufficient protection that beating only the normal DC requires area attacks to have normal hit chance. The uncertainty of their position can be represented by using a 3x3 square of which an arbitrary square holds the goblin. The goblin gains also Combat Advantage against anyone, who can't see him, while any attack rolls from the party suffer from -5 penalty. See PHB page 281 to resolve attacks targetting a square instead a creature.
Once one of the outlooks noticed the party, he calls out for alarm. The second sharpshooter arrives in the second round at the same wall, with its move action already used up. The other goblins below move into an ambush position in the main hall and warn the ones in the basement. The basement staff doesn't come to help, because they want to prevent the escape of the prisoners and aren't enough people to split up.
The goblins in the first story are distributed over the rooms. In the dining room there are two warriors and two cutters. In the living room there are two cutters, as well in bedroom 5. In case of 5 characters, the other warrior and two cutters are in beddroom 1. In case of 6 characters, the last warriors and two cutters are in bedroom 4. It takes them 3 rounds to gather all in the main hall and prepare a few tables as makeshift-cover. Should the party enter the main hall before the three rounds are over, not all goblins will benefit from cover.
Tactics:
The sharpshooters try to kill the party and to prevent that anyone enters the mansion. Two cutters man the main door one square behind it, protecting themselves with tables (shown in map), with the warriors behind them as second line and throw javelins. Once all characters are in the mansion, the sharpshooters descend in one round into the main hall.
Should the party consist of more than 4 characters then the extra goblins leave the building and go around the mansion to flank the party. This takes two, three rounds.
4 players can earn 600 XP:
2 Goblin Sharpshooters: 125 XP each.
2 Goblin Warriors: 100 XP each.
6 Goblin Cutters: 25 XP each.
5 players can earn 750 XP:
2 Goblin Sharpshooters: 125 XP each.
3 Goblin Warriors: 100 XP each.
8 Goblin Cutters: 25 XP each.
6 players can earn 900 XP:
2 Goblin Sharpshooters: 125 XP each.
4 Goblin Warriors: 100 XP each.
10 Goblin Cutters: 25 XP each.
Features of the Area
The Second Story: The contents of the rooms rot since the ceiling caved in and are worthless. The few things capable to withstand the weather have been looted long ago.
The First Story: The goblins have searched the rooms, but came also here too late. The rooms have been converted for use in a makeshift manner. The main hall especially has been turned into a stopping point for attackers.
Treasure: The goblins have only 7 gp and 16 sp.
Second Encounter:
The goblins in the basement will always be prepared against the players. The basement consists of two rooms which have emptied to allow the excavations. The room with the stairs contains a faily big heap of dirt, people can still stand on and in which some treasure has been buried (being another reason why the goblins below don't go upstairs). It takes a balance check of DC 15 to get on it and counts as obstacle for people on the floor. The obstacle area is marked with blue.
The second is basically a big pit, where the explorers are kept as slaves. The red line marks where the floor drops 5 feet down. A character has to succeed a Perception check of DC 15 to notice the height difference. If a character moves normally while knowing of the lack of earth, he can jump down without going prone when succeeding an Athletics check with a DC of 10. Not knowing or running while knowing increases the DC to 15. Not knowing and running increases the DC to 20. The entire basement is difficult terrain.
Tactics:
Depending, how much you want to challenge your players, the positions of the goblins are different. Really difficult, with a potential for a TPK is put all goblins around the stairs and force the party to enter one by one the room. The unlucky first has either to fight three enemies at once or to bull rush one of three into another space to make the stairs free for the next one. Despite being capable to bull rush enemies into border square of the earth heap (Athletics check DC of 15 to prevent ending prone), this tactic doesn't work very well, as the first receives due to the bull rush enough opportunity attacks to go down. The only chance for the player are using area attacks or breaking up the formation like through setting a few squares on fire.
An easier way is to split the enemies up due to a prisoner revolt. Kenric and his men notice that the party comes down. They managed to free themselves and attack in the right moment via thrown dirt-filled buckets the goblins standing in front of the door. Two of the goblins have to move into the digging room and fight the prisoners who can use only improvised weaponry like shovels. This adds to the urgency to remove the obstacles so the prisoners don't die. For the more dramatic inclined GMs this is a good opportunity to spice things up via a short "cutscene".
Once the prisoners are freed they explain that they have been forced to work on the excavation and that the slavers, to whom they wold have been sold, will arrive shortly.
4 players can earn 500 XP:
2 Hobgoblin Soldiers: 150 XP each.
3 Goblin Warriors: 100 XP each.
5 players can earn 650 XP:
3 Hobgoblin Soldiers: 150 XP each.
3 Goblin Warriors: 100 XP each.
6 players can earn 800 XP:
4 Hobgoblin Soldiers: 150 XP each.
2 Goblin Warriors: 100 XP each.
Features of the Area
Big Heap of Dirt: The result of the excavations in the other room.
Treasure:
Razor Armor (Level 2, 520 gp)
Jutting spikes and sharp edges cover each scale set into this armor.
Armor: Scale
Enhancement: AC +1
Property: When an enemy scores a melee critical hit against you, that enemy takes 1d10 + Dexterity modifier damage.
The armor is hidden in the earth heap. One of the explorers saw the hobgoblins hiding it, so should at least one of the survive they can tell the party where to look for.
8 gp and 13 sp.
Some books which should belong to Kenric.
Other small, pretty much worthless trinkets.
Third Encounter:
Here the players have to deal with the Bloodreaver clan. Depending on if they succeeded the Skill Challenge to reach the excavation site quickly the party can have an extended rest. Otherwise they have to deal with the new arrivals without their dailies. As the players can use the same tactics as the goblins to defend the mansion, the tactics for the enemies has to be adjusted on the fly. But basically the goblins try to take the characters out as fast as possible.
4 players can earn 614 XP:
2 Hobgoblin Soldiers: 150 XP each.
2 Goblin Warriors: 100 XP each.
3 Hobgoblin Grunts: 38 XP each.
5 players can earn 752 XP:
2 Hobgoblin Soldiers: 150 XP each.
3 Goblin Warriors: 100 XP each.
4 Hobgoblin Grunts: 38 XP each.
6 players can earn 904 XP:
2 Hobgoblin Soldiers: 150 XP each.
3 Goblin Warriors: 100 XP each.
8 Hobgoblin Grunts: 38 XP each.
Treasure: Amulet of Health Level 3, 117 gp, 45 sp and 2 healing potions.
Amulet of Health (Level 3, 680 gp)
This golden amulet increases your defenses and resists poison.
Item Slot: Neck
Enhancement: Fortitude, Reflex, and Will each by +1
Property: Gain resist 5 poison.
The leader also has note with a map which details that after they fetched the prisoners, they should go to the Keep on the Shadowfell and get another batch of slaves from the Cult of Orcus. The players should contact Nimozaran and sent to Winterhaven. Kenric and his people insist on going back to Fallcrest alone, so the party can help as soon as possible.
Fourth Encounter:
This can happen anytime on the way. A young white dragon will attack the party. Adjust its level by one, if the party has 4 or 6 members. Increase/decrease its attack rolls, defenses, and AC by 1. The treasure has been rolled into the third encounter already. For the map you could use the King's Road map and pretend that the road is grass.

") Considering that most of my DMing experience is still with AD&D (I've been mostly a player so far), it was quite easy. I can still remember an adventure where I gave thieves different swords but in the end made things only more complicated, not more fun. 4e does reward the use of different monsters.
Considering that most of my DMing experience is still with AD&D (I've been mostly a player so far), it was quite easy. I can still remember an adventure where I gave thieves different swords but in the end made things only more complicated, not more fun. 4e does reward the use of different monsters.