
Nemesis Destiny
Adventurer
Encounter B1, B2, and B3
Following the barrow mound, the group met with the elves again, securing their allegiance. Shortly after, they received the emissary of the rebel forces, as in the module.
Instead of using an NPC they'd never met or interacted with before, I used one of Reithann's acolytes, Theren. I had him show up in Wild Shaped form, then change into his human self to deliver the message before moving on to "warn the other loyal Harkenwolders."
He gave them the deadline and they decided to use their allotted time efficiently. They figured out that there was enough time to visit both Marl and Dardun to gather more allies and inspire the villagers to fight bravely in defence of their homeland.
The group also did another "storykill mode" battle in here against a column of retreating Iron Circle warriors, who were mostly on foot. The PCs used the speed their horses provided along with their captured Iron Circle disguises to ride in close and kill a few of the enemy and demoralizing the rest, before riding off over the next hill. It was pretty fun.
Anyway, because of that, they didn't see much point in taking part in B1 as laid out in the book, and considering the effort they went to, I think that what they did instead is a fair subsitute. I awarded them full experience and victory points for it.
When it came time to talk tactics, they had their own minds made up about what they wanted to do, and no amount of urging from an NPC would have changed their minds. I know my group well enough for that, and any attempt I had made would have felt cheap and railroady, so I just adapted to what they wanted to do.
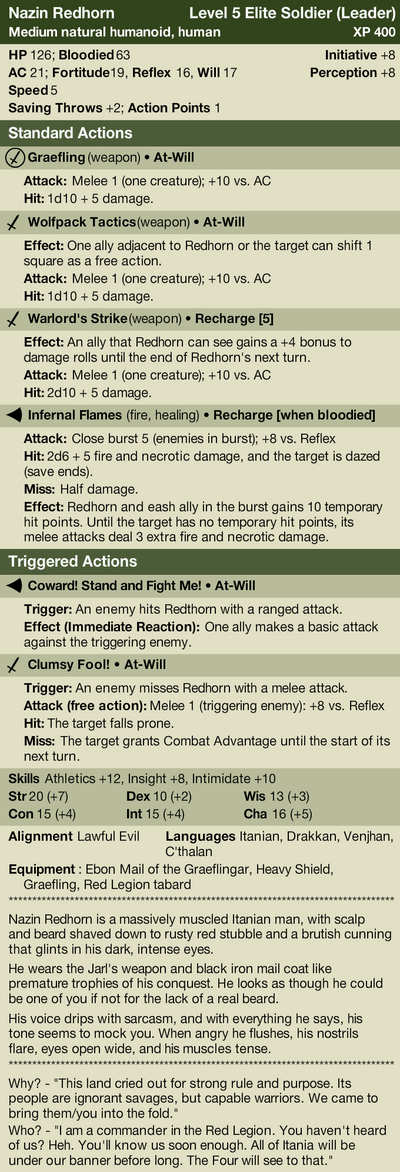
Their big plan was to split the party - half the group, the strikers, wanted to be on the front line, while the other half, the leader, controller, and defender, wanted to alpha-strike on Nazin's entourage. This proved to be a surprising challenge to the group.
Given how easily the group had blown through most of the "stock" encounters in this module, I figured that even at half strength, they had a fair chance at creaming these encounters. I was so wrong.
The way I decided to do it, was have the striker group take on B2, and the others take on B3. I had the players not involved in a given fight playing the monsters. This was a fun change of pace, except that in the case of my group, the players playing the strikers were inexperienced and/or subpar tacticians, while the other three players were all veterans and decent tactically.
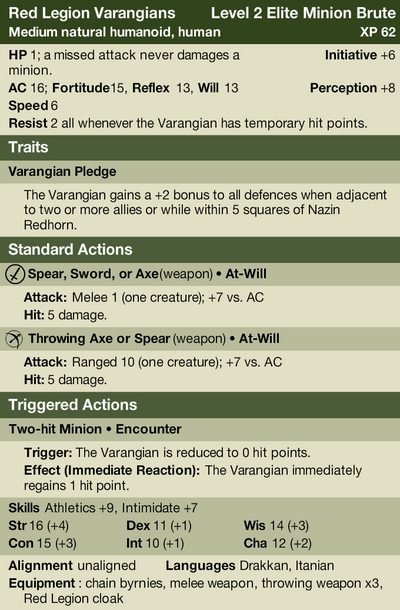
So as a result, B2 was very nearly a wipe. I ran the encounter completely stock. The last enemy (a minion) fled with the last PC standing at 1hp! That was close. And we all thought he was a goner. He had to pull out all the stops and go completely nova, and use his Do Something Cool power.
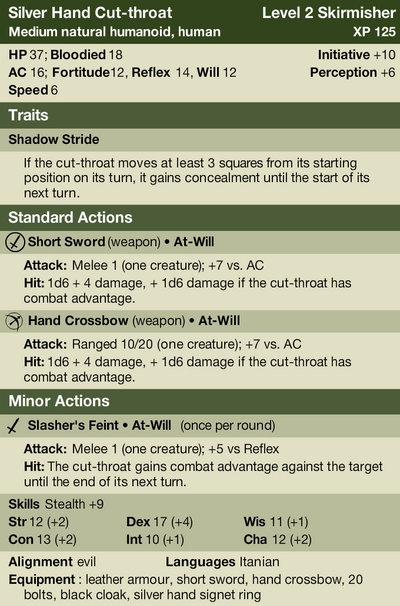
B3 was less close, but probably more annoying. It took a lot longer, and I spent a lot of time helping the players controllng the monsters make their moves and whatnot. And the poor guy controlling the Dark Adept; his charge was killed in the first round, so he sat most of the last half of the session doing nothing. For this fight, I replaced the Iron Circle Cutthroats with a concoction of my own that tied into campaign background, Silver Hand Assassins! The Silver Hand is a legendary assassins' guild that nobody is even sure exists, not even the DMs of the setting.")

Mechanically, the change was pretty minor; they gained a bonus to Initiative, Perception, and the ability to do bonus damage with their crossbow attacks as well. They almost got away.
Following the barrow mound, the group met with the elves again, securing their allegiance. Shortly after, they received the emissary of the rebel forces, as in the module.
Instead of using an NPC they'd never met or interacted with before, I used one of Reithann's acolytes, Theren. I had him show up in Wild Shaped form, then change into his human self to deliver the message before moving on to "warn the other loyal Harkenwolders."
He gave them the deadline and they decided to use their allotted time efficiently. They figured out that there was enough time to visit both Marl and Dardun to gather more allies and inspire the villagers to fight bravely in defence of their homeland.
The group also did another "storykill mode" battle in here against a column of retreating Iron Circle warriors, who were mostly on foot. The PCs used the speed their horses provided along with their captured Iron Circle disguises to ride in close and kill a few of the enemy and demoralizing the rest, before riding off over the next hill. It was pretty fun.
Anyway, because of that, they didn't see much point in taking part in B1 as laid out in the book, and considering the effort they went to, I think that what they did instead is a fair subsitute. I awarded them full experience and victory points for it.
When it came time to talk tactics, they had their own minds made up about what they wanted to do, and no amount of urging from an NPC would have changed their minds. I know my group well enough for that, and any attempt I had made would have felt cheap and railroady, so I just adapted to what they wanted to do.
Their big plan was to split the party - half the group, the strikers, wanted to be on the front line, while the other half, the leader, controller, and defender, wanted to alpha-strike on Nazin's entourage. This proved to be a surprising challenge to the group.
Given how easily the group had blown through most of the "stock" encounters in this module, I figured that even at half strength, they had a fair chance at creaming these encounters. I was so wrong.
The way I decided to do it, was have the striker group take on B2, and the others take on B3. I had the players not involved in a given fight playing the monsters. This was a fun change of pace, except that in the case of my group, the players playing the strikers were inexperienced and/or subpar tacticians, while the other three players were all veterans and decent tactically.
So as a result, B2 was very nearly a wipe. I ran the encounter completely stock. The last enemy (a minion) fled with the last PC standing at 1hp! That was close. And we all thought he was a goner. He had to pull out all the stops and go completely nova, and use his Do Something Cool power.
B3 was less close, but probably more annoying. It took a lot longer, and I spent a lot of time helping the players controllng the monsters make their moves and whatnot. And the poor guy controlling the Dark Adept; his charge was killed in the first round, so he sat most of the last half of the session doing nothing. For this fight, I replaced the Iron Circle Cutthroats with a concoction of my own that tied into campaign background, Silver Hand Assassins! The Silver Hand is a legendary assassins' guild that nobody is even sure exists, not even the DMs of the setting.
Mechanically, the change was pretty minor; they gained a bonus to Initiative, Perception, and the ability to do bonus damage with their crossbow attacks as well. They almost got away.
Last edited:


")


