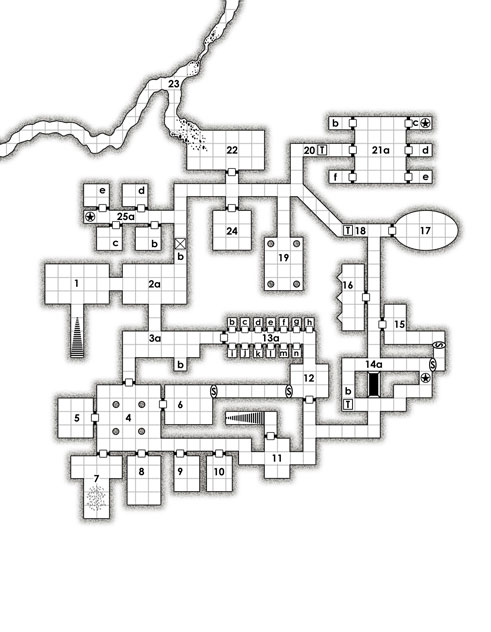
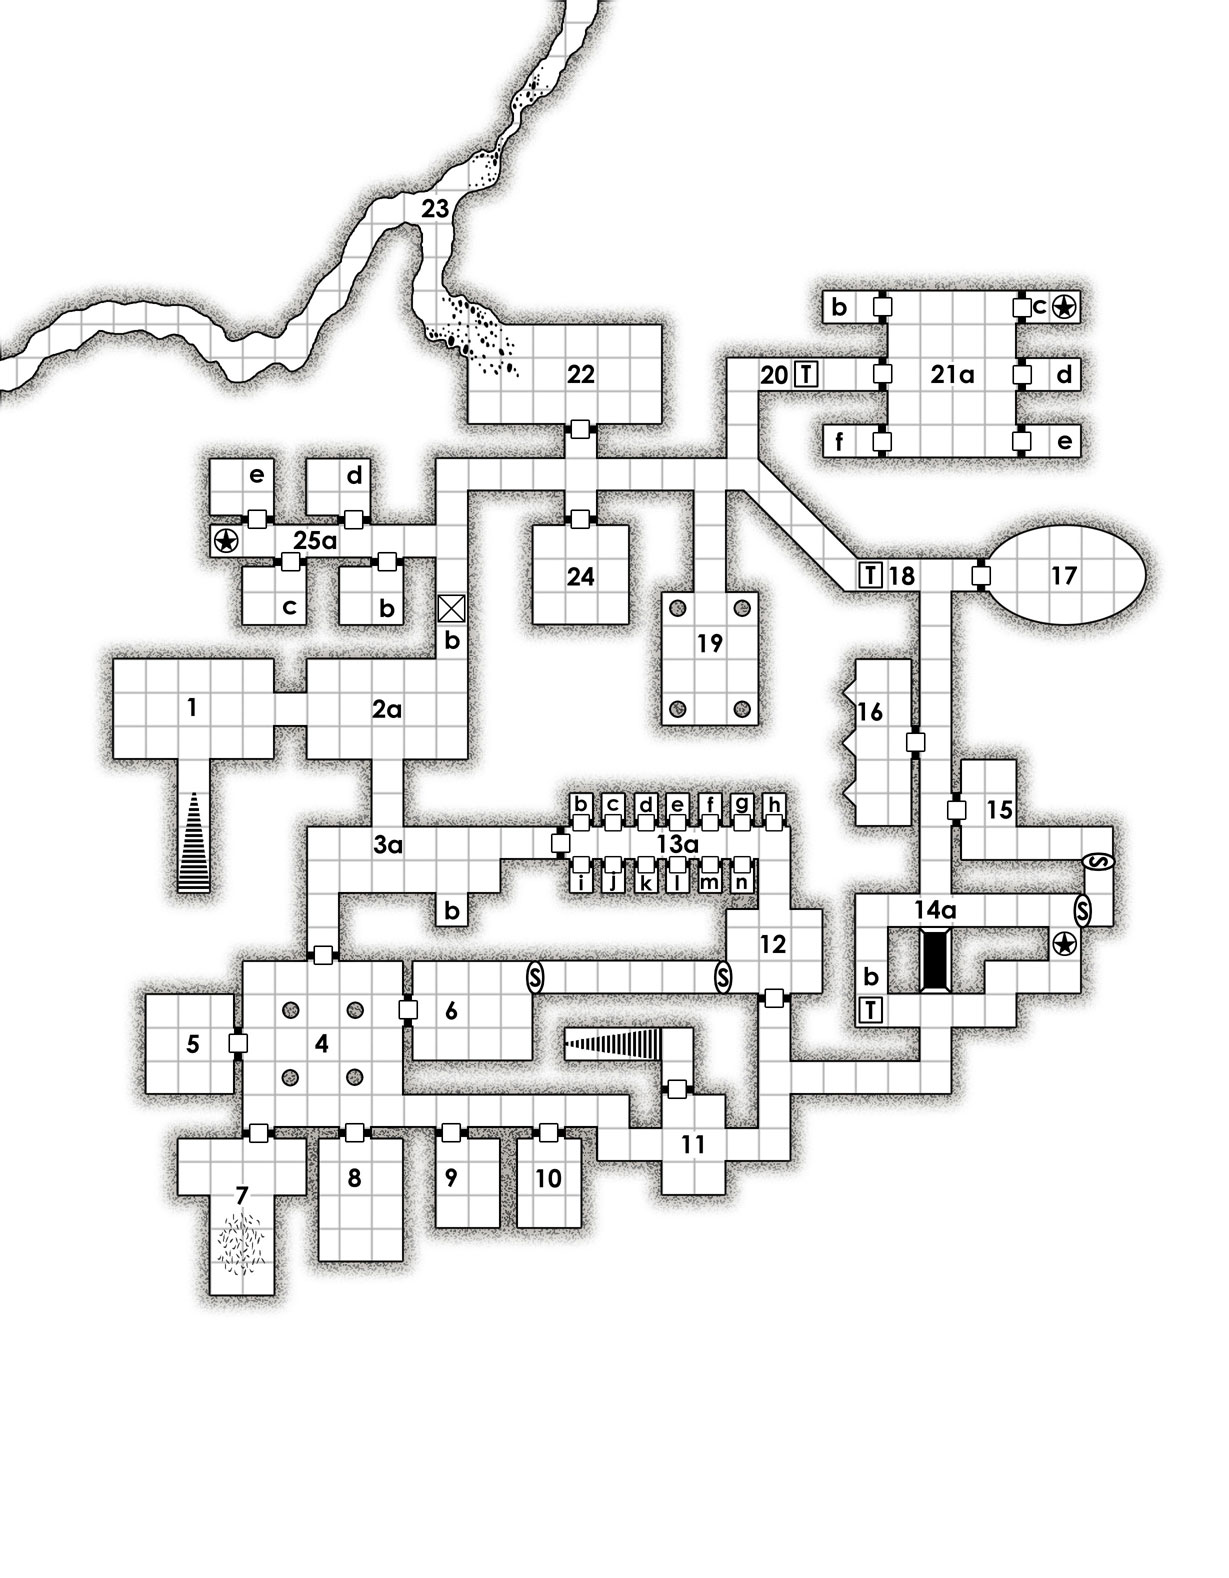
The Jebli Pit - Level 1
Here is the map for the first level of the Jebli (goblin) Pit. Click to enlarge. I used this as one of my
Friday Freebie maps but it originated from my campaign.
 Dungeon Background
The dungeon was originally built by a cult of Asmodeus known as The Devil's Hand. It is a name that they shared with their dungeon. The cult was forced to flee when their dungeon was invaded by goblinoids. Since the cult was driven from the dungeon, it has been known simply as the Jebli Pit (“Goblin pit” in Neblin).
The Devil's Hand has begun to return to their dungeon. They spent five years waiting for the right moment. The stars are right and the cult leader (Ebenezer Black) has sworn to return to their refuge to reclaim their lost territory. His command was heard by the cult's followers and they have begun returning to their true seat of power.
Meanwhile the goblins had begun to change the dungeon to suit their needs (well, until the PC party arrived who put a dent in the goblin and cult's plans).
Dungeon Key
1. Entrance Chamber: Has a falling net trap over the bottom of the stairs.
2. a) Goblin Guard Post: It was the goblin guard post until the PCs showed up and killed a bunch of them. When the party left the dungeon and came back at a later date, they found three of the goblins had been crucified upside down and spiked up against the eastern wall. These goblins were punished by their hobgoblin masters for not stopping the PCs the first time.
2. b) Pit Trap: 20 foot deep pit. It hasn't been activated in some time so it is covered with a thick layer of dust.
3. a) Goblin Training Hall: They practice their combat and animal training here.
3. b) Giant Rat Nest
4. Goblin Hall
5. Food Storage
6. First Chosen Barracks: This room has been ransacked and only shredded remains are left. It used to be the private room for Gakshuk, the First Chosen of Maglubiyet (Goblin Cleric 2). Since being killed, various "normal" goblins have ransacked and destroyed the room as a sign of revenge against a rival who once dominated them but proved to be weak when he was killed by the party. I plan on posting my write-ups for him and his followers in a later post.
7. Goblin Battlebeast Pens: What the goblins call battlebeasts are actually dimetrodons.
8. Goblin Barracks
9. Torture Chamber: Dried blood and fragments of humanoid flesh coats the floor and walls. Unknown to the goblins, under the coating of past sacrifices is a pentagram drawn in human blood. The Cult of Asmodeus originally used this room for their own sacrifices. The symbol of Asmodeus (three black triangles on a red background) still decorates the southern wall.
10. Chosen of Maglubiyet Barracks: The followers of the First Chosen, Gakshuk, use this quarters as their barracks.
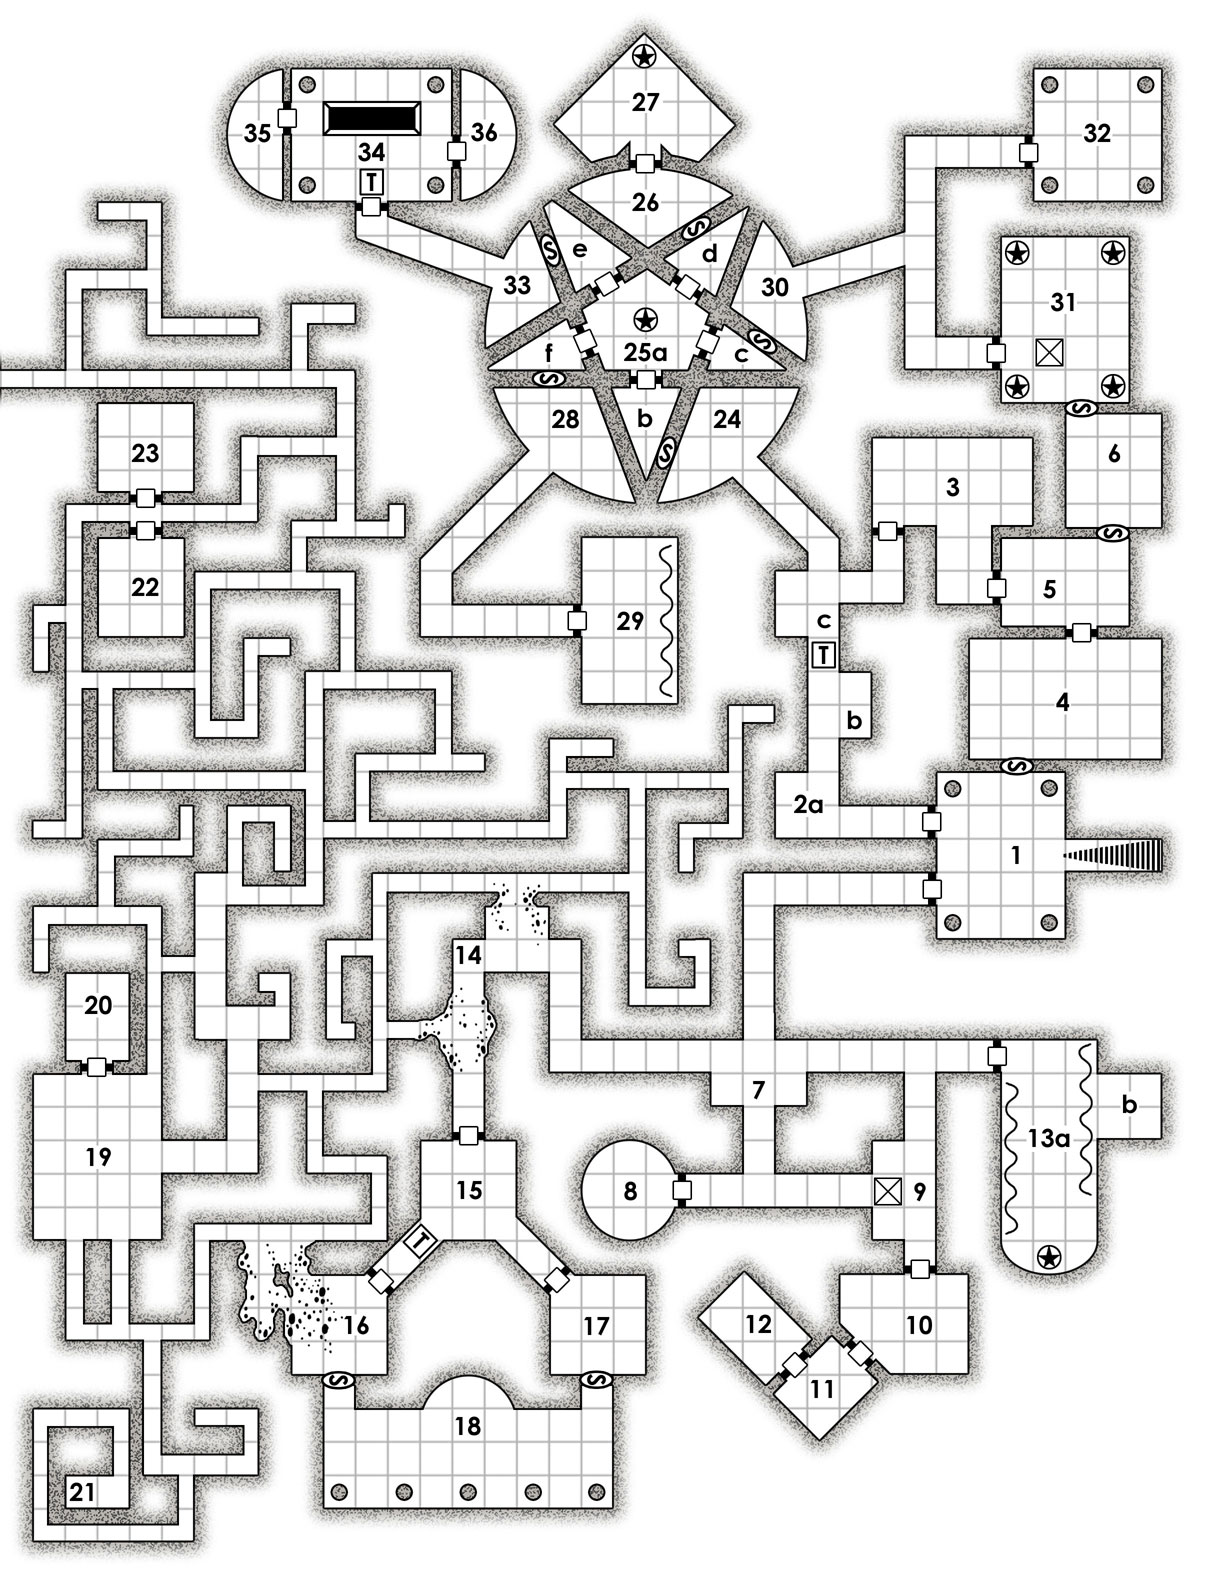
11. Delve Deeper: This post guards the stairs to the second level. The door was originally locked and there were goblins on guard duty here. Since the party's most recent return to the dungeon, they found this room to have slaughtered goblins lying on the floor and the door had been bashed open from the other side (from minotaur skeletons from the 2nd level).
12. Guard Post: Now empty since the previous goblins had abandoned it.
13. The Cells: The goblins used these to keep their captives (including the two human merchants that the party were searching for). Cells d and e had zombies in them. The zombies originated from the 2nd level and were rounded up and locked away. A futile effort since unknown to the goblins there is a strange spire that animates the dead on the 2nd level.
14. a) Open Pit: 10' x 20' and 10' deep with spikes on the bottom.
14. b) Poison dart trap
14. c) Statue: A white marble statue of Asmodeus blocks the corridor.
15. Webbed Chamber: The door is missing its top half. The room is filled with massive webs. An occult symbol has been painted on the eastern wall. The symbol consists of three inverted triangles arranged in a long triangle (the symbol of Asmodeus). A pair of giant spiders have turned the room into its lair. Hidden in a webbed chest are 1,000 sp, 110 gp, 4 50gp gems, potion of greater healing, potion of hill giant strength, and a bone scroll case containing a spell scroll (2nd level cleric spell: Aid).
16. Hell Furnace: There are three groves in the western wall, each with a single bright orange and red flame. The whole room is bathed in bright light. Exposure to any of the flames causes 1d10 burning damage. Constitution saving throw versus DC 15. Failure means the wound cannot be healed by magic.
17. Judgment Chamber: This chamber has a iron door (AC 19, 18 hp). Strength DC 20 to force the door open. The metal door will slam shut if it isn't restrained in some way. Once closed, it won't open again until a minute has passed and judgment has been delivered (via the enchanted smoke has its effect). Along the bottom of the chamber walls are eight small holes. When the door is closed, smoke and fumes will flood the chamber. A Constitution saving throw versus DC 16 is required. Those that make their saving throws will gain fire resistance for 24 hours. Those that fail become vulnerable to fire for the next 24 hours. Once blessed with resistance against fire, the creature cannot use the fumes again until a month has passed.
18. Giant Spider Webs: Hidden in the webs, about a foot above, the floor is a +1 light crossbow bolt snagged in the web strands.
19. Webbed Chamber: Webs stretch from pillar to pillar. A human skeleton lies on the stone floor in the centre of the room. It is devoid of any clothing or items. The bones have been chewed on by some creature(s) (by ghouls actually).
20. Flaming Oil Trap
21. a) The Devil's Hand Treasury: The chamber is now empty.
21. b) Trapped Door: Poison dart trap on the door.
21. c) Devil Statue: A crimson red statue of a Pit Fiend devil stands at the back of this small room. Its wings are swooped forward with its arms raised into the air. Its eyes burn with flames and its mouth is open. The statue breathes fire on those who step into the room. The trap activates when more than 20 pounds of weight is placed on the pressure plate, causing the statue to release a 20-foot long line of fire. Each creature in the line of fire must make a DC 14 Dexterity saving throw, taking 11 (2d10) fire damage on a failed save, or half as much damage on a successful one.
21. d) Poisonous Gas Trap: The Gas is activated when the door is opened. All within 10' of the door must make a DC 15 Constitution saving throw or else take 11 (2d10) damage on a failed save and half on a successful one.
21. e) Treasure Chest: Hidden under a mouldy tarp is a hardwood chest with iron braces (AC 17, 12 hp). The chest is locked and the bone key is in the possession of Ebenezer Black (cult leader). The chest is the treasure of the Devil's Hand. It is one of the main reasons why Ebenezer is so keen to return to the dungeon. Inside the chest are 23 cp, 1100 sp, 80 gp, black velvet mask stitched with silver thread (20 gp), gold locket with a painted portrait inside (25 gp), 1 small gold bracelet (30 gp), a Bard spell scroll (level 1) Heroism in a bone scroll case, and a ring of feather falling. The portrait in the locket is of a young (early 20s) human woman with long black hair and is wearing lots of jewellery. She is the Lady Zenadra Del Rooz, a baroness from the Duchy of Ernst.
21. f) Locked Door: Empty room.
22. Ghouls: A pair of ghouls have entered this room via the goblin tunnel (see #23). They are searching for a new source of food.
23. Goblin Tunnel: The tunnel that leads north continues until they reach a goblin warren about a mile away. The south end tunnel eventually leads outdoors in a small wood.
24. Occult Library: The heavy wooden door to this room is locked and trapped with a poison needle. The valuable tomes that were once in the library were removed by the cult (who still have them).


") ]
]


