Fighting the Gray Tide (Miniature Painting)

If you have a recommend for the stamp kit id take it.
Unfortunately I don't have enough experience with them to make any kind of recommendation. The $20 kit I got from Amazon was intended to be a proof of concept test. i.e. Do I think I could do this? The test was successful and I'd be willing to get some more templates. Goblin Hobbies charges $16 for their stamp templates which is relatively inexpensive but it's a lot compared to the ones for nails. We're always paying a hobby tax.
 

log in or register to remove this ad

I've occasionally made my own "stamps" by shrinking down images to the right size and printing them out, then carefully painting over them and pressing something like a cork or a piece of soft plastic onto them, transferring the image onto it. Then I carve off the excess material and I've got a stamp. It does require some pretty intricate knife-work, though.
A pencil eraser will work well sometimes when the design isn't that intricate.
Dating Dates GIF by The Roku Channel
 

Lol - I get hardcore about my hobby projects sometimes.
In order to sculpt a 15mm figure I was making, I made my own sculpting tools by grinding down the ends of the pins I normally use for pinning the arms on my guys.
When I was a teenager (and had lots of spare time) sometimes I'd replace the broken weapons on my figures with actual steel swords and wooden bows I carved myself.

That's my own blood on the rat's axe.... :p

firstministl6.jpeg
 

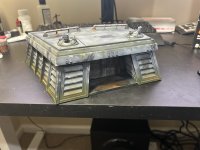
It’s always nice to mix things up a bit. I'm not real big on painting terrain. Throughout this thread, I think I only have two other pieces of terrain making this the third. It's an Imperial Bunker for Star Wars Legion I bought because it was half off at my FLGS. I almost certainly wouldn't have paid $65 for it, but $32.50 was just fine.
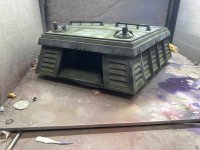
image.jpg

While you don't need an airbrush for a model this big, it's nice to have one. What I'm doing here is called under shading. I applied a black primer, then a patchy grey leaving the dark recesses alone, and followed that up by using a dark green for the shadowy areas. Paint is typically only semi-opaque, which means once I put the base grey color down those highlights and shadows should come through the final product. Once I get there, the next step is to begin the weathering process which will involve an oil wash, plants matter, pigments, and some glazing.

IMG_2793.jpeg
This is the exterior of the front door. I'm going for a weathered bunker, so the door looks weathered. I primed black, applied two coats of Army Painter Dark Rust and from there I sponged the following:

1. Vallejo Rust Texture
2. Pro Acryl Orange
3. Army Painter Uniform Grey with a few drops of Army Painter Speed Paint Ghillie Dew
3. Army Painter Uniform Grey
4. Army Painter Ash Grey
5. Army Painter Gun Metal

I followed that up by putting down some streaks using Army Painter Brownish Decay, but you can't really see it very easily in the photo.
 

I applied some thin layers of Army Painter Uniform Grey with my airbrush. You can see some of the green showing through which is what I wanted. I sponged on some Ash Grey and then sprayed a 50/50 mix of Burnt Sienna with thinner because buildings close to the ground get dirty. I'm going to let the paint cure, put a glossy coat on it, and in the next day or two I'll put a nice oil wash on it which will done down the colors a bit. After that, more weathering. Mrs. MGibster things I need to put some ferns on this thing and I might do it. I can buy some plant stuff for my miniatures and tell her it was her idea.

IMG_2794.jpeg
 

"Oh! I'm afraid the deflector shield will be quite operational when your friends arrive." -- Palpatine

We are inching ever closer to completion. One oddity I can't help but notice is how much brighter the model is in the photo when compared to the naked eye. If I didn't know any better I'd think the model in the photo wasn't the same one sitting on my desk.

IMG_2796.jpegIMG_2797.jpeg

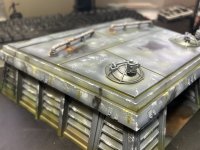
I painted the pipes (why would you have pipes on the outside of a bunker?) with a rusty base, sponged on some Uniform Grey, and made a wash of the original rust, then another wash of orange to simulate where rusty water pools on the roof. On the recesses of the roof, I applied some Boney Matter Speed Paint as panel lining, and in the gutters of the base I used a green and then some Boney Matter for some streaks. I followed that up with some black weathering pigment for scorch marks, and finally some green pigment at the base.

I could leave things as they are and consider this project done. This will serve perfectly well as an objective or a focal point in any TTRPG or miniatures war game I want to play, and with any project, there comes a point where you ask yourself, "If I do anything more will I ruin what I've done?" Maybe. I'm going to stew on this for a little while, but I'm contemplating putting some dead plant matter on the model. If you go watch Return of the Jedi, you'll see the bunker had what looks like old leaves on the eaves. I'm also contemplating putting some vines creeping up the walls. We'll see.


Remove ads

Top