Playing With Parchment

today's effort went into sidebars.

the first set:
 

Attachments

  • parchment-sidebar1.jpg
    parchment-sidebar1.jpg
    101.9 KB · Views: 194
  • parchment-sidebar2.jpg
    parchment-sidebar2.jpg
    60.1 KB · Views: 170

log in or register to remove this ad

And another - with the colour burn effect on the circles instead of the overlay like I have on the first post in the thread - I think it looks WAY better.
 

Attachments

  • parchment-sidebar3.jpg
    parchment-sidebar3.jpg
    73.5 KB · Views: 217


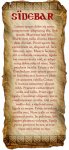
The following is medium-difficulty photoshop work, so if you aren't too familiar with channels in photoshop, you'll have to polish up on them - I just learned how to use channels this last week.

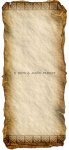
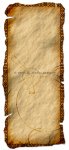
I started with a flat #8C6239 colour layer.

Then I went into the Channels, and added a new channel where I used the [Render] > [Clouds] filter to produce the texture

Then I went back to the flat colour layer, used [Render] > [Lighting Effects], used Directional Lighting, 40 Intensity, Matte surface (-68), and a slightly positive ambience, using the new Clouds channel as the texture channel, with a height of 32 (fairly flat).

That produced a very 'orange' final colour, so I played with Hue & Saturation - changing the hue to more yellowish, and reducing saturation to produce the colour I want.

Then I trim the edges to produce the shape I want.

To get the coloration of the edges, use the colour burn tool.

To make the centre block pale and easy to read text on, block the area you want to use with the marquee selection tool, then [Selection] [Feather] 80 pixels or so. Then play with the Brightness & Contrast, increase brightness and decreasing contrast.
 

Today's OTHER lesson:

Save as you go.

While explaining the process, I created a new parchment, just before I did the edge colour burning... my system crashed.

Blah.


So, following my own directions, above, I made the following one, which I'm calling the dragon parchment.

I'm not quite sure about the fold on the upper left corner, but the overall effect is very strong. I included too much noise in the masking channel, and had to smooth it out in the end because the noise wasn't visible at 25% magnification where I was working, but made the paper look sandy at 100% magnification.

In the end, this one is good, but not amazing. But I am learning a lot about colour burning in the process.
 

Attachments

  • parchment6.jpg
    parchment6.jpg
    94.2 KB · Views: 216


devilish said:
Very nice work all in all!

Thanks. I'm working on improving them because they are for commercial releases when all is said and done.

re: Wax Seal
Care to share the secret?

Actually, for this, I recommend you Google "photoshop wax seal" and find a tutorial, it's a nicely done tutorial.
 

HellHound said:
Thanks. I'm working on improving them because they are for commercial releases when all is said and done.

Thanks and (though it need not be said) please keep us posted when this goes commercial --this is something I'd love to throw cashish at.

-D
 

Remove ads

Top