D&D General Maps, Maps, Maps! Dungeons, Ruins, Caverns, Temples, and more... aka Where Dyson Dumps His Maps.

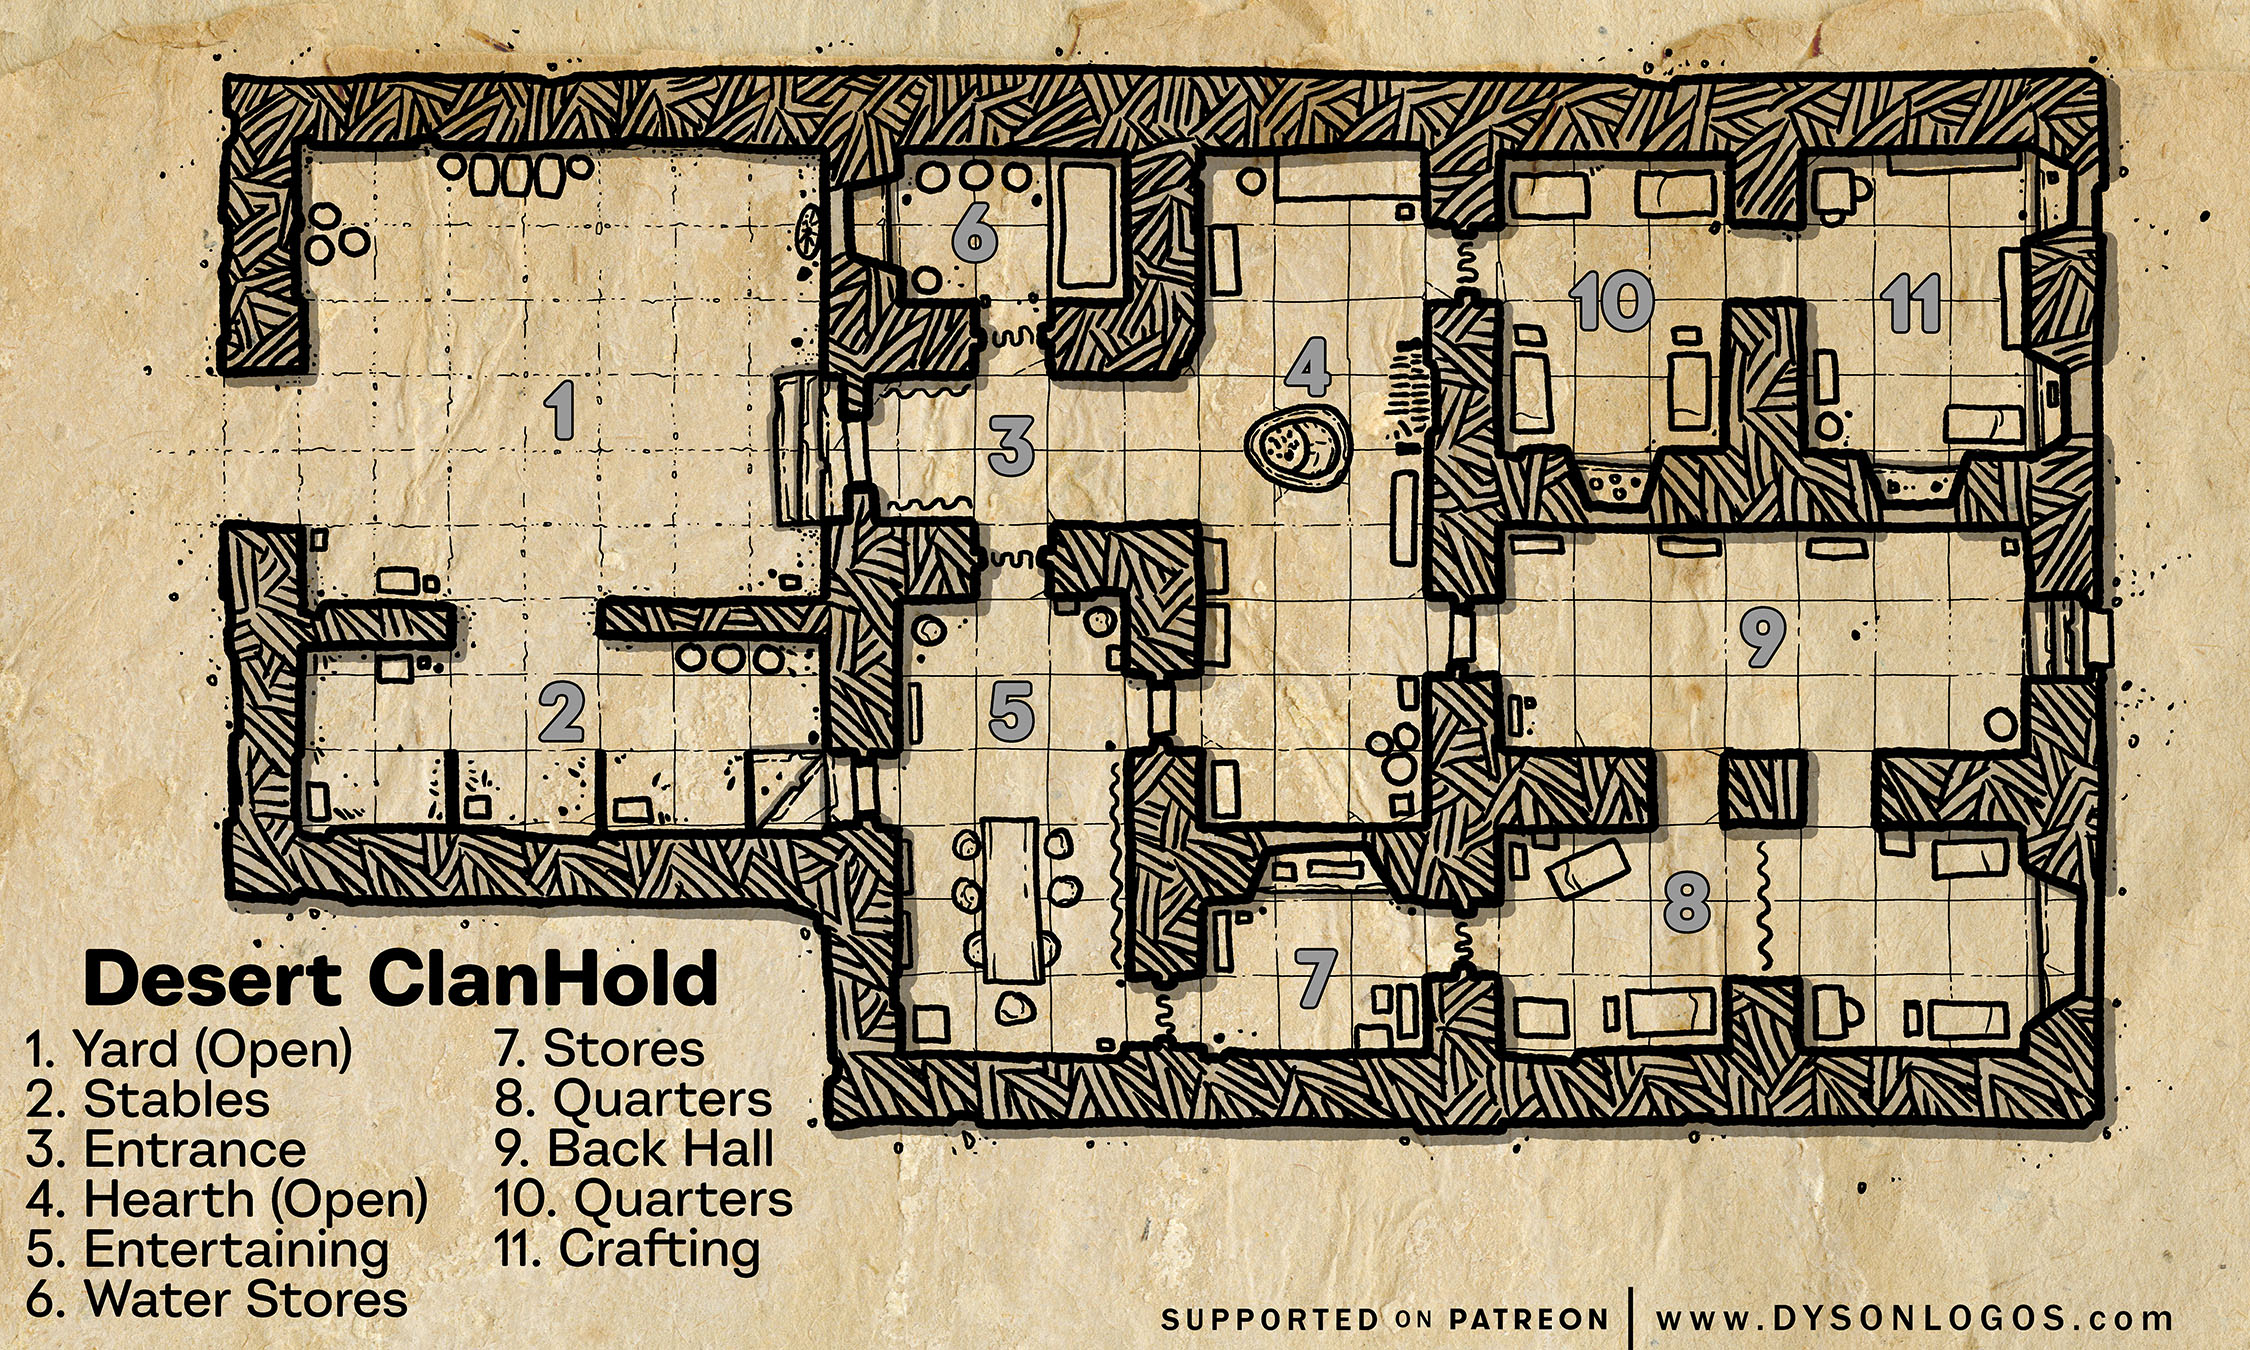
Desert ClanHold

Desert-Clan-Hold.jpg


Small mud-brick single-level structures are common among the desert clans – usually with a walled courtyard and an open-ceilinged kitchen area. Some richer households devote half the ground floor to animals and move the majority of the bedrooms to the second floor. To reduce heat, these buildings are typically covered in a thin layer of white gypsum plaster – and the second floor will have significant openings to allow wind to blow through.

These clanholds can be free-standing in small villages or “farms”, but similar designs exist in many desert towns and cities as well.

This example of a ClanHold includes a small stable for either riding & work animals, or for goats attached to the courtyard but not part of the main building. The hearth room has an open ceiling with cloth strips suspended across it to reduce sunlight shining in while allowing smoke and heat to escape.

This particular clanhold has segregated quarters for two family units – one on the north side attached to a crafting workshop, and larger quarters on the south side open to the back hall of the structure. Windows along the east and west walls are all shuttered and contain no glass.

The 1200 dpi versions of the map were drawn at a scale of 300 pixels per square and are 9,000 pixels (30 squares) wide. To use this with a VTT you would need to resize the squares to either 70 pixels (for 5′ squares) or 140 pixels (for 10‘ foot‘ squares) – so resizing the image to 2,100 pixels or 4,200 pixels wide, respectively.


log in or register to remove this ad


Archons-Tower.jpg


Archon’s Tower

“The Master at the Table”, said to be a sphinx in humanoid form, once ruled these lands for many miles around. This tower is said to be where he would look over the lands, from the parapets of blue stone much akin to the massive pillars in the distant City of Blue. The Master at the Table was said to infiltrate many regional societies and organizations, posing as a human, an elf, even a dragon, and supposedly even once as a goose. It would then gather information, manipulate events, and influence people to serve their interests and the interests of its small sphinxdom. But more importantly to adventurers, combining this espionage and manipulation with its knack for legendary lore, it could uncover ancient secrets, artifacts, and spells.

The Master is ancient history, the tower no longer the centre of a sphinxdom, and others now use the strange blue structure and the tunnels beneath. But an oracle has seen visions of this blue spire and treasures hidden within – spells in the form of riddles that must be solved to be learned, and an artifact from another world that can change history itself. And what are the odds that this oracle is actually The Master at the Table, now returned and seeking to regain its own lost treasures?

The Archon’s Tower has four surface levels here, built partially into the rocky hillside, with only two levels being completely free-standing. The level below the rooftop is not accessible via the spiral stairs, and is instead only accessible from the level below it – by bringing a ladder, climbing the stone walls, or some form of levitation or flying to get up to the small archway 25 feet above the floor below. The underground level features a memorial of the Archon, the Master at the Table, but also has a small passageway that leads to older structures beneath – the real reason the Archon built the tower here…

The 1200 dpi versions of the map were drawn at a scale of 300 pixels per square and are 10,800 pixels (36 squares) wide. To use this with a VTT you would need to resize the squares to either 70 pixels (for 5′ squares) or 140 pixels (for the recommended 10‘ foot squares) – so resizing the image to 2,520 pixels or 5,040 pixels wide, respectively.


Beneath-Archons-Tower.jpg


Beneath the Archon’s Tower

There are deeper structures hidden beneath the Archon’s Tower. Those who have discovered these ancient ruins can but assume that The Master at the Table chose this site to build the tower specifically to seal off the entrance. The two-level substructures have their own distinct architectural style, lots of curved corners, a few too many stairs, and a dried pool in the lower chambers that was likely once full of some foul ichor or perhaps even blood.

Of note, there are four ways between the two levels. Two stairs lead down to the main room in the lower level from above, the stairs in the southeast corner, and the broken floor in the chamber on the upper-right that leads to the room just to the east of the central chamber below (with all the debris on the floor from the collapsed ceiling above). The chambers here show that they have been used for other practices over the years, with tables set up here and there for guards or perhaps even living.

And of course, the oracle did indicate there were important lost treasures down here…

The 1200 dpi versions of the map were drawn at a scale of 300 pixels per square and are 10,800 pixels (36 squares) wide. To use this with a VTT you would need to resize the squares to either 70 pixels (for 5′ squares) or 140 pixels (for the recommended 10‘ foot squares) – so resizing the image to 2,520 pixels or 5,040 pixels wide, respectively.


Index-Card-Descent.jpg


The Black Skulls Tomb

In remote and desolate Khervis, surrounded by mountains and ravines, is the Black Skulls Tomb – a small subterranean complex with two entry ways. The first is a stone door behind four standing stones that leads to an antechamber (“the Chamber of the Black Skulls”) with a magically sealed stone door beyond it that shows no signs of ever having been breached. The antechamber is decorated with four massive black skulls (cut out of stone) on a circular black background – two on each side of the room. Each of the four standing stones outside also have this same motif cut into them (although the black paint has long ago faded).

An alternate access point into the deeper levels is a collapsed section into a lower stairwell. This unstable descent bypasses the antechamber and curved staircase and leads straight into the stairs that descend to the lower chambers. Again, the doors to these chambers are sealed, but with traditional mortar instead of magic. The larger chamber can also be accessed via the well in the small room on the level above (surrounded again by three black skulls). The lowest chamber once held a pool of something that has dried into a thick black crumbly crust that is intensely poisonous if swallowed.

But this completely ignores the actual treasure of the Black Skulls Tomb – the secret treasure chamber isn’t in the depths of the dungeon, but is attached to the first flight of stairs from the antechamber. Here there are statuettes, paintings, and carvings of the Black Skull, as well as magical amulets, scrolls and flensing daggers of the cult that built this complex. Beyond that is a second secret treasure chamber, heavily trapped, who’s treasures include a 4 inch crystal orb containing a fragment of the original Black Skull – a fragment of a slain god from a distant realm – the Black Skull Orb can grant visions, insights, and even curses upon those who gaze within it.

The 1200 dpi versions of the map were drawn at a scale of 300 pixels per square and are 9,000 pixels (30 squares) wide. To use this with a VTT you would need to resize the squares to either 70 pixels (for 5′ squares) or 140 pixels (for the recommended 10‘ foot squares) – so resizing the image to 2,100 pixels or 4,200 pixels wide, respectively.


Eyes of Nine

Everything's Fine
View attachment 310700

The Black Skulls Tomb

In remote and desolate Khervis, surrounded by mountains and ravines, is the Black Skulls Tomb – a small subterranean complex with two entry ways. The first is a stone door behind four standing stones that leads to an antechamber (“the Chamber of the Black Skulls”) with a magically sealed stone door beyond it that shows no signs of ever having been breached. The antechamber is decorated with four massive black skulls (cut out of stone) on a circular black background – two on each side of the room. Each of the four standing stones outside also have this same motif cut into them (although the black paint has long ago faded).

An alternate access point into the deeper levels is a collapsed section into a lower stairwell. This unstable descent bypasses the antechamber and curved staircase and leads straight into the stairs that descend to the lower chambers. Again, the doors to these chambers are sealed, but with traditional mortar instead of magic. The larger chamber can also be accessed via the well in the small room on the level above (surrounded again by three black skulls). The lowest chamber once held a pool of something that has dried into a thick black crumbly crust that is intensely poisonous if swallowed.

But this completely ignores the actual treasure of the Black Skulls Tomb – the secret treasure chamber isn’t in the depths of the dungeon, but is attached to the first flight of stairs from the antechamber. Here there are statuettes, paintings, and carvings of the Black Skull, as well as magical amulets, scrolls and flensing daggers of the cult that built this complex. Beyond that is a second secret treasure chamber, heavily trapped, who’s treasures include a 4 inch crystal orb containing a fragment of the original Black Skull – a fragment of a slain god from a distant realm – the Black Skull Orb can grant visions, insights, and even curses upon those who gaze within it.

The 1200 dpi versions of the map were drawn at a scale of 300 pixels per square and are 9,000 pixels (30 squares) wide. To use this with a VTT you would need to resize the squares to either 70 pixels (for 5′ squares) or 140 pixels (for the recommended 10‘ foot squares) – so resizing the image to 2,100 pixels or 4,200 pixels wide, respectively.

Love the side elevation. Wish more maps did this - at least more complex maps
 

Sunken Crypts of the King in Copper

Dog-On-A-Table.jpg


The King in Copper ruled a civilization that adjoined (and eventually was subsumed by) these swamps. While libraries wax poetic about the King’s wisdom, wealth, and magic, they were better known for their arrogance, ambition, and cruelty that lead to forming pacts with foul entities beyond the reach of their civilization. The dark pacts of the King in Copper granted them the ability to manipulate the water, plants, animals, and even the lands of the swamps that extended around their ancient kingdom. Knights of the kingdom would ride upon King Crocodiles that weighed over a tonne through whose eyes the King in Copper could see with a thought.

The entire kingdom was put to sword and flame, the King slain, and their body thrown into the swamp where an isle of stone lifted up from the marshy waters and seemed to consume the body, forming stony crypts for the King and their slain generals.

The crypt island remains to this day, lost in the swamp that eventually consumed the lands where the fallen kingdom once stood. The crypts are within a massive stony abutment that is now covered in moss, swamp muck, and plant life. The main level of the crypt (on the left of the map) is flooded, with brackish swamp water about two to three feet deep covering the floors. The upper level (on the right) is drier but still damp and unpleasant. None of this is improved by the foul froglike swamp beasts that have claimed it as their home.

Of note on the upper level there is a “well” that leads down to the upper left room on the lower level, as well as a collapsing chamber on the upper right – that room has wooden braces mounted to hold the collapsing walls and ceiling back. The braces are tied together with oiled vines and if pulled the whole assembly will come down, collapsing the walls and ceiling and “hopefully” providing an escape route to the residents.

The 1200 dpi versions of the map were drawn at a scale of 300 pixels per square and are 10,200 pixels (34 squares) wide. To use this with a VTT you would need to resize the squares to either 70 pixels (for 5′ squares) or 140 pixels (for the recommended 10′ squares) – so resizing it to either 2,380 pixels wide or 4,760 pixels wide, respectively.


Index Card Dungeon – Dungeons 3

Index-Card-Dungeon-Dungeons-3.jpg


We are now entering into the depths of the “Index Card Dungeon” with this sixth map in the set. This map connects to the Dungeons Map 2 above it (via the stairs in the open chamber in that map that lead to the centre of this one as well as the stairs on the left side of both maps) as well as the Caves 1 map via the natural caverns on the right, and finally deeper into the Catacombs 1 map via the continuation of the central stairs and a small passage that passes over two shafts that extend into the halls of the catacombs below.

This area has been infiltrated by humanoids via the caves, but they know better than to move up into the trapped and guarded level above (and try to keep out of sight when travelling through the chamber with the stairs up). They make their lairs here in the dark, trying to subsist of the cave crickets that live in the small caves here.

This is the sixth of ten index card-sized dungeon maps that all connect together. Each is designed to fit on a traditional 3 x 5 index card (at six squares per inch), and you can write up any notes about the level on the reverse of the card. The first five maps were posted last month, and five more are being posted this month.

The 1200 dpi versions of the map were drawn at a scale of 300 pixels per square and are 9,000 pixels (30 squares) wide. To use this with a VTT you would need to resize the squares to either 70 pixels (for 5′ squares) or 140 pixels (for the recommended 10′ squares) – so resizing it to either 2,100 pixels wide or 4,200 pixels wide, respectively.


Remove ads

Top