Art Who Me?-I like to draw...

Wow! You did that in photoshop using a mouse? Wholy cow, your lines are so smooth and straight! That is pretty* bleep* awesome! I do all my art in psp, but they start off as blobs. Then after about 50 thousand layers, I have a completed pic, but each thing on my pic has it's own layer or two. Down to right hand on a layer, then arm, one eye, then other, etc. etc.

But here is an idea that has helped me alot....is if lets say, one hand or arm, what ever it is that there might be a pair of, you mastered one but not the other. I usually scrap the one that looks terrible and duplicate the one that turned out. then mirror the image, or flip, copypaste as a new layer and adjust size and what not. I've done that to wings on the fire griffen I did, and most people I paint.

Another thing is sometimes the leg, arm, what ever turns out great, but the position of it looks off. What I do is select part of it to promote to a new layer, and then play with it in new positions and/or size, then smooth out the part where it may look disected. Then close out all layers EXCEPT what I know will never need to be adjusted again, and merge them together, to get rid of an abundance of layers.......... Just a few tips that work for me, maybe they can help you or at least give you some ideas. ;) Keep up the awesome work, glad to see you branching out to color! Definately keep the pics coming, can't wait to see finished product. :)
 
Last edited:

log in or register to remove this ad

malessa

hello

thankyou for your tips, that'd come in handy as i can get very, very lazy :p
i guess the lines look clean cause i smudged them (should seen them before i fiddled)...but it is time consuming drawing from scratch (a good thing because a lot of my work can look rushed or incomplete... :o )
layering is so handy :)

thankyou :D
have a good one
 

Babette said:
hello

thankyou for your tips, that'd come in handy as i can get very, very lazy :p
i guess the lines look clean cause i smudged them (should seen them before i fiddled)...but it is time consuming drawing from scratch (a good thing because a lot of my work can look rushed or incomplete... :o )
layering is so handy :)

thankyou :D
have a good one

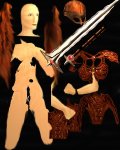
I am extremely lazy, so no worries......matter a fact, I skip the drawing lines part, and use a paint brush and make an oval skin color blob first. Then I use a slight shade lighter for light part of skin, then go a deep shade darker for shadowy parts of skin, then smudge till it looks right, adding touch ups along the way. I cheat.......alot......Here is an example of my last pic..I dissassembled her to show you...There were alot more layers, but when I was satisfied enough with certain things, I merged them together. But as you see, she doesn't have a complete body painted.....You can always undo, erase, and smudge the crap outa stuff to get the finial look.....All together this pic took me about 5hrs to do....which is great considering when I first started painting on the computer, the same pic wouldn't have looked nearly as good but would have taken me 5 days to do. lol....practice, lots and lots of practice and playing around! But you seem to take to it alot faster than I did, you'll be giving me tips before too long. ;)
 

Attachments

  • examplelayers.jpg
    examplelayers.jpg
    75.2 KB · Views: 121

inner glow

Malessa said:
I am extremely lazy, so no worries......matter a fact, I skip the drawing lines part, and use a paint brush and make an oval skin color blob first. Then I use a slight shade lighter for light part of skin, then go a deep shade darker for shadowy parts of skin, then smudge till it looks right, adding touch ups along the way. I cheat.......alot......Here is an example of my last pic..I dissassembled her to show you...There were alot more layers, but when I was satisfied enough with certain things, I merged them together. But as you see, she doesn't have a complete body painted.....You can always undo, erase, and smudge the crap outa stuff to get the finial look.....All together this pic took me about 5hrs to do....which is great considering when I first started painting on the computer, the same pic wouldn't have looked nearly as good but would have taken me 5 days to do. lol....practice, lots and lots of practice and playing around! But you seem to take to it alot faster than I did, you'll be giving me tips before too long. ;)

how is it you get that kind of glow...(or brightness)...do you get what i'm asking...especially that uniqueness of your weapon colouring...
do you do your backgrounds from scratch as well?
 

prac attack

here's a pic where i was expermenting with background...oh my lens flare obssession...
it's one of 3 versions...

drow male magic user who has just cast a chameleon spell...

drawn with pacer and manip[ulated with photoshop

:D
 

Attachments

  • drowmagb copy.jpg
    drowmagb copy.jpg
    74.9 KB · Views: 124
Last edited:


Babette said:
how is it you get that kind of glow...(or brightness)...do you get what i'm asking...especially that uniqueness of your weapon colouring...
do you do your backgrounds from scratch as well?


Hmm....wondering how I can best answer your question, wish you were here, I'd show you.....I'll try to put it in words and describe best I can. I believe that photoshop and paintshop pro are very similar.

Yes I do the backgrounds from scratch....If it's just a sky background, I don't even use layers. For example on the sky, I first just adjust the paint brush to low-medium opacity and hardness, step=1, and density 100. This way when you overlap strokes you get varied degrees of the same color, which is usually blue. Then I go back and put streaks of white here and there for where I would like the clouds. Then smudge and blend, adding a touch here and there of more color if need be. Then I go to the effects option and choose the illumination effects(your fav). In my program I have a choice between sunburst and lights. I always choose lights, then choose color, angle, degree of light vs dark etc. and usually after that I'm done. However what ever the pic is I use the same angle and color for each layer of Item. I may adjust the degree of light vs dark, but thats it.

As far as the weapons go, hmm....actually thats fun and the easiest to create, believe it or not. I go to the shapes tool and use a rectangle, boom thats the hilt. Then on another layer, use the rectangle again, boom thats the blade. Then I use the triangle, on a different layer, thats the tip of blade, then I match the two up, and erase the bottom of the triangle and top of the rectangle, then merge the two images to one layer. With other shapes I play around for the palmal(sp, sorry). The handle is on one layer, blade on another, etc. Then I color for example the blade with a shade of gray. Then hot wax under effects, then play with inner bevel which has many adjustments that do wonders, which plays a big roll in alot of things. If it doesn't look right, then skip hot wax and go to bevel, or experiment. But hot wax I use alot, bevel I can't live without, light effects, smudging, these tools are by far what I use in most, if not all things. I even use them more than once or twice on one item, depending on the look I'm going for. Oh and if your having problems lining weapons up, you can go to view, then use grid, that will help with important angles and distances and lining things up.
If the options still throw you off, then remember this when your coloring something, wether on computer, pencils, paint etc..For metallic items, like metal. Where ever light hits make it white, then as it spreads out, do gray, then black. smudge and your done.

Hope I answered your questions ok? Feel free to ask away, or email me, I'd be happy to help anyway I can. :)
 

Malessa said:
Hmm....wondering how I can best answer your question, wish you were here, I'd show you.....I'll try to put it in words and describe best I can. I believe that photoshop and paintshop pro are very similar.

Yes I do the backgrounds from scratch....If it's just a sky background, I don't even use layers. For example on the sky, I first just adjust the paint brush to low-medium opacity and hardness, step=1, and density 100. This way when you overlap strokes you get varied degrees of the same color, which is usually blue. Then I go back and put streaks of white here and there for where I would like the clouds. Then smudge and blend, adding a touch here and there of more color if need be. Then I go to the effects option and choose the illumination effects(your fav). In my program I have a choice between sunburst and lights. I always choose lights, then choose color, angle, degree of light vs dark etc. and usually after that I'm done. However what ever the pic is I use the same angle and color for each layer of Item. I may adjust the degree of light vs dark, but thats it.

As far as the weapons go, hmm....actually thats fun and the easiest to create, believe it or not. I go to the shapes tool and use a rectangle, boom thats the hilt. Then on another layer, use the rectangle again, boom thats the blade. Then I use the triangle, on a different layer, thats the tip of blade, then I match the two up, and erase the bottom of the triangle and top of the rectangle, then merge the two images to one layer. With other shapes I play around for the palmal(sp, sorry). The handle is on one layer, blade on another, etc. Then I color for example the blade with a shade of gray. Then hot wax under effects, then play with inner bevel which has many adjustments that do wonders, which plays a big roll in alot of things. If it doesn't look right, then skip hot wax and go to bevel, or experiment. But hot wax I use alot, bevel I can't live without, light effects, smudging, these tools are by far what I use in most, if not all things. I even use them more than once or twice on one item, depending on the look I'm going for. Oh and if your having problems lining weapons up, you can go to view, then use grid, that will help with important angles and distances and lining things up.
If the options still throw you off, then remember this when your coloring something, wether on computer, pencils, paint etc..For metallic items, like metal. Where ever light hits make it white, then as it spreads out, do gray, then black. smudge and your done.

Hope I answered your questions ok? Feel free to ask away, or email me, I'd be happy to help anyway I can. :)

i'm just using basic photoshop so i don't have some of the stuff you mentioned. i actually find it a lot easier to have drawn my pics first and then manipulate or just colour, there's only one from scratch as i mentioned before, and i'm having trouble with what to put her in :) .

thanks again ;)
 

No problem Babette, only wish I could have helped more... :(

Honestly, I think you'll find your own way of achieving your goal, your definately on the right path and doing very well! ;)
 

hi 5

Brix said:
Thank you again for your great work

Just for the sake of completeness I want to post the description of the other party members. This is by no means a request, but if you (or someone else) like any of these and need some more drawing experience
;o)

So here are my iconic characters:


5. The burly fighter
A bear of a man. strong and sturdy but vulnerable at heart. He is very friendly and has a good heart. Since his wife and children have been killed by marauding orcs, he has taken up arms again, and now works as a soldier. He always has an aura of death around him, because he seems to seek out his own death. He does not want to make friends anymore, because he fears to loose them again. This behaviour is however agains his nature. So he is often melancholic. And even if didn't wanted to have new friends, he would do anything to protect his new party (friends)
He wears a banded mail, is armed with a longsword and a shield. He is bearded and very sympathetic and likable. In combat he becomes a real savage.

.

i concentrated more on his face for the overall feel of what you described...more than the image in its entirety...

:D :D
 

Attachments

  • bfighter.jpg
    bfighter.jpg
    46.7 KB · Views: 114
Last edited:

Remove ads

Top