Thanks. Of course I hope that you can add "of quality" to that statement. I tend to suprise editors with my speed as well. Don't know where I picked up the habit, but thats just the way I write now.
I am enjoying reading these, and the critique. I'd consider using any number of them in my campaign, only right now my "party" is a warband of Orcs and Goblins.
Keep up the good work. I hope to have the time required to participate some day.
The Broken Mirror Blues
An adventure for four PC’s of approximately 10th level.
SUMMARY
A xenophobic druid tests the PC’s for their suitability in defeating a legendary monster.
BACKGROUND
The druid Ayiana has a serious dilemma on her hands. With the recent demise of her mentor Tremayne, she inherited a great amount of responsibility she is not really prepared for. Her mentor had been instructing her in the arts of divination (Foresight) when he was struck down with a vision of impending doom throughout their domain. As her mentor’s life ebbed away he managed to pass his vision on to Ayiana, and charged her with seeing the matter resolved. Tremayne foresaw the arrival of a beast from the abyss, which would lay waste to the domain of the Broken Mirror. He also saw the arrival of a group of noble heroes who would be the only ones capable of destroying the beast and returning the surrounding area to balance.
The beast Tremayne saw in his vision was an Abyssal Greater Basilisk. The Basilisk arrived in the Broken Mirror nearly one month ago, and since then, control over the area has rapidly slipped away from Ayiana. The local denizens of the Broken Mirror have had their life turned upside down. To make matters worse, after so many years of life in the wilds, Ayiana, must now confront her overpowering xenophobia if she is to locate the promised heroes and see the Broken Mirror set right.
SETTING
The Broken Mirror is a heavily forested chain of lakes. Seen from the high mountains surrounding the area, these bodies of water resemble nothing so much as a shattered mirror, it’s shards gleaming in the sunlight. Legends surround each of the “shards” attributing a wide variety of characteristics and properties to the waters. For example it is well known that those who risk a trip into the wilderness to drink from the Shard of Wealth will find their finances greatly improved. While several of these shards will be mentioned in this adventure, the exact number and effects of these shards is left for the DM to detail.
SCALING THE ADVENTURE
This adventure can accommodate a fairly wide range of PC’s. DM’s can scale back the adventure by simply reducing the hit dice and class levels of all encounters by an appropriate amount. The adventure is even easier to scale upwards, by adding as many additional “Shard” encounters as desired. Suitable creatures to inhabit these shards include all kinds of aquatic creatures, fey, and animals, dire animals, as well as vermin. The presence and corrupting influence of the Abyssal Greater Basilisk could also warp many of the shards and their inhabitants. A swarm of fish or mosquitoes is no great challenges, but adding the Abyssal template to them could certainly add to the challenge.
HOOKS
Getting your PC’s into this adventure can be as simple as allowing a wandering group to discover this remote locale.
Alternatively, it should be a simple matter to plant some rumors regarding the miraculous powers of the various Shards in the area. I can’t envision a group of adventurers that wouldn’t at least want a little sip from the Shard of Wealth. ;-)
If the party contains a druid, they could be asked by other members of their faith to check on old Tremayne and his pupil.
Divination magic could also give the PC’s the same vision Tremayne saw. Allowing them to believe themselves the only ones who can defeat this evil should serve as a powerful motivation to investigate this area.
ENCOUNTERS The Frightened Druid
Ayiana has never known another life aside from the wilderness. As such, she has never met another humanoid other than Tremayne. It is understandable then that she might be a little apprehensive around people. As such, when she learns of the presence of the PC’s within the Broken Mirror (Commune with Nature) she will be excited, and hopeful that they might be the promised saviors that will end the strife within the forest. Her excitement soon turns to dismay, when she realizes that her phobia is so strong, she is just unable to approach the PC’s.
The solution she finds is two-fold. First, Ayiana can observe the PC’s with little risk of detection, by shadowing them in the misty form provided by the Wind Walk spell. Nestled in the bowl of the mountains, the occasional misty or fog should hardly be surprising to the PC’s.
Ayiana also will manage to lead the PC’s through the trouble spots in the woods via the Animal Messenger spell. The PC’s can be lead to each encounter in turn by the arrival of various birds and beasts bearing scrolls. The DM should be aware of what animals he uses. If the PC’s are skittish, you could wind up with a series of dead messenger critters, and a group of PC’s with no idea where to go.
The PC’s may be able to gain an ally if they are able to confront Ayiana without triggering her xenophobia. The Calm Emotions spell could be of great use here, as could an exceptionally good use of Diplomacy. Other spells that can help include Good Hope, Charm Person, or even Dominate Person. Ultimately this is up to the individual DM, but there is little to be gained by making the xenophobia “unbeatable” and the role-playing opportunities inherent in dealing with a druid who is literally terrified of the party, but unable to just let them go their merry way promise to be interesting.
Vision of Doom
The first message Ayiana sends the PC’s will instruct them to travel to the Shard of Faeries. Ayiana will explain that since the arrival of the legendary beast (the basilisk) the local fey have been agitated. She will request that the PC’s act as her envoy to the local pixies and recruit their help in dealing with the basilisk. As usual in her messages, Ayiana will flatter the PC’s as “the promised champions of destiny”.
Upon arriving at the Shard of Faeries, the PC’s will be met by ten very angry pixies, as well as their leader. Alert PC’s will notice that the leader is wearing spectacles.
The Pixie leader Hucklepie (Male Pixie/Sorcerer 7, with Irresistible Dance) will immediately accuse the PC’s of being responsible for unleashing the “fell beastie” and dooming the Pixies to a life of plague and destruction. He will curse them for all sorts of hideous maladies his people are now suffering, and rattle of a litany of miseries he claims the PC’s are responsible for, including wasting sicknesses, leprosy, stillbirths, and any other horrible afflictions the DM cares to mention. A simple Heal check will reveal that none of the pixies visible here are suffering from any of the aforementioned maladies, and yet the leader will continue to point to his people and decry the PC’s for the vile tortures each pixie is suffering.
Detect Magic reveals that the glasses the pixie leader wears are both magical and radiate necromancy. In reality, the goggles are a pair of cursed Eyes of Doom. While they do function normally as Eyes of Doom, these glasses also curse the wearer with visions of decay and despair. Couples that with the leaders own distrust of “big folk” and the PC’s have their work cut out for them.
Ideally, the PC’s will detect the magic glasses and seek to break the curse, freeing the pixies and gaining a valuable ally against the basilisk. If the PC’s falter here, they may be dealing with a battle against some well armed fey (they have sleep arrows) on the faeries’ home turf. The pixies will fight at the greatest range possible, to get the most benefit from their small bows and sleep arrows. Ideally, they will fire down on the PC's from the treetops at extreme range. A simple matter in a forest filled with towing trees. This tribe specializes in distance fighting, and makes good use of the Far Shot Feat. If push comes to shove, the pixies attempt to immobilize the PC’s for later sacrifice to the “fell beastie”. The DM can then allow them a fighting chance against the basilisk, or let their capture be reason enough for Ayiana to defeat her xenophobia and come to their rescue.
The Basilisk
After the PC’s have passed through whatever other shards the DM chooses to use as tests for them. (See Scaling the Adventure above.) They will eventually be led/directed to the Shard of Poisons. One of the more shallow shards, this lake is filled with brackish water, and choked with large stumps and sticky waterweeds. The battle with the basilisk will be made more treacherous by the environment. Tripping roots and hidden underwater obstacles, as well as the basilisks spell resistance and natural hiding ability will hinder the PC’s in battling this enemy. To tweak this final encounter feel free to modify the encounter based on what help the PC’s have been able to recruit. If they have helped Ayiana overcome her xenophobia, or cured the madness of the pixies, they will have some powerful allies aiding them. It’s only fair then that the DM should make the single Basilisk a mated pair, or even adding Hit Dice to the monster.
WRAPPING IT UP
Depending on how the PC’s handle the events in this adventure, a number of branches can be spun off. Obviously if the basilisk is not driven off, it will continue to prey on the creatures of the Broken Mirror. Even if the beast is destroyed, the pixies will continue to suffer until the curse is broken. If the PC’s were forced into a fight with the pixies, other inhabitants of the Shard of Faeries may be out for a little revenge. And if Ayiana never manages to overcome her xenophobia, the Broken Mirror will continue to lack a strong defender, leading to more opportunities for adventure.
INGREDIENT SUMMARY
Abyssal Greater Basilisk
The final foe the PC’s face in the adventure, the legendary beast seen in Tremayne’s vision.
Eyes of Doom
A cursed pair of these is the cause behind the current state of unrest in the Pixies of the Shard of Faeries.
Far Shot
The specialty of the pixies of the Shard of Faeries.
Broken Mirror
Both the name, and the appearance of the lakes and forest that comprise the adventure's setting.
Wind Walk
The spell Ayiana uses to follow the PC’s at a distance undetected.
Xenophobia
The irrational and overwhelming fear of strangers that Ayiana suffers from.
Ill Wishes
An adventure for 10th -13th level characters.
Background:
In the city of Taj Ubaid there is chaos. A lowly nobody named Abdul-Hayy uncovered a Noble Djinni Ring. The Djinni offered him 3 wishes. The first was to become a Sultan. The djinni asked a servant genie to brake the mirror of life trapping, that belonged to the Sultan Izz al Din. This unleashed a swarm of terrible creatures. These creatures immediately killed the old sultan and most of his staff, guards and concubines. The Djinni brought Abdul-Hayy to an audience chamber in the outer palace, he was given the sultans robes and jewelry, the Emirs were told that he was cursed, and that to have him killed would bring the curse on them instead. Emir Abdul-Azim refused to accept him, and ordered his troops and champions to lock down the city to prevent riots. His elite unit of archers, the One Mile Strikers took up positions in nearby towers and on rooftops, ordered to shoot at any flying targets. Emir Abdul-Ghani gave the new Sultan bodyguards, and promised him loyalty, then set about organizing troops to take and hold the city for himself.
Meanwhile two beholders set free from the mirror began to fight. They charmed the other beasts and many of the guards, using them against each other. Neither dared try for the Basilisk as only anti magic was sure defense against the beasts gaze. The beholder in the front room tried to fly above its range, but was stopped by archers.
Abdul-Hayy‘s second wish was that all the vicious creatures in the place be slain – the Djnni responded by summoning the party.
The Court of Wind Walking
The party appears on a large courtyard. A massive closed ornamental gate lies before them. Standing in facing is a statue of a swordsman in a spiked helm. There is the sound of a throat clearing behind them. A 9’tall richly dressed man in a turban speaks to them. “Greetings Sa’hibs I am the Djinni Khalid Dhakwan, and I have brought you here at the request of the Sultan Abdul- Heyy. His inner palace is overrun by monsters, and he wishes for you to dispose of them. In return I will grant you one wish, once the task is complete.” He will explain that they are in the courtyard of wind walking, which is as close as traveling magic can reach towards the Inner Pavilion. The worst are the Eyes of Doom – a pair of floating orbs, each topped with multiple eyes. One smooth the other covered with scales. He will also mention a terrible wingless dragon that turns victims to stone. The Djinni will ask as if they wish to see the sultan or begin immediately clearing the inner palace, he will recommend not leaving the palace as the city is in an uproar.
If asked to see the sultan the Djinni will escort them through winding hallways, most covered in gold mosaics. The sultan Abdu-Heyy is sitting in a small audience chamber in an outer courtyard. He is thin and self conscious sometimes stuttering or missing a word, at others acting very official and confidant. Sense motive or diplomacy checks will reveal that he is trying to rule, but has very few ideas how to do so. Checks are made at -10 if language is a barrier. He has 6 guards with him, all dressed in a similar fashion to the statue, except that they have crane badges. None will speak the common tongue. The Sultan’s guards should be veterans but no match for PCs. If communication is possible the Abdul-Heyy will say that he was the chosen successor of the old Sultan who perished in the onslaught of beasts. He will expect them to clean out the palace saying he may have work for them afterward. If the players inform him of the Genies offer he will offer 50,000 gp instead of the wish. He will also warn against flying, saying that his A loyal Emir commands the One Mile Strikers, and they have orders to fire on any flying targets.
The guards will not speak voluntarily, but this is often no obstacle for determined adventurers.
They are assigned by the Emir Abdul–Ghani and told that this is the new Emir, at least until the place is clear. Ghani at this moment is gathering his troops outside the city, and expects to replace the Sultan as soon as the palace is straitened out. They think highly of their Emir especially his military tactics. They think little of the Sultan but show him nothing but loyal faces.
Flying
Archers hide in rooftops and towers surrounding the place, some even in the outer palace buildings. Anyone trying to fly (if visible) will be shot at by 3-18 arrows most at +4 (1d8+1), each volley will also include 2 arrows at +10(1d8+4). There are no more than three archers on any building. They will fire at anyone rising above the roofline. The roof is a complex mass of domes towers and pitched roofs and offers good cover to those who stay close. (see leaving the palace for further info on archers)
Resting:
If the party is rests with the intention of returning the Sultan will have guest rooms readied but the lack of staff will be obvious. If the party has made at least one attempt on the inner Palace, messengers from the two Emirs will arrive to consult with the PCs inviting them to outside meetings. Additionally after one assault the Sultan will provide gifts (roll randomly on art objects table) he has no real notion of the value of objects he gives out.
Leaving the Palace:
An archer will stop anyone coming out of the palace, her wears the badge of the scorpion.
If the characters are not hostile he will summon his Emir. Emir Abdul –Azim (cleric/fighter ECL-3) commands the archer troops surrounding the palace. If approached he will willingly talk, as long as none of his archers have been slain. If some have been the he will be initially unfriendly and demand a blood price for each man. He speaks his own language as well as common and Draconic. His troops will fight on unless it seems hopeless if any of their fellows have been killed. The troops have access to greater magical weapon, and most will have a few magic arrows. His troops are elite skirmishers and rarely are found without cover or in a group of more than 3.
One Mile Strikers: 50, 3rd level fighters/warriors all with point blank shot and Far shot, 30 are on roof tops, 15 stationed around the Emir. The archer captain is a fighter specialized in archery. The rest of his troops are scattered through the city trying to keep peace. Emir Abdul- Azim is proud and values his duty to his men above all else.
The city itself is chaotic, many stores are closed streets are either deserted of full of people loitering and talking. Diplomacy, gather information or magic can find a translator who will accompany them as far as the palace for a fee. Bringing a translator inside the outer palace is more expensive and the inner palace only possible with force.
The following rumors may be uncovered talking to troops, citizens or using divinations.
The information gained depends as much on the status of the person questioned as the rolls.
Sultan Abdul-Hayy was an unknown before he became Sultan.
The current Sultan is doomed for his rapid rise to power has offended the otherworld.
…..They will then make the sign of the evil eye.
Sultan Abdul-Heyy has little support among the troops or populace.
Even now Emir Abdul-Ghani gathers troops, around the city, to take/defend it.
Uncles, brothers and rivals of the old Sultan ready troops to march on the city.
Wars are fought between teams of heroes; troops are used only to hold land.
The last sultan was killed by the evil eye.
The Inner palace was taken by the Eyes of Doom – physical manifestations of the evil eye. (beholders)
Many of the Old sultan's guards and concubines were turned to stone.
Entering the Sanctum
Gates and Audience Hall:
The gates are locked and magically held – 12th level caster but not invulnerable. If the party searches they can find a hole where a beholder used disintegrate, 15’ above the ground. Most internal doors have been destroyed. Any use of teleportation or dimension door like spells either into or out of the inner palace will redirect to the courtyard of wind walking. Divinations work normally, but will not function on beholders due to the Anti-magic.
The great hall has even more elaborate mosaics than are seen elsewhere. There is a large copper vessel overturned on the floor. Dead guards are everywhere, many killed fighting each other and over a dozen statues. Several of the dead are carrying broken pieces of a mirror. Some of the dead are heroes, several levels lower than the party and one or two may be found with full equipment. A hole near the ceiling brings in lots of light.
A wounded beholder hides near the ceiling (20’up) it suffers from multiple arrow wounds. It lacks a ray of death, instead it has a long flexible eyestalk that casts doom. The beholder is able to focus this in addition to any other 3 eyes in a single arc.
If noticed beholder will use its antimagic cone and talk with the party, trying to convince them that the other abominations dwelling in the building are far more of a threat. It will say that there is a terrible corrupted beast living in the center of the palace – it has scales, where only smooth skin should be ! It will also mention the basilisk that roams the halls
Any move to avoid the Central Eye will result in a fight to the death.
The Halls and Second Courtyard:
Narrow winding halls lead inward doors lead to baths, storage, and guard rooms- the statues become more common – eunuchs and harem girls. The mosaics become more sensual and erotic. After passing a staircase to a gallery the halls open out into another courtyard (which can be reached by air if the archers are dealt with (only +2 to hit at this range). The courtyard is dominated by statue of a defeated sphinx, injured by arrows and partially eaten. There are several human statues as well. The Abyssal Greater Basilisk is hiding behind the statue, it considers this courtyard its lair. The galleries would be good spaces to attack it from as it must move close to each to be able to use its gaze. One gallery has a huge hole where the railings and pillars should be. Behind it stands a statue of a second genie. (spot check from courtyard) he stands before a large broken mirror in an elaborate frame, he has a fist raised to strike, careful examination shows glass shards imbedded in his fist.
Bathing Chamber:
The very center of the palace contains another courtyard – this one with a bathing pool in the center. There only two statues here, a harem girl scrambling out of the pool, and a single guard. This courtyard is domed but clearstory windows around the base of the dome bring in lots of light. The last beholder is floating under the dome. It will attack violently and without warning, trying to catch all but one character outside the anti-magic are. It will call them servants of the scale-less abomination. It too has a single longer eyestalk that casts doom. This beholder lacks the charm monster ray.
(If necessary the beholder may have a charmed human guard.)
Continuing the Adventure:
This was just the beginning.
The genie will suggest the party use the wish to restore fallen comrades (this is a highly lethal adventure.) promising a complete lack of side effects.
The Sultan will invite the PCs to stay on – and he will try and use them as a threat to hold off his rivals. He is not very bright, but does posses some cunning. Without major support he will be overthrown, and the harder PCs defend him the more trouble the city will be in when they do leave.
The sultan does not have the promised 50,000 gp. but will offer gifts of furniture or art looted from the palace. He can scrape together about half of what he promised, but he knows little of the real value of the things he gives away.
Emir Abdul-Azim (cleric/fighter) will either offer to join the sultan, or betray him depending largely on if the PCs killed any of his men, or dealt with him on friendly terms. If on very good terms he will try and convince the PCs to back him for Sultan instead.
Emir Abdul-Ghani (aristocrat/fighter) will try and convince the party of his fitness to rule instead; saying that he alone has enough armed men to hold the city from the uncles and brothers coming to assault it. Claiming that he was the old sultan’s most trusted advisor and weeping piteously that he was not in audience that day, or he could have saved the Sultan. He is rampantly insincere, but commands enough troops and respect to hold the city.
The other candidates have champions who will try and target the players, while the troops will just camp and hold position and wait for the champions to decide the fate of the war. There is a ritualized display of abilities. When this display ends it is open season on champions. All contesting champions must be present, although invisibility, shapechanges and bluffing are all par for course.
It is considered unethical to attack troops without disposing of their champions. The loosing side is normally given the option of retreating. Any Emir will be happy to explain this to the players.
It will take a week for the rivals to arrive. These forces and their champions are left up to the DM’s needs.
The players would be hard pressed to hold the city without loyal men, but could easily become the power behind the throne.
Ingredients:
• Abyssal Greater Basilisk – Terrorizing the palace.
• Eyes of Doom – two beholders with doom eyestalks
• Far Shot – The One Mile Strikers archer company that surround the palace
• Broken Mirror – a mirror of life trapping, when broken it released the monsters.
• Wind Walk – the Courtyard of wind walking, redirects and limits travel magic.
• Xenophobia – drives the beholders to fight against each other rather than leaving the palace.
WOW! I get back to be surprised by the thread so far. Both in the neat ideas that I've seen and my disagreements with some of the winners (doing a great job, though carpe, keep it up). I love Iron DM.
Iron DM round 2, match 2: Nonamazing versus Stormborn.
The Sound of Fear An Eberron Adventure for 6th - 8th level characters
Part One of The Siege of Karrlakton
Karrlakton is a massive, grim metropolis that sits on the northern bank of the Cyre River, a mere stone's throw away from the edge of the fearsome Mournland. Doomsayers and apocalyptic prophets gather in Karrlakton's all-but-abandoned docks, staring across the water at the thick grey wall of mist that marks the Mournland's border and muttering about the horrible fate that is surely soon to befall sad Karrlakton.
They may be right.
For in the grey gloom of the Mournland, a terrible foe stirs. A dark and mysterious enemy who has already set his plans in motion, has already sent his agent to infiltrate the city and prepare it for its downfall. In this adventure, the player characters come into contact with that agent, a mighty arcane hydra, and are given the chance to stop its plan to recover a cursed artifact that can turn ordinary men into ravaging killers.
Background
Many years ago, in the nation of Cyre, there lived a powerful but mad old elementalist named Augustus Kepler. Augustus was never part of the Cyran war effort--his fellow wizards considered him unstable, and with good reason. His specialty was fire, and he had a tendancy to use it a bit too liberally, tending to rain destruction down upon his friends and enemies alike. The addled wizard was left alone in his tower, while the other wizards of the day fought to keep Cyre free.
Augustus grew very lonely over the years, and eventually decided to adopt a pet (having accidentally immolated his familiar). But what does a mad fire wizard take for a pet? Why a baby eleven-headed pyrohydra, of course! Augustus raised the pyrohydra in the basement of his tower, feeding it on cattle, small game, and the occasional leftover bits of his various experiments.
Under Augustus' influence, the hydra grew up to be very strange. First of all, the monster developed sentience and intelligence, eventually becoming as clever as any mortal man. And secondly, each of the creature's heads began to embody a different facet of the overall intelligence, in effect developing their own seperate personalities.
The wizard, of course, was thrilled. Instead of one companion, it was as though he had eleven. He encouraged the changes in the hydra, even going so far as to use his magic to further their development. Eventually, each of the hydra's heads had its own, distinct personality.
Then came the destruction of Cyre, and Augustus died. The hydra was unharmed, somehow, as was the wizard's tower. The hydra spent its time arguing with itself and occasionally reading bits of Augustus's diaries and spellbooks.
A year or so later, the hydra was discovered by a powerful entity (the mysterious foe who now seeks to assault Karrlakton, and who shall remain unrevealed in this adventure). This entity saw the potential in such a minion, and immediately set to bringing the hydra under control by promising it the one thing it desired most: individual bodies for each of its personalities (who were becoming quite tired of sharing one body).
The hydra was smuggled across the river and into the sewers of Karrlakton, where it began to sets its master's plan into effect. Using the simple bits of magic it had picked up from Augustus' books, the hydra charmed a handful of rogues and scoundrels, each head choosing one humanoid to act as its proxy in the city. With the aid of a secret weapon uncovered from the Mournland and some cursed artifacts discovered in Karrlakton, the hydra is unleashing a quiet wave of fear across the city. And in the dank tunnels of the sewers, it hunts for a long-dead bard's worst mistake--an artifact that will transform innocent people into unstoppable killers...
The Hydra's Plan
The pyrohydra was brought into Karrlakton with orders to spread fear and destablize the city's defenses. It was given no specific plans on how to acomplish that goal, however. Its new master did give it a secret weapon to use in pursuit of its goal, but the hydra found this weapon difficult to control, so it began to search for some other tools to use.
At first, the hydra snatched criminals and thugs away from the street of the dock district under cover of darkness, charming the captives, and then using them as its own private thieves guild. Its gang, the Black Rose, has already begun to cause mayhem throughout the city. But recently, the chance discovery of a long abandoned hiding place in the sewers has given the hydra an extra plan. The hydra has uncovered one of the secret boltholes of Vothario, a legendary elven seducer who often found himself needing a place to hide from angry husbands or spurned lovers. One of the bard's flawed creations, a cursed pair of drums, has become the centerpiece of the hydra's plot to spread panic throughout the city.
Notes on the structure of the adventure:
This adventure is divided into two halves. The first part, 'Fear in the Streets', consists of eight small encounters and vingettes designed to give the players a sense of what is happening in Karrlakton. These encounters can be run in any order, and one does not have to use them all. (It would be quite possible, and even reccomended, to insert these encounters into parts of other adventures, thus slowly setting up the foundation of this story). Part one, as a whole, acts as the 'hook' for the player characters, presenting enough unusual happenings to draw the attention of even the most jaded of adventuring groups. Part one also generates an interesting red herring for the characters to chase: the elven bard Vothario.
The second part, 'What Lies Beneath', describes a (literal) crawl beneath the city, and an eventual confrontation with the pyrohydra itself. This part of the adventure is more direct, but also much more dangerous, and begins as soon as the characters discover one of the entrances into the hydra's lair. The player characters may or may not be able to stop the wicked pyrohydra from finding and/or using the cursed artifact that it seeks.
Part one: Fear in the Streets
(Note: to keep up the general level of danger and excitement, the DM may wish to include after every three or so encounters, a combat featuring 1d8+2 low-level Black Rose gang members who are after the characters for "sticking their nose into other people's business". These fights will probably not be much of a threat for the characters, but will serve to create a little dynamic tension in the middle of some otherwise quiet encounters. Black Rose thugs are usually low-level warriors and rogues, with an occasional mid-level leader, at the DM's discretion--perhaps one of the gang leaders mentioned in Appendix I. The thugs can be easily identified by their black leather armor, often decorated with some sort of rose symbol.)
Sidebar: The structure of the city.
Karrlakton is a very large city of about 60,000 citizens. For the purposes of this adventure, we'll consider the city to be divided into six broad districts. These districts are not sharply distinguished in anyway, and tend to blur into one another at the edges. DMs should certainly add more detail as they see fit to help flesh out individual locations, always keeping in mind the essential character of city: gloom and despair. Everything is grey and dark, and these days, there is also a mild sense of fear in the air.
District one: central city. The wealthiest district, containing most of the mansions of the nobles and the major centers of city and regional authority. Information is hard to come by here, as most of the people are unwilling to share rumors with strangers or members of the lower class (+2 circumstance modifier to all Diplomacy and Gather Information DCs unless the character making the check seems to be a member of the aristocracy). The district is home to the Greymarble Library, an excellent place to research historical information, although there is a cost to use it (5 gp per day of research). At the moment, the city's rulers are discussing a plan to tear down the city walls, to "make the atmosphere of the city a bit more open around here". This proposal, known simply enough as the "Tear Down the Wall Initiative", has been met with a great deal of controversy.
District two: the docks. Quiet and mostly abandoned, the dock are home to most of the city's most vicious and dangerous criminals. Since the Cyre river became too dangerous to easily travel, the city's once-bustling docks lie mostly unused. The few taverns and inns still open in the distrcit are good places to hunt for rumors (-2 circumstance modifier to the DCs of Gather Information checks) although most (50%) of what the characters learn will be outright lies and misdirection. The clever use of bribes can help the characters make friends here, but may also attract attention. For every occasion on which the characters use bribes to help them succeed on a Diplomacy or Gather Information check, there is a cummulative 10% chance that they will ambushed by a group of 1d4+1 low-level muggers, who have decided the characters might be easy marks.
District three: mid-city markets. The mid-city is the area between the docks and the central city, and is mostly poor and insular. The small marketplaces sell food, clothing, and other essentials, although a few shadowy booths hidden in alleys also sell simple weapons. The hydra has several agents here, who will report to their master if they notice any suspicious people nosing around (such as the characters). Assume the merchants in this district start off as Indifferent, but if the characters do anything to draw the hydra's attention to themselves, rumors will suddenly rise up portraying the characters as dangerous, unbalanced thugs, causing the merchants to shift their attitude to Unfriendly.
District four: mid-city residential. The people in this area are simple, poor folk who wish to be left alone. The neighborhoods are insular and quiet, making it difficult to learn much (+2 circumstance modifier to the DCs of any Gather Information or Diplomacy checks). This district has been hit the hardest by the hydra's campaign of terror, and everyone seems frightened and nervous. Oddly enough, the characters see people sleeping outdoors all around this district, often whole families at a time (this is because of the claustrophobia the hydra has generated; see part two for details).
District five: north-city markets. The north-city is the area on the far side of Karrlakton, away from the river. Conditions here are a bit nicer--craftsmen and skilled laborers sell their wares here, and a pair of weapon factories, the Karrnathi military's main suppliers, dominate the industry in this district. The markets here have a better variety of goods than in the mid-city, with a corresponding increase in prices (assume everything for sale in this district is 5% to 10% more expensive than base cost). The hydra is currently trying to insert its agents into the markets here.
District six: north-city residential. The neighborhoods of the north city are a bit more friendly, a bit less plagued by the vague sense of fear that seems to be settling across the rest of the city. The people here are, for the most part, willing to talk to polite strangers, but there is little useful information to be had here, as the citizens of this district know little about what is happening in the poorer sections of the city. This is the best place to learn about Vothario, as the people of this district still tell tall tales about the legendarily lecherous elf.
Part one, encounter one:Robbery. At some point during their stay in the city, the characters find that they have been robbed. This encounter probably requires the most adjustment from the DM, as the exact conditions of the robbery will vary greatly depending on where the characters tend to spend the night and how well their belongings are protected. Ideally, the theft happens while the characters are staying the night in a local inn. A low-level rogue (Hide and Move Silently totals of +10 each; don't forget the -10 penalty that sleeping characters take on all Listen checks) sneaks into the characters room and makes off with a small amount of gold or an item. The thief then leaves a withered rose behind as a calling card.
If the characters manage to catch the rogue in the act, or successfully track him to his hideout (DC 25 Survival check, due to difficult conditions), they can try and interrogate him. Cord ir'Vain is a former noble whose family lost all their holdings, forcing him to resort to a life of crime. He was being recruited into the Black Rose gang--this job was supposed to be his initiation. He doesn't know how to contact anyone in the gang, because they had contacted him first, and were going to contact him again after the job was done.
(The characters may not be able to catch the thief--that's okay. Just remember to include whatever was stolen as part of the hydra's treasure at the end of the adventure.)
The withered rose itself is completely ordinary, with no traces of magic. Roses are fairly common--this one could have come from any one of the flower sellers in the city. See the investigation section, below, for more about what the players can learn from this clue. The main purpose of this encounter is to get the withered rose into the characters hands.
Part one, encounter two:Quack. While passing through the mid-city markets, the characters pass a large crowd of tired commoners. The crowd is gathered around an oily-looking merchant with large curled mustaches. The merchant is loudly proclaiming the properties of his "Dreamless Sleep Potion", while a ragged halfing takes orders from the desperate commoners. The characters can hear the customers complaining among themselves about how they haven't gotten a good night's sleep in ages because of their recurring nightmares.
Any character who takes the time to listen to the merchant's sales pitch can make a Sense Motive check (DC 18). If the character has 5 or more ranks in Heal or Profession (herbalist), they gain a +2 bonus on their Sense Motive check (a total of a +4 bonus if they have 5 ranks in both). Those who make their checks realize that the merchant is lying about his wares--he is likely selling nothing more than flavoured water.
If the characters wish to involve themselves at this point, they will have to make Diplomacy checks to convince the crowd that the merchant is tricking them (alternately, a Bluff check might also work; or the players might decide to profit from the merchant's scam by joining forces with him and helping to sell the 'potion'). The commoners really want to believe that the potion works, so it won't be easy to convince them otherwise (DC 20). Once convinced, however, the crowd disperses sadly, their hopes thwarted. They appear to be too tired to really get angry with the con artist merchant. (Alternately, if the characters side with the merchant, he'll offer them 30% of his sales, which after about four hours of work amounts to 100 gold for the characters). The merchant, whether successful or not, does not return to sell his potion here again.
The main point of this encounter is to let the characters know that the city is suffering from a plague of nightmares, the mid-city area in particular. If asked, the commoners will say that their dreams are very similar: being buried alive, being trapped underground, the wall of their houses or of the city slowly closing in on them. All of the nightmares have common themes of claustrophobia and suffocation.
Part one, encounter three:Nightmare. (This encounter may be used at any point, but it works best if it comes at some point after encounter two). At some point, while sleeping near or in the mid-city district, the characters suffer terrible nightmares. A specific dream is described in detail below, but only one of the characters should experience it (and remember it clearly). The other characters should have troubling but non-specific similar dreams featuring images of being buried alive and feelings of suffocation and claustrophobia. Choose randomly which character experiences the full dream (and remembers all of it), or choose whichever character is known to be the most 'sensitive' (perhaps a wizard or other magic-using type).
In the dream, the character is standing in a dank and smelly room. It is incredibly hot. There is a large old chest nearby with an intricately-carved crest that somehow seems important. The crest is of a lovely rose, but it appears to have recently been charred black. Just in front of the character is a deep pit. There are strange noises coming from the pit, hungry noises which become more and more omnious. Suddenly, a blast of fire hits the character from behind, driving them off their feet and into the pit. Cold earth rises up all over them, dirt filled with sharp rocks that tear at their skin. The earth wraps around them, making it impossible to move, surrounding them, drowning them, pouring itself down their mouth and into their lungs...
This where the dream ends and the character awakens, feeling short of breath. The shortness of breath (and an intense feeling of claustrophobia) remains until the character goes outside or into some sort of wide open area.
This encounter's main purpose is to give the characters a sense of fear, but the dream also provides them with a couple of vague clues (the incredible heat and the blast of fire pointing to a foe that uses fire as a weapon; the rose crest possibly leading to connections with the Black Rose Gang or with Vothario).
Part one, encounter four:Trial. While travelling through the central city district, the characters pass by notices annoucing an upcoming public trial. The criminal in question is said to be one of the leaders of the notorious Burnt Flower gang (the local legal authorities have unknowingly gotten the name of the gang incorrect).
By this point the characters may have heard some rumors about the Black Rose gang and may decide to attend the trial. Or the person on trial may be an NPC that the players have met before and who they believe to be innocent of the charges. Or they may attend the trial at the request of an ally, who asks for the characters' impartial observations (If the characters have played through the prelude, "A Fearful Harvest", then General L--- might ask one of them judge the trial on his behalf, as he is much to busy to attend). If the characters decide not to attend the trial, or there isn't a hook strong enough to draw them to it, they later learn that the accused was judged guilty and sentenced to death, despite repeated assertions of innocence.
The trial is held in a large open ampitheater near the city hall. (Ideally, a few days should pass between the time that the characters first see the notice for the trial and the time that the trial actually takes place. The characters could experience one or more of the other possible encounters between the two events.) The six judges all sit near the center of the audience section, while the accused stands on a raised platform in the middle of the ampitheater, restrained and flanked by two scary looking Karrnathi skeletons. A small crowd has assembled behind the judges, in order to watch the trial. Two young men stand behind small podiums arranged in front of the judges, one dressed in red robes and the other in green (the green robed man is here to present the notes for the defense, the other the notes for the prosecution).
The six judges are all aristocrats, all well dressed and healthy looking. Before the trial begins, the characters can pick up discussion among the crowd that indicates the judges have already pretty much decided that the suspect is guilty--the trial is a formality.
The prosecutor's notes are strong--it seems that a snitch in the suspect's own gang passed on a lot of damning information. The charges include conspiracy, murder, extortion, smuggling...the list goes on and one. The defense doesn't have much, just the suspect's claim that they were mind controlled by a powerful wizard (this seems to be a common defense, and one that the judges pay little attention to).
The suspect can be any one of the heads of the Black Rose gang (see Appendix I for a list). The DM can decide which of the gang leaders best works for this scene, but I suggest Hawk, the young ranger in thrall to Gemlin, as the characters will probably be sympathetic to her. The leader was ratted out by one of the gang's newer members (who is later found stabbed to death, a withered rose left on the body) and was surprised to be caught. After a few days away from the influence of the hydra, the suspect came to realize that they had been magically influenced, and decided to use that as their defense.
If the characters do not involve themselves in the trial, the judges all vote the suspect guilty, and the sentence is death. If one of the characters is on the judging panel, she may attempt to vote otherwise and to convince the other judges to vote along with her. Convincing one judge takes a DC 20 skill check (Diplomacy, Bluff, or Preform) and another judge is convinced for each three points by which the character beats the difficulty (so two judges are convinced at a check of 23, three judges at 26, and so on). In the event of a tie, the criminal is judged to be guilty--there has to be a majority vote of innocence in order to free the suspect. Characters who are not on the judging panel find it more difficult to sway the judges opinions (the DC of all checks is increased by 2), as the judges are not inclined to listen to random strangers who decide to interrupt the proceedings.
If the suspect is set free, the characters may have gained a useful source of information. Of course, the Black Rose gang will try and eliminate the newly-freed criminal as soon as possible. (This may lead to a few minor combat encounters for the characters. Assume death squads of 1d6+2 2nd level warriors led by 1d2 4th level rogues). The criminal knows the gang's main goal (to spread terror and cause mayhem), the names of the other leaders (see Appendix I), one of the entrances to the hydra's lair in the sewers (unfortunately, the hydra, knowing that its servant has been caught, has sealed off that entrance), and the importance of the withered rose (the hydra's lair guardians are trained to avoid anyone carrying one of the roses). Getting this information should be difficult, however, as it will not be easy to gain the former suspect's trust. This should be a matter of roleplaying, not of simple dice rolls (although Intimidation might work just fine, if the characters choose that route).
Part one, encounter five:Job. At some point, a minor level member of the Black Rose gang approaches the characters with an offer for a job. Jivaro, a rather dim-witted halfling sneak, had been assigned to steal some rare books from the Greymarble library. He chickened out, however, and decided to find someone else to 'subcontract' the job to. Having gotten an entirely inaccurate portrait of the characters from the rumors that he'd heard (or perhaps an accurate one, depending on the characters in question) Jivaro seeks out the PCs and offers them the work. He asks only a 40% commission, although if the characters decide to take the job, Jivaro can be bullied down to a mere 10%. (By the way, Jivaro is the same ragged halfling who acts as the merchant's assistant in encounter 2).
Jivaro was supposed to steal a three volume biography on the life of Vothario. It would be incredibly easy to steal, as the library is unguarded and sealed only by a single lock on the massive front doors (Open Lock DC 28). There are no windows one the first floor, but one could scale the wall fairly easily (Climb DC 16) and break in through a second floor window. It would also be simple to enter the library during the day (paying the 5 gp fee) and Bluff one's way out with the books (Bluff DC 20). The only complication is that Jivaro was supposed to leave a withered rose behind, and if the players agree to steal the books for him, he insists that they leave the rose as required (Jivaro has a rose that the characters may take). The player characters probably won't steal the books, but if they do, Jivaro will arrange to turn then meet one of the gang leaders (Maya, who is Testra's thrall) and will then deliver the 100 gp reward (minus his agreed-upon percentage). If the characters set things up to try and follow Jivaro they may do so, but when Maya discovers them, she will call upon her goons and fight to the death (knowing that her master, the hydra, is likely to kill her if she is captured or gives away any information). The characters may also attempt to have Jivaro contact Maya without the books (Jivaro should be easy to intimidate or convince), in which case things happen more or less the same way, except that Maya will also attack Jivaro if she assumes his betrayal.
The biography turns out to be surprsingly steamy, bordering on pornography--well, perhaps not so much of a surprise, considering the subject. The hydra wanted the books because it is searching for Vothario's Pipes of Prowess (more details in part two) and it thought the books might have a clue. They do--in the third volume, Vothario's biographer suggests that the bard tried to destroy his own creation (the pipes) but failed. He supposedly hid the pipes in "a place where no man could ever play them". The book says that the pipes were supposed to be Vothario's greatest creation, but that they came out flawed in some way (the biographer does not know what the flaw was). But even if the hydra doesn't get its claws on the books, it will still eventually find the pipes in time for the final confrontation of the adventure, so don't worry about it.
This encounter is intended to make the characters more aware of the actions of the Black Rose gang, as well as build on the Vothario red herring (while also potentially providing a useful clue--the pipes were thrown into the river, where a wind instrument, naturally, could not be played).
Part one, encounter six:Missing. Ella, a polite but frightened young human woman, contacts the characters and asks them to find her recently married husband, who has mysteriously. Her only clue is a withered rose that was left on her doorstep. She describes the her husband in great detail and says that he was last seen in the docks area (being one of the very few sailors brave enough to still work on the Cyre River). He went missing four days ago.
The characters have no way of knowing this, but Ella's husband, Ferlis, is already dead. If the characters have already had the nightmare described in enounter two, then they suddenly realize after Ella's description that the person in the dream (the person from whose perspective the dream takes place) was none other than Ferlis. If they have the nightmare later on, they realize this shortly after waking. (For an added interesting twist, have Ella's description of Ferlis closely match the appearance of the character who had the nightmare).
Ella has no money to offer the characters and no way to reward them (in fact, she is in danger of losing her home now that she no longer has her husband's income to rely on). She refuses to believe that her husband may be dead, and begs the characters to find him. Characters who search for Ferlis may make Gather Information checks (DC 30 normally, or DC 25 in the docks) once every four hours of searching. Keep in mind that people in the docks may unintentionally (or perhaps maliciously) give the characters inaccurate information. On a success, the characters learn that Ferlis was last seen heading into the mid-city markets. With another success, characters learn that for several days prior to his disappearance, Ferlis had been telling everyone that would listen about the smugglers he had spotted slipping crates of weapons out of the city. With a third success, characters learn that members of the Black Rose gang had been asking about Ferlis on several occasions.
This encounter is intended to showcase the dark deeds of the Black Rose gang, hopefully by eliciting some sympathy from the players on behalf of poor widowed Ella. This should provide a good reason for characters (and players) to want to confront the Black Rose gang, especially if Ella remains a recurring NPC.
Part one, encounter seven:Rumble. Late one evening, the characters are disturbed by the sounds of a large battle. In a broad alley between two inns (one of which just happens to be the characters' inn), a group of six Black Rose thugs are attacking three burly-looking dockworkers (some of the last few survivors of a rivial gang that dared to challenge the Black Rose). Things looks grim: one of the dockworkers is already wounded, and the Black Rose thugs are well armed.
The characters may ignore this conflict, or they may get involved on one side or another. If they ignore things, the Black Rose thugs swiftly eliminate their targets and return to their leader, the Hooded Ogre (one of the Black Rose leaders, Uthlug's thrall--see Appendix I). If they chose to get involved, neither side will prove to be much of a challenge for the characters. If they rescue the dockworkers, they will be rewarded with promises of friendship and an offer of drinks at the nearest scummy tavern. The characters may be able to follow any surviving Black Rose thugs back to their leader. If they help the Black Rose thugs, they will be rewarded with an offer to join the Black Rose gang (an offer not to be lightly refused). The Black Rose thugs will take willing characters to meet their leader, who they refer to in whispers as the Hooded Ogre.
One way or another, this encounter is likely to end with the characters meeting the Hooded Ogre. Because the Ogre is loud and violent (assume his starting reaction is Unfriendly) things will probably end in a fight, unless the characters have something up their sleeve. This may be one possible route by which the characters learn of an entrance to the hydra's lair. The DM should not make such information easy to obtain, but neither should he ignore the clever use of tactics and tricks on the part of the players. Although the Hooded Ogre knows about one of the entrances, he has never been inside (he is too big too fit) and he does not know about the need to carry a withered rose to avoid the attacks of the lair's guardians.
Part one, encounter eight:Murder. An important noble or aristocrat is found murdered, and their death becomes the major topic of conversation across the city. This encounter works best if the noble in question had some prior association with the characters (if you have previously run the prelude, "A Fearful Harvest", then General L--- is the murdered noble). A withered rose is found at the scene of the crime.
If the characters choose to get involved in the investigation, they will find few clues to help them. It becomes appearant that the murdered noble was important in some way to the defense of the city (perhaps a military leader, or one of the weapons factory owners), but what this means is anyone's guess. There are, unfortunately, no clues that betray the identity of the murderer (who happens to be Zhukov, one of the Black Rose gang leaders, the thrall of Halgrin--see Appendix I).
Over the next few weeks, there are several such murders (one every three days or so). Each of the victims is involved in the military defense of the city in some way, and it most cases it appears that the victims knew the killer, or at least trusted the killer enough to let him into their house (Zhukov, a solider, knew most of these men at least by reputation, and he used his uniform and rank to bluff his way into their houses). The murders are part of the hydra's plot to destablize the city's defenses--characters who interrogate Black Rose gang members may learn more of this.
Sidebar:Investigation.
At some point, the characters may to want to do a little investigation of their own. There is a lot they can figure out from simple Gather Information checks (see the lists below), but they may be able to get even more information by questioning the right people. If they capture a Black Rose gang member, the characters will be able to learn quite a bit about the gang, although only the gang leaders know of the entrances into the sewers near the hydra's lair. Eventually, however, the characters may be able to capture one of the leaders and force them to reveal the location of one of the entrances. Part one effectively comes to an end when the characters find one of the entrances and choose to use it. As such, the DM should not make this information too easy to find (after all, the four entrances are the gang's most highly guarded secret). Once the characters do know, however, it is time to move on to the climax in part two.
The red herring/subplot about Vothario can keep the players busy for quite some time, depending on how the DM chooses to run things. Some players may begin to believe that Vothario is the main villian behind the Black Rose (which may leave them in for a nasty surprise when they make their way into the hydra's lair). The important information that the characters should get out of the Vothario subplot is that he created some magical instruments and left them hidden in Karrlakton.
About the withered rose:
DC 12 The rose has been left at the scene of numerous robberies and crimes recently, mostly in the mid-city district.
DC 15 The rose is the sign of the new gang that has been slowly taking over the mid-city area. the gang calls themselves either the Black Rose or the Burnt Rose.
DC 17 (DC 12 in north-city residential) Vothario always left a fresh rose on the bed of his lovers, on the morning after. It was his symbol--he wore a rose crest and had a rose design on his signet ring.
About the Black Rose gang:
DC 15 The Black Rose gang has been gathering strength for about a month now. They are very intimidating, and most people are scared to speak about them.
DC 22 The Black Rose gang is involved in the usual sorts of criminal activities--robbery, extortion, smuggling--but their activites seem random, chaotic.
DC 25 Several of the leaders of the Black Rose gang are thugs who used to be bitter enemies. No one can understand why they're suddenly working together like the best of friends.
DC 27 The leader of the Black Rose gang lives in the sewers, they say, but nobody knows how to find his or her exact location.
DC 30 The Black Rose are desperately looking for something--a magical set of pan pipes. No one knows why or what the pipes are supposed to be able to do.
About the nightmares:
DC 12 The dreams started about a month ago, and have gotten constantly worse. It's hard for anyone to get any sort of sleep at all.
DC 15 Some people say that they've dreamed about men and women that have gone missing. In the nightmares, these people are murdered by being buried alive.
DC 20 Many, if not all of the missing people (the ones that have appeared in some of the dreams) have had some connection to the Black Rose gang, either working for them or openly defying them in some way.
DC 22 The noble who suggested the "Tear Down the Walls" initiative currently creating controversy among the city government allegedly got the idea after experiencing one of the nightmares while visiting cousins in the mid-city district.
DC 25 Oddly enough, the dreams seem to be moving around the city. Different neighborhoods experience the nightmares on different nights, although it seems to be random. (Further research, requiring several hours of work and two more DC 25 Gather Information checks, can pinpoint the center of the disturbance, where the dreams are strongest.)
About Vothario (all these DCs are -8 in north-city residential)
DC 15 Vothario was an elven bard, notorious for seducing women, who lived in Karrlakton about a hundred years ago, before the start of the Last War. No one knows what happened to him, and he might still be alive.
DC 20 Vothario's symbol was the rose--the flower of love. He always left a freshly blooming rose on the beds of his lovers, as he snuck away with the morning light.
DC 25 Vothario is remember for his (many) romantic conquests, but he was also quite skilled at magic. It is rumored that he made many magic musical instruments, some of which are said to be hiding in the city.
DC 30 Vothario did indeed make several magic instruments, including some Drums of Panic, a set of Pipes of the Sewer, a Chime of Opening, and a unique magic item that he called the Pipes of Prowess. What few people know, however, is that each of Vothario's creations had a major drawback or curse.
Part two: What Lies Beneath
Eventually the characters will find their way into the sewers beneath the city, where the monstrous leader of the Black Rose gang awaits them. The hydra has several potent defenses, and is prepared to fight off almost any intruders. First of all, the tunnels themselves make moving and fighting difficult. Each tunnel is only three feet high and three feet wide, forcing characters to crawl (this imposes a -4 penalty to a character's AC and a -4 penalty to all their attacks; small characters, having a bit more room to maneuver, only suffer a -2). Secondly, the sewer tunnels are protected by a large number of serpents and oozes, all of whom have no trouble fighting in the cramped quarters due to their unique shapes. And thirdly, the hydra has a secret weapon given to it by its master (it's a surprise--see below for more details).
But finally, and most importantly, the hydra has Vothario's Drums of Panic, which one of its minions plays every night. These drums cause fear, just like normal drums of panic, but the fear is a specific one: claustrophobia. Although the drums have a limited range for their full fear effect (120 radius; DC 16 Will save or suffer as per fear spell) anyone who hears the drums at all over a period of time, or feels their vibrations, begins to suffer from mild nervousness and fear. The hydra has been playing the drums every night since it found them (it sleeps during the day). The vibrations have been seeping up through the pipes, and infecting the people of the city with nightmares and claustrophobia.
If it is nighttime, the hydra is awake, and has at least three of its thralls with it (chosen randomly or DM's decision--see Appendix I). One of the thralls is playing Vothario's Drums of Panic, and the sound is vibrating up through the sewer pipes. To the characters, it feels as though the walls are throbbing slightly, almost alive. Although the sound is still too indistinct to have a direct effect on the characters, it does make them all begin to feel slightly claustrophobic. This feeling will grow as they move closer to its source, increased, no doubt, by the fact that they are moving through 3x3 tunnels.
If it is daytime, the hydra is asleep, and has only one of its thralls with it (the thrall is probably also sleeping). The hydra always leaves one of its heads awake, however (the various personalities take turns with this duty). If it hears sounds of battle in the pipes above, it will wake up the other heads and command the thrall to begin drumming (it may be important to note that the hydra cannot play the drums--its large talons are too clumsy--or any of Vothario's instruments). Assume that each time the characters enter combat, the hydra makes a Listen check (+7) versus a DC of 19 (the DC may grow lower as the characters approach the center of the maze). The hydra does not recieve its usual racial bonus to Listen checks on this particular roll (normally the hydra would have a +9)
Map Key: There are four circular chambers on the map (each marked with a circled 'T'). These are the four entrances to the lair (each hidden in a basement of a house somewhere above). The entrance areas are the only places where the ceiling is of normal height, and each is a little smaller than 10 feet in diameter. The walls are stone and the ladders set into the wall at each entrance are metal. If you used encounter four in part one, one of the entrances has been collapsed (determine randomly). The hydra may collapse other entrances, at the DM's discretion, if it feels that an entrance's secret location has been compromised.
The large circular area at the center of the map is the hydra's lair, of course--formerly a secret hiding place of Vothario's. When the characters approach one of the four tunnels leading into the lair, they are attacked by the hydra's secret weapon (see encounter #3, below). Note that each appearantly dead end on the map is actually a pipe that becomes smaller than the characters can possible traverse. Most of these pipes are homes to the hydra's defenders, snakes and oozes. This means that an attack can come from out of a "dead end" the characters just crawled away from.
Encounters: There are four possible encounters in this area, and the first two are small ones that can each happen multiple times. The second two are more dangerous ones that are unique. The DM may wish to add extra encounters to expand this section of the adventure (this is an excellent dungeon for traps of all sorts, such as grates that randomly drop down and seperate the party or shallow spiked pits disguised with filth).
Encounter #1: Snakes!
The snakes in this area should be of a CR equal to roughly half the parties' average level (the difficult fighting conditions make even low CR creatures much more dangerous). The characters should have a 30% chance every minute of encountering 1d2 snakes. I reccomend large or huge viper snakes (CR 2 and 3, respectively), or, for more of a challenge, a Giant constrictor snake (CR 5). (Monster Manual, pages 279-281).
All of the snakes have had charm animal cast on them at one point or another, and they have been trained to avoid anyone who shows them a withered rose (the snakes have a sharp enough sense of smell to detect the roses, if they are brought close enough to them) (does a withered rose have a smell? yes, they smell very faintly like rotten perfume).
Encounter #2: Oozes!
There are fewer oozes in the sewers than there are snakes, but they are much more dangerous. Assume the characters have a 15% chance of encountering an ooze for every minute they spend in the tunnels. It is best if the DM uses oozes with a relatively low CR compared to the characters. I suggest grey oozes, they will be dangerous enough at CR 4, given the conditions. A sadistic DM might bring in a black pudding, but should be prepared to have their players throw dice at them, with good reason (oozes may be found on pages 201 and 202 in your handy Monster Manual).
Malforias has used his amulet to charm the oozes, and train them to avoid those who bear a withered rose (how do the oozes recognize the roses, given they have no eyes or nose? that is a mystery we may never solve, my friend. short answer: magic).
Encounter #3: Spikey! (Warning: this is a dangerous encounter that may badly sap the PCs' resources. Be careful.)
In the forbidding gloom of the Mournland, there are terrors that the people of the civilized lands of Khorvaire could never have imagined. Among the worst of these terrors are the living spells, congealed bits of animate magic that have taken on lives of their own. When the pyrohydra's master sent it to Karrlakton, a secret weapon was also sent along: a living spike stones spell.
Spikey appears to be a huge mass of undulating earth filled with hundreds of sharp pieces of stone. It is, in effect, an ooze, which makes it perfectly suited for battling in these small tunnels. It prefers to use its engulf ability whenever possible, smothering its foes as it tears at them with its many sharp spikes.
When the players reach any of the four tunnels that lead into the hydra's lair, the hydra (specifically Randal) uses a wand of levitate to raise Spikey up out of the pit it is normally kept an into the tunnel the characters are traveling through. The ooze always attacks the nearest target every turn (yes, it will attack the hydra if the hydra is closest), and it will fight until it is utterly destroyed.
Spikey! CR 7; Medium Ooze; HD 7d10+14; hp 57; Init +0; Spd 40 ft.; AC 14, touch 14, flat-footed 14; Base Atk +5; Grp +7; Atk +7 melee (1d8+2 bludgeoning, slam, plus 1d8 piercing, spell effect); SA Engulf (Ex), Spell Effect (Su), Blindsight, DR 10/magic, SR 14, ooze traits
Spikey should be a very difficult challenge for the characters. Keep in mind that the characters are, at this point, probably within range of the Drums of Panic, which will make things worse. Luckily for the characters, there is something that might be able to help them. At either end of the tunnels leading to the hydra's lair there are small metal levers--water flow control switches, now unused. It takes a Spot check DC 14 to notice one of the levers. If pulled, the levers cause metal plates to fall at each end of the tunnel, sealing it off. If used carefully, this might let the character trap Spikey, but that will also force them to go around and enter the hydra's lair from another direction.
Encounter #4: The Hydra's Lair--Final confrontation!
If the characters finally make it into the hydra's lair, they are in for an incredible confrontation. The hydra itself is prepared to fight viciously to protect its territory, and depending on the time of day, it will have one or more of its thralls with it.
But the hydra isn't the greatest challenge the characters will have to face here. For the Black Rose gang has finally uncovered the last and most dangerous of Vothario's flawed artifacts: the Pipes of Prowess. These pipes were originally intended to give Vothario's bodyguards extreme prowess and skill in battle. And the work: those under the effect of the pipes temporarily gain the use of the Cleave and Greater Cleave feats. The drawback, however, is that the target is forced to try and use those feats at every possible opportunity--which means that the target will immediately lash out and attack whatever happens to be closest.
The target of the pipes is allowed a Will save (DC depending on how evil the DM feels, but I suggest a mild 14) each round. If they fail, they must immediately try and make use of their new feats, which means attacking whatever happens to be nearest, even if it is an ally.
As soon as the characters enter the Hydra's lair, it commands one of its thralls to begin playing the pipes (if it only has one thrall present, it commands the thrall to stop playing the drums and start playing the pipes). The thrall targets the character furthest away from the hydra, and if there are multiple possible choices, the thrall will target the character that seems most martial (wearing heavy armor, brandishing a mighty blade, etc.). The group may suddenly find that one of their number has begun cleaving into them from behind.
Even if the party manages to deal with the effects of the Pipes of Prowess (the hydra will stop to watch the fray, at least until it is attacked), they still have the hydra and its thrall(s) to deal with. The hydra is practical and is willing to settle for driving the characters away, and it would even be willing to negotiate, if the characters try to do so. Under ordinary circumstances, the hydra would be reluctant to reveal the name of its master. But if it finds itself on the verge of death, it will curse the characters with this final remark <spoiler>:
"The Lord of Blades will have your heads!"
Full information about the pyrohydra and its personalities is located below, in the appendix. The hydra's heads should be very verbose during this final battle: arguing with one another ("What did you cast that spell for, idiot?"), making fun of the characters ("Cor, that's an ugly one."), and making general comments about the battle ("Ah, that was a clever move! ...but not clever enough!").
Is it possible for the hydra to survive and somehow escape at the last moment? Yes. It owns a ring of teleportation that it normally keeps in its locked chest. If forewarned, it may have commanded one of its thralls to bring out the ring, and it won't hesitate to use it if it has no other choice. The ring will take the hydra safely to the side of its master. If you feel that the hydra will make a good recurring foe, then by all means allow it to slip away at the last moment (after delivering its furious threat of revenge).
The hydra's treasure is all kept in a small blackened chest that used to belong to Vothario (the chest bears Vothario's rose crest). In addition to holding anything that may have previously been stolen from the characters (see part one, encounter one), the chest also contains 2,156 gp in various coins, a set of pipes of the sewers (drawback: the rats summoned attack everyone in the area, including the user), a chime of opening (drawback: unlimited uses, but only affects clothes), and a horn of fog (drawback: the fog is extremely damp and soaks everything in the area). The characters can also take the drums of panic (drawback: creates specific fear--claustrophobia) and the pipes of prowess (drawback: see above) for themselves, but such items may prove tricky to make use of. On the hydra (if it doesn't teleport away) they can find an amulet of ooze control. On the ground near the hydra is a wand of leviation (it had been clutched in the hydra's teeth, and then dropped when the battle started).
Appendix I: The Pyrohydra, lord of the Black Roses
This pyrohydra, which will provide quite a challenge to most adventuring groups, is a unique monster in several ways. First of all, it is intelligent--ordinarily, hydras are not. Secondly, this intelligence is spread out though several different personalities, with each head mainfesting its own unique personality. And finally, each of the pyrohydra's seperate heads has studied magic, making the collective as a whole very, very dangerous.
Despite having many heads, the pyrohydra can still only cast one spell per round. Each round, one of the pyrohydra's personalities can cast one spell, but the other heads can still fight and breathe fire as they normally could. The various personalites tend to babble amongst one another constantly.
The pyrohydra is considered to have the stats of an average eleven-headed pyrohydra as presented in the monster manual (p. 157) with the exception of its spellcasting abilities. For simplicities sake, the hydra's spellcasting 'level' grant it spells only--no increased hit points, saving throws, attack bonus, or other benefits of having class levels. Its unique abilities and intelligence make it CR 13.
Below is a brief look at each of the hydra's different personalities and the humanoid thrall that works for each individual head (these thralls, for the most part, were affected by repeated used of the charm person spell). These descriptions are kept vague and short for two reasons: one> so that the DM has free reign to craft these NPCs and personalities to his liking, and two> because I'm running out of time and I want to finish this. The format is Hydra personality /slash/ humanoid thrall
Head number eleven: Randal, an overly curious Diviner, male, level two spellcasting ability. Randal is very curious about the *ahem* physical life of humanoids, and the other personalities consider him to be something of a pervert. / Vellen, a carefree half-elven bard, male, who is unknowingly an descendant of Vothario. Randal often instruct Vellen to rob wealthy ladies of society by seducing them, but sometimes seems more interested in Vellen's description of the seduction than in the treasure.
Head number ten: Testra, an intellectual Evoker, female, level two spellcasting ability. Testra loves to read, and is often quoting her favorite authors. Testra would like to believe that she is the most skill spellcaster of the group. / Maya, a failed half-orc wizard (actually rogue), female, who greatly looks up to Testra. Maya has absolutely no magical talent whatsoever, but likes to pretend that she does by using a combination of Slight of Hand and alchemical items.
Head number nine: Gemlin, a hot-tempered Conjurer, male, level two spellcasting ability. Gemlin is one of the less intelligent personalities. He gets angry easy, and loves to use burning hands on his opponents (he loves magic, and doens't understand that burning hands isn't as useful as his own fire breath). / Hawk, a cute and pixieish young elven ranger, female, who's actually quite nice when you get to know her. But she's no less dangerous for having a nice personality--she has a temper almost as bad as Gemlin and is a crack shot with her longbow.
Head number eight: Wolwoo, an irreverent Illusionist, male, level two spellcasting ability. Wolwoo appears to be the only one of the personalities with anything resembling a sense of humor--unfortunately, he takes it too far. He is fond of deadly practical jokes. / Varmeer, a cowardly halfling rogue, male, who happens to be in way over his head. Varmeer is often the subject of Wolwoo's pranks, and has become very twitchy as of late. He spends more time in the hydra's lair than any of the other thralls (and as an interesting but probably pointless side note, he happens to be Jivaro's long-lost father).
Head number seven: Halgrin, a cruel and cunning druid, male, level two spellcasting ability. Halgrin believes that he is an animal and should act accordingly. He tends to speak in grunts and howls, though he is actually capable of normal speech. No one knows how he learned to cast druid spells. / (Halgrin has no thrall. He used charm animal to tame/train the snakes that guard the lair.)
Head number six: Rallfi, a child-like Universalist, male, level one spellcasting ability. Rallfi was the last of the heads to develop a personality, and acts like the youngest of the group. He is easily excited but very immature and unstable (he's quite likely to start crying during the middle of a battle, for instance). / Mace, a three-year old warforged fighter, neuter, whose own personality is still mostly unformed. He was built to be a soldier in the Karrnathi army, and he tends to act in a very military fashion. Because he doesn't need to breathe, he's the thrall that finds the Pipes of Prowess (by walking along the riverbed).
Head number five: Qalla, a deeply paranoid Abjurer, female, level two spellcasting ability. Qalla is the planner of the group--and she plans a lot. She's responsible for making sure the hydra's lair was kept a closely-guarded secret. She trusts no one, not even (especially not even) her fellow heads. / Zhukov, a disgruntled human soldier, male, who almost deserted during the final days of the last war because he had grown so sick of the Karrnathi War Council. Of all the thralls, he is certainly the most loyal, nearly fanatic about achieving the hydra's goals.
Head number four: Uthlug, a primitive sorcerer, male, level one spellcasting ability. Uthlug is, frankly, as dumb as a brick. He's not nearly smart enough to have learned any wizardry--luckily for him he's got some innate magical ability. / The Hooded Ogre, a ogre vigilante, male, with an over-developed sense of drama. The Hooded Ogre used to sweep down out of the night and terrorize criminals, and now he is forced at the head of an organized crime racket! This makes the Hooded Ogre very angry indeed! (Note: Uthlug did not charm the Hooded Ogre. Malforias did--and then he gave the ogre to Uthlug to watch over.)
Head number three: Burah, a neurotic Transmuter, female, level two spellcasting ability. Burah always seems to have a severe head cold, which makes her voice annoying and nasal. She also tends to sneeze and worry a lot. She's the least confident of all of the personalities. / Neka, a teenaged changeling rogue, female, who ran away from her parents and ended up in Karrlakton. She acts cocky and confident, but its just a pose--she's discovered that she doesn't want anything more than to go home again.
Head number two: Sterleen, a seductive Enchantress, female, level three spellcasting ability. Sterleen is very assertive, and very direct. She prefers using cunning to get what she wants, and she has become an expert at turning the other personalities against one another. She is an expert mainpulator. / Liada, an elven gang leader, female, has been learning spells from Sterleen. Liada is tough and demands respect. She controls the largest portion of the Black Rose gang due to her powerful personality and natural leadership skills.
And the number one pyrohydra personality is: Malforias, an evil Necromancer, male, level five spellcasting abiltiy. The most dominant personality, Malforias believes he needs no thrall--considers the rest of the personalities to be his under his control as much as any thrall could be. He rules the other personalties through intimidation. His an amulet of ooze control helps him manage the lair's guardians.
The Big Wrap-up!
Eleven-Headed Pyrohydra: the central bad guy of the piece, a mainpulator who brings chaos to Karrlakton.
Drums of Panic: Vothario's flawed creation and the pyrohydra's most devious weapon.
Great Cleave: the ability granted to those targeted by the Pipes of Prowess
Withered Rose: the symbol of the pyrohydra's gang. It got the idea from the crest carved into Vothario's trunk. A withered rose can be used to get past many of the hydra's guardians.
Spike Stones: a living spike stones spell is the secret weapon the pyrohydra uses to execute those who get in its way.
Claustrophobia: the type of fear generated by Vothario's drums of panic, felt by the citizens of Karrlakton and by the characters when they make their assault on the hydra's lair.
Wow--I'm exhausted. I spent all day working on my entry, and I know I should probably proofread it some more, but I'm really tired so I'm going to bed now. Tomorrow I'll wake up and read it again and realize how horrible it is.
Ah, I'm probably being too rough on myself. Well, I do acknowledge that my use of Great Cleave was pretty weak, but in my defense--hey, that's a tough one, man!
Now I'm anxious awaiting the judgement, which sucks. I'm really tired, but I'm so anxious about my entry that I'll probably have trouble falling asleep. Oh well.
I've read through the first match's entries once so far, so I should be able to get up a judgment sometime late this afternoon or evening. Round three ingredients go up tonight as well.
Tomorrow, I'll hope to write up the second match judgment (though it looks like I've got some extensive reading ahead of me ).
Saturday is game day.
Sunday should see the judgment for round three - which puts us right on schedule to start the finals on Monday-ish.
I'll put some comments in a spoiler block, so CD doesn't read them while he's judging.
There is absolutely no comparison between this round's entry and last round's. To be completely honest, I didn't particularly care for your last entry - the general and his constant urgings seemed more like a railroad to me than a true plot device, and if you're going to set something in Eberron, you might as well use the lightning rail, instead!
That being said, I would have absolutely no qualms at all about taking this adventure and running with it. It's a complete 180 in terms of presentation; the drive of the adventure is back in the PCs' hands, I love the rules / tidbits for Gather Information you've presented, and I particularly like the adventure hooks you've presented (in the form of 8 vignettes).
I'm something of an Eberron fanboy at the moment. I like the way you tied the setting specific material in, though I wish there could have been more. However, this would be largely useless to someone not playing in Eberron, and its inclusion may even have hurt your entry. So, in summation, I'm happy with it.
The only thing I have a serious question about is how the hydra moves around underground. If all the tunnels are as small as you say they are, and only the entrances fit medium-sized characters, how does a Huge-sized monster get around?
Otherwise, that's a *fantastic* bit of writing. Major props, mad ups, high fives, and all other signs of approbation unto you.
You have 24 hours from the timestamp on this post to submit your entries. If the boards are inaccessible when your entry is due, you can send a copy to garrettdm AT ameritech DOT net.
Do not read your opponent's entry until you have submitted yours.
Once your entry has been submitted, NO EDITING!
You have a suggested limit of 3500 words.
Please include a summary of ingredients at the end of your entry. See some of the recent competitions for examples.

")
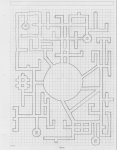
 ).
).


