As the party falls back, the dead throw themselves at Fredrock as the dwarf braces himself for all of them. Their sheer mass is enough to push even the sturdy dwarf back, but he lures most of them away from his companions.
More dead fall and lie still with each passing second, but there are so many that even the heroic efforts of the group have only slowed their advance.
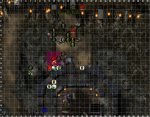
[sblock=Notes about this round]Switching to the other map would be a HUGE pain in the butt, so I just moved the map down. I did this after I moved the enemy, so their movement locations in the Enemy Actions are incorrect. They should be correct in the Combatants section.
Assume the difficult terrain ends once you reach the new line S on the map and the door is marked with the blue dot. Also, don't forget you can make an Athletics check as part of any movement, clearing 1 square per 5 rolled(rounding down).
I also totally forgot about Dwarven Stability. In this case it was a good thing, otherwise, Fredrock would be completely surrounded where he was at. I'll try to remember it in the future however. You have the option of letting them push you if you desire, just let me know Xeterog.[/sblock]
[sblock=Enemy Actions]Rerisen Dead 4: Charge to P17, Slam(+1 charge): NAT1 vs Fredrock.
Rerisen Dead 6: Move, charge to Q18, Slam(+1 charge): NAT1 vs Fredrock.
Rerisen Dead 7: Charge to R18, Slam(+1 charge): 24 AC vs Fredrock, hit, 5 damage reduced to 1 and push 1.
Rerisen Dead 8: Move, charge to Q17, Slam(+1 charge): CRIT vs Fredrock, 5 damage reduced to 1 and push 1.
Rerisen Dead 11: Charge to O14, Slam(+1 charge): 23 AC vs Fredrock, 5 damage reduced to 1 and push 1.
Rerisen Dead 12: OA vs Eithal: Slam(+2 CA): 24 AC vs Eithal, hit, 5 damage reduced to 0 and push 1. Charge to N15, Slam(+1 charge, -2 mark): 21 AC vs Fredrock, hit, 5 damage reduced to 1 and push 1.
Rerisen Dead 15: Rerise: Fail. Dead.
Rerisen Dead 16: Move, charge to P15, Slam(+1 charge): AC 19, hit, 5 damage reduced to 1 and push 1.
Rerisen Hulk 2: Slam: 19 AC vs Yim, hit, 11 damage and push 2.
Rerisen Hulk 3: Charge to Q14, Slam(+1 charge): 10 AC vs Fredrock, miss.
Rerisen Hulk 4: Rerise: Fail. Dead.
Rerisen Hulk 5: OA vs Eithal: Slam(+2 CA): 12 AC, miss. Move, charge to T16, Slam(+1 charge): 25 AC, hit, 12 damage reduced to 7 and push 2.
Rerisen Hulk 6: OA vs Eithal: Slam: 14 AC, miss. Move, charge to P14, Slam(+1 charge, -2 mark): 10 AC vs Fredrock, miss.
Rerisen Hulk 7: Move, charge to U15, Slam(+1 charge): NAT1 vs Cale.
Rerisen Beast 2: Rerise: Fail. Dead.
Rerisen Beast 3: Rerise: Succeed. Stand.
Rerisen Beast 4: Rerise: Fail. Dead.
Rerisen Archer 2: Move to J18, Longbow: 16 AC vs Fredrock, miss.
Rerisen Archer 4: Longbow: 17 AC vs Fredrock, miss.
Rerisen Archer 5: Longbow: 20 AC vs Fredrock, hit, 4 damage reduced to 0.
Rerisen Archer 6: Longbow: 21 AC vs Fredrock, hit, 4 damage reduced to 0.
Rerisen Archer 7: Longbow: 13 AC vs Fredrock, miss.
Rerisen Swarm 1: Rerise: Success. Stand.
Rerisen Swarm 3: Charge to U14, 1 square up, Beaks and Talons(+1 charge, -2 marked): CRIT vs Cale, 8 damage + 4 necrotic damage.[/sblock]
[sblock=Combatants]Rerisen Dead 4: H15
Rerisen Dead 6: I16
Rerisen Dead 7: J16
Rerisen Dead 8: I15
Rerisen Dead 11: G12
Rerisen Dead 12: F14, marked(Eithal)
Rerisen Dead 16: H13
Rerisen Dead: Minion, AC 14, Ref 12, Resist 10 Necrotic. MBA: +6 vs AC, 5 damage and push 1.
Rerisen Dead destroyed: 11
Rerisen Hulk 2: O7, 9 damage taken
Rerisen Hulk 3: I12, 11 damage taken
Rerisen Hulk 5: L14, 11 damage taken, marked(Eithal)
Rerisen Hulk 6: H12, 12 damage taken, marked(Eithal)
Rerisen Hulk 7: M13
Rerisen Hulk: 36 max hp, AC 15, Ref 11, Will 12, Resist 10 Necrotic, Vulnerable 5 Radiant. MBA: +6 vs AC, 2d6+3 damage and push 2.
Rerisen Hulks destroyed: 2
Rerisen Beast 3: G16, 27 damage taken, bloodied, dazed
Rerisen Beast: 28 max hp, AC 14, 11 Will, Resist 10 Necrotic, MBA: +6 vs AC, 1d4+2 damage.
Rerisen Beasts Destroyed: 3
Rerisen Archer 2: B16
Rerisen Archer 4: C13
Rerisen Archer 5: C15
Rerisen Archer 6: C16
Rerisen Archer 7: C17
Rerisen Dead: Minion, AC 14, Ref 14, Resist 10 Necrotic, MBA: +6 vs AC, 3 damage.
Rerisen Archers destroyed: 2
Rerisen Raven Swarm 1: B18, 33 damage taken, bloodied, dazed
Rerisen Raven Swarm 3: M12, 1 square up, 19 damage taken, bloodied, dazed, marked(Eithal)
Rerisen Raven Swarm: 34 max hp, AC 16, Reflex 14, Swarm, Resist 10 Necrotic,Winged Pestilence: Aura 1 - any creature that ends its turn adjacent to a swarm takes 5 necrotic damage. MBA: +7 vs AC, 1d4+4 damage +1d4 necrotic damage.
Swarm: Swarms take 1/2 damage from ranged and melee attacks. They are vulnerable 5 to Burst and Blast attacks.
Rerisen Swarms destroyed: 1
Rerisen Lords destroyed: 1
Livia: S12
Yimanyngurr: P7, 11 damage taken
Eithal: O11, 32 damage taken, bloodied, 5 DR
Kaz: O12, 10 damage taken
Fedrock: H11, 14 damage taken, DR4
Craftsman 2: S11
Craftsman 4: Fled
Craftsman 5: R12
Craftsman 8: O18
Craftsman: Minion, AC 15, Fort 12, Ref 13, Will 10, speed 4. Longspear(Craftsmen 6-10 only): Reach 2, +4 vs AC, 4 damage. Crossbow(Craftsmen 1-5 only): Range 15/30, +4 vs AC, 4 damage. Shortspear(all): +4 vs AC, 3 damage.
Craftsmen killed: 6
Master Mason: O18, 9 damage taken
38 max hp, AC 15, Fort 14, Ref 12, Will 12, speed 6. Mallet: +7 vs AC, 1d8+3 damage.
Captain Cale: N12, 23 damage taken, bloodied
43 max hp, AC 19, Fort 16, Ref 15, Wil 15, speed 5. All allies gain +1 to hit and +3 to damage when they spend an action point while Cale is conscious.
[sblock=Cale's powers]Viper's Strike(MBA): +10 vs AC, 19-20 crit range, 1d12+1 damage (crit 1d12+13) and the enemy provokes and OA from an ally if it shifts.
Paint the Bulls-Eye(RBA, Longbow): +8 vs AC, range 20/40, 1d10 damage and all allies get +3 to damage rolls against the target until the end of Cale's next turn.
Vengeance is Mine: immediate reaction, when hit by an enemy melee attack, +10 vs AC, 1d12+8 damage and an ally can move their speed and make a melee basic attack against the target.
No Gambit is Wasted: immediate reaction, when an ally misses all targets with an encounter or daily attack, attack one adjacent targeted enemy, +10 vs AC, 2d12+4 damage and the ally's power is not wasted.
Inspiring Word(x2): Minor action, one ally in close burst 5 heals surge+1d6.[/sblock][/sblock]
[sblock=Special rules for this fight]As a minor action, you may let one of the Craftsmen, the Master Mason, or Captain Cale take a standard action. They may take move and minor actions as well each round if you convert additional minor actions to "fuel" them.
As before, if an adjacent craftsman is hit, you may take the damage instead as a free action. Alternatively, if you are hit, you may make an adjacent craftsman take the hit instead.[/sblock]
[sblock=Terrain]*Any terrain with rocks is difficult terrain. You can ignore it by making DC 15 Acrobatics checks to keep your balance as you run across the rocks. Fail the Acrobatics check and you are knocked prone. You can, of course, use Athletics to jump over difficult terrain as always.
*The palisades fill all the squares they are in and will make attacks against anything that tries to climb over them.[/sblock]
[sblock=Tower Door]A little reminder again about the location of the door to the tower; it's near the blue dot I put on the map. Next round I'll shift the map and drop it down a level so everyone can see, that'll just take... alot of work.[/sblock]
[sblock=Map/Combantants block discrepancies]Fredrock technically wasn't adjacent to that beast he just hit since he pushed it back with Bull's Rush last turn and it got stunned, but it's easier to let it go than wait for a redacted action.
In the future, if there is a discrepancy between the map and the location given in the Combatants section, assume the Map is correct since I update that first, then go back right before I'm going to post it and update the Combatants block off of the map (occasionally missing things since there's 40+ combatants in this fight).
The only exception is flying creatures, who may not be in the block they appear to be on the map. In the future, if flying and ground creatures occupy the same square, I'll put the ground creatures in the square and the flying creatures tokens in a square adjacent. I'll be sure to double check the flying creature's Combatants locations to be sure they are correct.[/sblock]

")
 Iron Fist
 Battlemind Demand
 RBA -1 vs AC, 1d4-1 (improvised..would have to pick up a rock or something)
 RBA vs. RRB2 =
  Hungry Longspear +1: +8 vs AC 1d10+5 dmg