Adding color - help needed

Jürgen Hubert

First Post
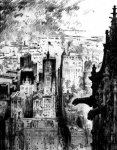
Since I'm trying to get Urbis published one day, I need a nice picture for my cover page. For this reason, I've been browsing ClipArt, and I've found one image that I really like (which should be attached to this file). It is very moody and evokes pretty much the feeling I want for Urbis. Unfortunately, it is in black & white only - and in my mind at least, covers should be in color.

So, do any of you have some good advice for how to add color to this image? It can be fairly subtle, but it should be a bit beyond just turning everything into the same shade of brown (for example)...

I'm using Photoshop, if that helps...
 

Attachments

  • UrbisTestTitle.JPG
    UrbisTestTitle.JPG
    94.6 KB · Views: 108

log in or register to remove this ad

You should be able to do the following:

Create a new layer. Put the black-and-white art on the top layer, and set it to Multiply. (This essentially means white turns transparent, black stays where it is.)

On the bottom layer, paint with whatever colours you feel like you need. Personally, I'd use hard-edged brushes (ones without fuzzy borders - I don't use Photoshop, so I don't know precisely how to get them, but experiment a bit - Undo is your friend), and fill the layer with white before starting; that way, you can just draw a border around a region that's supposed to be one colour, then floodfill the interior very quickly and with no fuzzy edges. This method also allows you to magicwand-select the areas of colour and replace them very, very quickly, which is good if you've decided you want a different colour there (and if you're not used to that sort of thing, you can probably spend a long time searching for the right colour).

The result should be a lot more colourful than before. There are plenty of things you can do afterwards, but this is a good starting point...
 

Lots of goodies that will help you in Photoshop.

One trick is to copy and paste the image multiple times so that you have many layers, all displaying the same image. Then tint each of the layers a different color using "adjust hue/saturation." Then carve away different bits in each layer with the eraser.

You can adjust transparency of various layers, or make them completely invisible if they are in your way--in the show layers palette, click the little eyeball icon next to each layer to turn them on and off.

Don't forget that you can dodge, burn and saturate/desaturate with the sponge. You can use these tools to take a single tint wash and make it appear to contain more colors.

Another trick is to get a set of colors that work pretty well, and then invert them. You often get surprising and interesting coloring this way, or see potential in the image you had not previously noticed.

It's a nice image by the way. I'm curious to see what you'll do with it. PLease post results when you get them.
 

A couple of notes, after looking around your image a bit.

1. If it's possible to have the pre-colored image inked then that's usually preferable since that gives a better line and less fuzzies.
2. I hope you've got a higher resolution version of it. :)

You can clean up and jigger the black by multiply layers and sharpening and smart blurs first. Since you're talking about a cover illo I'd probably go in there and very carefully crisp up some of the greys by painting over them in white.

Then I'd isolate the black completely, invert, and removeall the white from the image entirely. That means you're going to have a locked black layer available with nothing else. That means no messy darken/hue/color layers and guessing at colors because what you see is what you're going to get. I'd drop all the color layers beneath the black layer so you don't have to worry about edges as much, and work a single color to a layer unless you have an outstanding hardware issue with doing it otherwise. That allows you to, if you later on decide that a color doesn't work for you, quick-select the layer mask and just fill it in with another color that suits you more. Don't forget to add some of those hue and saturation layers afterwards since you're working with buildings and buildings usually aren't particularly 'clean' looking. Sometimes a few gradient fades work wonders too. After I'd finished that, I'd probably go over the 'top' of the layers (including the black) and put in the outstanding highlights on the leading edges. That sometimes fakes the eye into a greater sense of depth IMO.

For maximum fun though, I'd beg Knid to do the whole thing in CAD. :)
 

James, that's interesting enough that I'm going to try some of these things you mentioned in my own work and see how it goes for me.

Usually, I find that unless I merge down the layers at some point and start working the whole image, I wind up with tones that don't really seem to "touch" each other--edges of things that should connect don't.

So I might do a table in green and an apple in red as two separate layers, but at some point, when I've got things near to the end, I'd probably merge them down and work on the shadows in the spot where the apple touches the table. Otherwise the apple winds up looking like a circle hovering over the plane, instead of a sphere resting on it.

Another thing I like to do is print out the image, water color it, and then scan it back in. This gives me a lot of nice texture, and I can always correct the color once it's scanned in. If you look at "Citizen of Idle Fen" in my gallery, you'll see one done this way. The original watercolor is not very interesting, and it's over a pencil sketch on a Post-it note, so everything had a yellowish cast. But I laid out the rough texture, and then I worked most of the color in Photoshop. It's nice to have something "real" to start from.
 

James Heard said:
2. I hope you've got a higher resolution version of it. :)

Yes, I have - the original is 1167x1500 pixels, and 247 kB. But I didn't want to increase download time needlessly...

For maximum fun though, I'd beg Knid to do the whole thing in CAD. :)

I would, too - he's already created a web images for my site (and in fact, I have a web gallery with some of his images here, though I probably should update it one of these days...) - but last time I checked, he used his company's CAD program for this, which means I can't use them for publications...

Thanks for the help, everyone - I'll see what I can come up with, and post the result here.
 

Sialia said:
Usually, I find that unless I merge down the layers at some point and start working the whole image, I wind up with tones that don't really seem to "touch" each other--edges of things that should connect don't.
Well, the things I was suggesting mostly lend themselves to inked artwork that have clear edges in the first place. It's a comic book sort of process, that's where I learned it (if I made a mistake somewhere it's my fault), watching colorists I know that work on comic books. Variations on it have served me well in coloring certain sorts of a greyscale images though enough that I'm fond of it.

Just curious, when you say that the edges don't connect, when you work on individual layers you're still always looking at the whole image right? I tend to put everything and anything on a different layer and keep it that way always until it is time to save it for sharing. That means when it comes time to add in the shadows they're occassionally old school copies of the color layers of the object skewed and blackened and blurred, just because it isn't that hard and sometimes looks ok.

Um, another thing I should probably mention in the 'not that hard' category I suppose is that I've got a Wacom and I've blissfully forgotten anything that was really hard with a jerky mouse now.

I also recommend Painter if you can get it for watercolors and 'natural' medium feels. Sure, you can do it with Photoshop - but with Painter your brushes are mostly already there and the 'paper' and 'textured board' looks are preprogrammed and fairly convincing.
 

James Heard said:
Just curious, when you say that the edges don't connect, when you work on individual layers you're still always looking at the whole image right?
Hmm. Well, you've made me curious, so I've gone and given it a try both ways to see what difference it makes to me. I'll show you the experiments. You probably won't see all that much differnece between the results.

I did find that as far as ease-of-use goes, I was a lot happier doing the highlights and shadows in the flattened image, because I didn't have to keep remembering which layer I was in.

One advantage for the layered drawing was that it was a lot easier to shadow the duck's body while highlighting the legs. Since the legs are in the orange layer, shadowing the green doesn't affect them.

But when light is falling across things of multiple colors, it is much easier to get even shadows if the image has been flattened.

Here's what the layers look like first, then the flattened and shadowed version, and then the version I did with the shadows being applied to seperate layers.
 

Attachments

  • duck-in-layers.jpg
    duck-in-layers.jpg
    26.5 KB · Views: 71
  • duck-flattened.jpg
    duck-flattened.jpg
    45.5 KB · Views: 69
  • duck-still-layered.jpg
    duck-still-layered.jpg
    46.1 KB · Views: 76
Last edited:

Sorry-couldn't resist. Here's a quick and dirty 15 minute version.

I pasted your jpg in, converted the mode to RGB, then copied and pasted in 4 times. I colorized and turned each layer a different hue--red, yellow, blue, green. Then I erased gleefully through the layers, kind of haphazardly. The yellow turned out to really project too much, unless you want a golden sunset shining hard light on the buildings--which would have to be thought out so you know where the sun is coming from. So I desaturated a lot of the yellow, and burned some of the areas a bit darker.

This was easy and fun. I didn't flatten it, because it meant that no matter what I screwed up, there would always be some of the first B&W layer showing though that still showed the orignal sketch in it.
 

Attachments

  • urbis.jpg
    urbis.jpg
    161 KB · Views: 79
Last edited:

And then just for fun, I inverted all the layers. What the hey. Sometimes I find out cool stuff this way about what works and what doesn't or, a way to express sky that isn't blue and ocean green.
 

Attachments

  • urbis-inverted.jpg
    urbis-inverted.jpg
    105.2 KB · Views: 80

Remove ads

Top