• NOW LIVE! Into the Woods--new character species, eerie monsters, and haunting villains to populate the woodlands of your D&D games.

Photoshop question - Att: DMAC or someone else who might be able to help

GentleGiant

Explorer
Okay, I'm looking for some help with Photoshop.
I'm sure this is covered in some tutorial somewhere, but I'm not sure what to look for exactly.
I'm looking to do what DMAC did to his drawings in this thread:
http://www.enworld.org/forums/showthread.php?t=93347
I.e. put something in as a background (as it happens it's a parchment background too) and have it look like it was drawn directly on the background.
I've experimented with removing/deleting the white from the scans, but I always end up with small bits here and there... maybe it's just a question of being meticulous enough?

Anyway, any help would be greatly appreciated.

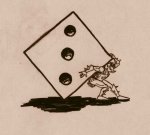
Here's a few of the pictures I need to do it to (sorry if the pics are fairly big):

diary2.jpg


Gentle%20Giant.jpg


Roll%20the%20Die.jpg
 

log in or register to remove this ad

Here's one way to do it:

You can use the old Parchment map that Wizards gives away here: http://www.wizards.com/dnd/article.asp?x=dnd/mw/mw20020725x2001 (just scroll down.) Then again, you can use any image you find online or make up yourself.

Copy one of your images. Go into photoshop, and open a new document, then paste your image. It should automatically adjust the canvas size to fit your image. We'll use the first picture as an example:

ps1.jpg


Create a new layer between the background and your image layer, and paste the parchment sheet into it:

ps2.jpg


Then, select the layer with your picture, and adjust the bar where it says "normal." These different options decide how your layer interacts with the layers below it. Try choosing the option "Darken" :

ps3.jpg


It should give you a result of something like this (be sure your top layer is selected!):

ps4.jpg


Go ahead and play around with the other options. You can get a fun result, such as this:

ps5.jpg


Also, playing around with the opacity of your layers simply adds to your options:

ps6.jpg


Have fun!
 

You rock!
That's totally great. Now, for a follow-up question. ;)
Is there any way I can do something similar if I e.g. wanted to make a transparant .gif file, so only the inked lines would show?
Imagine this: If I wanted to have a whole web page with different drawings scattered about it, but they should only be with the lines showing and then instead of having the parchment on the whole page I'd just put it in as a background image on the web page to cut down on the filesize(s).
 

Yep, a layer set to "Multiply" is the way to do it. I actually use a scan from one of the 3rd Edition books for most of my parchment backgrounds but I've also made custom "dirty" backgrounds using textured papers/watercolors/ink.

I also switched your line art to "Duotone" and made it brown, then back to RGB Color before layering on the background:

diary.jpg


I don't know about your second question but transparant GIF files tend to be sort of rough looking. I'm not sure how well it would work.
 

My favorite way to get this effect is to make sure the Image>mode >RGB color

and then Image>Adjust>Hue/Saturation and/or Image>Adjust>Color Balance.

That way whatever cheap white paper you have actually drawn the image on becomes your parchment, and your ink turns sepia. So it doesn't look like your drawing is floating in front of your background, but is genuinely drawn onto it.

here's a sample:
 

Attachments

  • coloringsample.jpg
    coloringsample.jpg
    21.2 KB · Views: 85

Or you can try the select>color range tool. Usually, I'll select the background, not the ink. Then you can delete the background color, or "select inverse" to cut and paste your ink somewhere else.
 

Into the Woods

Remove ads

Top