pogre's model and figure thread

pogre

Legend
pogre's model and figure thread - Tabaxi(2/28/2017)

PMT 01
Pogre’s Model and Figures Thread
The Gate House

All of the pictures in this thread are thumbnails linked to larger pictures.

Some Story Hours have Rogues Gallery Threads to accompany them, but mine needed a model and figures thread! First up is the gatehouse I designed based on Wolfgang Baur’s adventure Legacy of the Griffon.

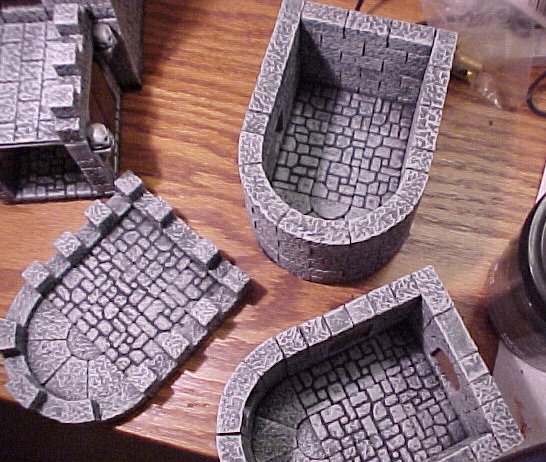
The gatehouse is made mostly of Hirst Blocks.


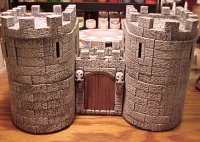
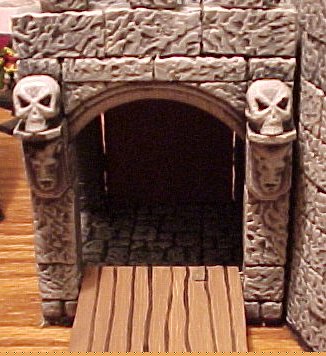
The middle section has a drawbridge that actually goes up and down. Note that this was not completed when the adventure was shot on disc.


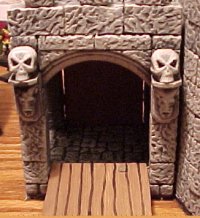
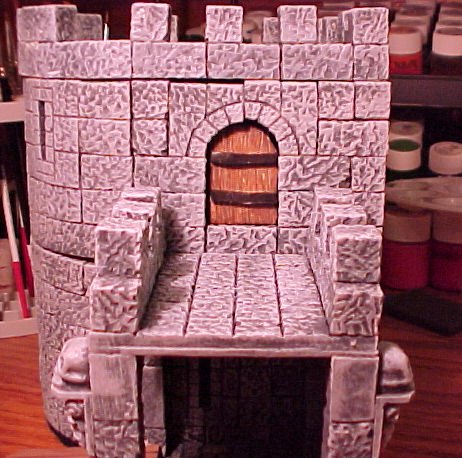
This is a side view of the gate section and one of the towers. The doors in the towers were sculpted and the walkway above the gate tunnel is complete with murder holes!


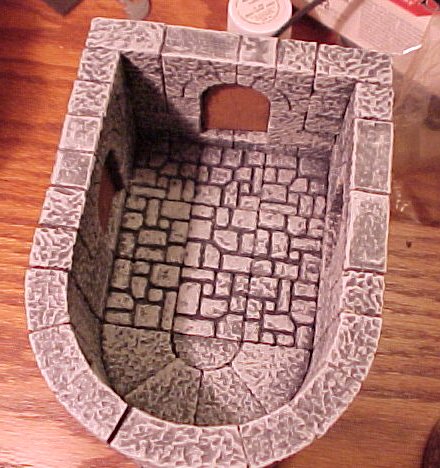
This is a top down view of one of the upper stories of the towers. Lots of room for guards to move around in there.


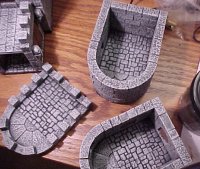
The towers are composed of three sections: roof, upper story, and base story. This allows easy access for minis.


The model still needs a few things like trap doors, stairs, and ladders. However, overall I am very pleased with it. I will eventually build some walls with aprons that will attach to the towers and create an entire castle/keep.
 
Last edited:

log in or register to remove this ad

D'karr

Adventurer
That is really cool. The work you've put into the buildings looks great.

Some questions for you from those that are interested in doing something similar.

How long did it take to assemble and paint?

Overall, how hard was it to build?

How many molds did it require? Which ones?

From start to finish (casting to building) how long did it take to construct?

What material did you use for the casting and how durable is it?

Have you found a good way to store these after they are built? That is my main concern with these buildings.
 

pogre

Legend
D'karr said:
That is really cool. The work you've put into the buildings looks great.

Thanks!

How long did it take to assemble and paint?

Hmmm, not positive - building it took a couple of evenings - I already had most of the blocks cast. Doors took another night to mold and paint. Painting the building was 90 minutes or so.

Overall, how hard was it to build?

If you can build a Hirst Arts building you can build this - it is not that difficult.

How many molds did it require? Which ones?

I used a bunch of different molds, but it could really be built with just two:
The Dragon's Inn
Circular Tower

From start to finish (casting to building) how long did it take to construct?

Wow! Hard to say. The casting would take a long time if done specifically for the project. I would guestimate you're talking about 18-20 castings (more if you are just using the two molds I mentioned) - That's going to be the big time eater. Construction can be accomplished in a couple of evenings work. Painting went fairly quickly - around an hour and a half. I made the doors and painted them in another evening.

What material did you use for the casting and how durable is it?

I use Die-Keen green high impact dental plaster. It is very durable and great to cast with. It's durability is comparable to the resin used in master maze. Once I started using it I gave all the building I have made out of plaster of paris away to friends. It runs about $65.00 for 50 lbs. That's a lot of blocks and it is worth every penny.

Have you found a good way to store these after they are built? That is my main concern with these buildings.

I do have an advantage there, we game over at a friend's (hwoolsey on here). I put a group of large merchandise drawers in there and all of my buildings and dungeon pieces go in it. I store the pieces in a box segmented with cardboard dividers. I pad the dividers with a thin lair of foam or polystyrene.

Obviously, you know about the Hirst Arts Site , but I'll share this link with others.

Another site you might check out for a bit of inspiration is Skow's Medieval terrain. He has not updated for a long time, but his stuff is really cool.
 

Destan

Citizen of Val Hor
I'm thinking of gathering some half-troll buddies, heading to Pogre's, and raiding his collection of awesome models and mini's. They're simply top notch. Pogie, you should have a vending booth at GenCon, brother.

D
 

pogre

Legend
New Gjord

PMT 02
Gjord

I need to get better at photographing these figures, because this figure is really much nicer than it looks here. Oh well, it gives you a sense of the paint job.


Front view:


Here is the old Gjord for comparison:

 
Last edited:


pogre

Legend
Well, it has changed. I used to take pictures during the game, but I switched. Setting up the scenes is very quick - what takes time is snapping the pictures. For that reason, we have gone to taking the pictures immediately after the session is over. Usually we leave everything set up for the after-session photo shots. I think we like this method better.

The only recreation is placing the miniatures in the scene. A couple of players hang around and help me remember positioning and do lighting. Hank (Gerhardt) always helps because it is his house. The photo session for a long adventure with lots of action takes about 20 minutes.

My photography skills are improving, but are still bad. If you have suggestions from your experiences by all means share.
 

D'karr

Adventurer
pogre said:

[SNIP]
My photography skills are improving, but are still bad. If you have suggestions from your experiences by all means share.

Pogre. I've been inspired by your models and your storyhour. Totally fantastic.

Let me return the favor.

The following link leads to the articles section of the Coolminiornot Website. Look down the page and you'll see a whole section comprised on articles about miniature photography.

Granted, not all the articles will apply to the type of photography you are doing but the techniques might help you to get sharper pictures of those fantastic minis and terrain models. The articles that cover lighting are probably going to be very helpful.

Of course a lot of this is going to depend on how close you can get your camera to the action so the article that covers camera setup might be helpful.

Like I said not everything will apply but the techniques are sound.

Good luck.
 
Last edited:

pogre

Legend
D'karr said:
Pogre. I've been inspired by your models and your storyhour. Totally fantastic.

Let me return the favor.
<snip>
Like I said not everything will apply but the techniques are sound.
Good luck.

Thanks much - some of the articles look good. I need to come up with something because as you shall soon see my photos need help. I know everyone says it, but I promise these minis look better than the pictures below ;)
 

pogre

Legend
PMT 03
Zombie

This zombie is wielding an unusual weapon ;). A Games Workshop figure – it was a lot of fun to paint. This posting anticipates the next story hour episode, but as the players have gone past it no harm done.


Last edited:

pogre

Legend
PMT 04
Zombie

Tried some different things with the flesh on this zombie. This guy is right out for a belly button piercing;)


Last edited:

pogre

Legend
PMT 05
Morgang

Here comes the evil spellcaster Morgang. Morgang is a Mordheim figure from Games Workshop.


Last edited:

pogre

Legend
PMT 06
Making a Dungeon Room Part One

All of the pictures in this tutorial are thumbnails that are linked to larger photos.

A few people had expressed interest in how I create dungeon rooms to integrate with my massive Dwarven Forge Master Maze collection. This tutorial talks about my style of creating rooms and what works for me. It’s not the only way, and Bruce Hirst has his own tutorial for using his blocks for making dungeon tiles. I do things differently stylistically and for purposes of the dungeons and dragons game.

I created a number of blocks using Hirst Arts molds Fieldstone Wall Mold #70 and Flagstone Floor Tile Mold #260.

Here you can see I already have the bricks I need molded out of die keen dental plaster ready to go. I am going to make a generic 30 ft. by 30 ft. room. The needed materials have all been laid out on my cheap cutting board I use for modeling.


I first put the floor together. This is the first of many places that I depart from Bruce Hirst’s tutorial. I surround my 30 ft by 30 ft worth of tile with a layer of half tiles. This way when I put my walls down I will have nice full squares to works with – as opposed to the half squares you get with Master Maze or the Hirst method. The tiles are glued together side to side – not down to any surface. This helps to avoid warping, which can occur with bigger floor pieces.


I use Aleene’s Tacky Glue and a cheap brush to apply the glue to the tiles.


I let the floor pieces dry completely before the next step of putting the floor tiles on a base. I like using self-adhesive linoleum floor tiles as a base. A 12” by 12” piece will run you about 90 cents at a DIY store like Lowe’s. The piece pictured here has been used for other projects, but has plenty left to use for this room.


I mark the tile for cutting for the room’s size. In this case I cut two pieces to cover.

Next, I apply some glue to the hirst arts tiles and stick the non-adhesive side of the linoleum to the hirst arts tiles. This helps reduce warping. I have tried using the adhesive side but it causes all kinds of problems: It warps your floor, it makes the project harder to paint, and you have to deal with the sticky adhesive that never dries.


I flip this over and allow it to dry with a big heavy book on top.

Next, I start to build the room. I use Lego (tm) forms to keep my corners and walls true.


I finish up the corners and set the main room aside.


Honestly, I could be finished building here and have a nice room with four exits. Master Maze doors fit nicely into each of the exits. However, I want this room to be versatile as possible. I am going to create three insertable wall pieces in order to have a 30 ft. by 30 ft. room with 1 to 4 exits. I am also going to make some corridor entrances just for fun.

I will build the corridor entrances upside down.


The same is true for the movable walls.


I let these dry and then add a feature or two to the corridor pieces – torch holders and slanted pieces to the crowns.


Now, the pieces are built. All I have to do is let everything dry completely and then paint it. But wait, there’s more! I also have a couple more tricks to show you on how to make it even more compatible with your master maze. We’ll save that for Part Two of the tutorial.

I hope you find this helpful!
 
Last edited:

pogre

Legend
PMT 07
Making a Dungeon Room Part Two

All of the pictures in this tutorial are thumbnails that are linked to larger photos.

You will notice in this next photo I have already painted the basic grays on the dungeon room. I have sculpted a couple of flames and put them atop the torches.


Next I base the torch holders and the flames black.


I painted the bases brass and painted the flames. I was not crazy about how the flames turned out – so no close-ups. I took the whole thing out and gave it a few coats of matte over gloss.

I could be done and have a very nice room.


Recall, I used self adhesive tile for a base. Now I measure some dark felt to put on the tile.


I cut it to fit and place it on the tiles adhesive. No glue application and thus no concerns about warping!


Some white spaces show on the side of the tile – so I use a permanent black marker to touch up.


Now, my dungeon room is done! Look how nicely it works with my Master Maze.


Watch for the new dungeon room to appear in a story hour near you!
 
Last edited:

alsih2o

First Post
first- major coolitude! thanks for sharing :)

second- what source are you using for dental plater? have you tried mold plaster? is it better?
 

pogre

Legend
alsih2o said:
first- major coolitude! thanks for sharing :)

second- what source are you using for dental plater? have you tried mold plaster? is it better?

Thanks - I actually thought your name was Clay until I looked at your pottery gallery the other day (I know I'm an idiot).

I get the dental plaster from American Dental Supply. This stuff is super tough and way better than hydrocal and PoP. I have not used Art Mold plaster - do you mean like Vatican Art Stone? I have heard you can achieve some interesting results with it.

Bruce Hirst has a customer reviews page where customers have given him input about different materials. That may be of interest to you.

Take care,

Keith
 

Ed Cha

Community Supporter
These are AWESOME!!! They make me want to restart my miniatures collection actually.

My brother's huge lead miniatures collection (mostly Ral Partha) was damaged during a move by my parents. He had some great pieces. I wasn't as big of a collecter as he was though because I can't paint well. I couldn't even paint an air elemental if I had to. Believe me, I tried! My brother could paint pretty well, but not quite as good as you.

I'm kind of jealous though because I never had any of the dungeon pieces ever! I don't think I ever will because I just don't have any space in my Manhattan apartment.

Where do you store all of this stuff anyhow?
 

pogre

Legend
PMT 08
Gaming Room
All of the pics are thumbs that are linked to larger images.

A number of folks have asked the question: How do you store all of this stuff?

I cheat, I use my friend’s gaming room, hwoolsey (Gerhardt in the SH).


This first picture shows a player’s view down towards my position. Right behind my chair is the main miniatures cabinet – where we keep the figures we use most.


To the left of the cabinet you can see the Drawers fullo’ Dungeon ™.

Here some shots of how I store the Dungeon room components in the drawers.

This first shot shows the drawer with a bunch of stuff I built.


Some regular Mastermaze to build rooms.


Some passage pieces:


Well, I won’t bore you with shots of every drawer, but it may give you some insight into how we play the game.
 
Last edited:

Scorch

Explorer
Pogre,

I wish to tap your vast knowledge of Hirst Arts Blocks (as I tell my fellow gamers: "I have serious Pogre envy").

I want to build some dungeon pieces that are compatable with Master Maze Dwarven Forge stuff. Specifically I am looking for extra floor tiles that have a recognizable pattern on them for 1" grids, wall units, and passageways (both 2" across and 1" across for 10' and 5' wide corridors).

I was looking through their catalog and#45 and #210 look good along with #265, 260, and 212. What do you use for walls and passages?

Can you recommend any molds that make pieces that could go with the MM cave sets?

Thanks,

Scorch
 

pogre

Legend
Scorch said:
Pogre,

I wish to tap your vast knowledge of Hirst Arts Blocks (as I tell my fellow gamers: "I have serious Pogre envy").
Hey, thanks!:)
Scorch said:
I want to build some dungeon pieces that are compatable with Master Maze Dwarven Forge stuff. Specifically I am looking for extra floor tiles that have a recognizable pattern on them for 1" grids, wall units, and passageways (both 2" across and 1" across for 10' and 5' wide corridors).

I was looking through their catalog and#45 and #210 look good along with #265, 260, and 212. What do you use for walls and passages?

Can you recommend any molds that make pieces that could go with the MM cave sets?

Thanks,

Scorch

To match up with master maze you want molds #70 and #260. That's all I use for my halls and most of my rooms. Mold #71 looks like fun, but I have not had a chance to pick it up yet. Avoid #265 for D&D as they are 1.5 inches. I could see a use for the other molds in a dungeon, but I honestly rarely use them. I have #45, but I rarely use it.

As far as the cavern sets go - no not really. I have a floor piece I am working on - I just have to make an RTV of my model. The walls would be difficult to cast in rtv and have look "right." I would like to make a modular system to create mines and caverns, but I am stumped on the walls.

BTW - I played with the cavern passage set for the first time the other night. It's outstanding and I recommend it to everyone. Well worth the money.
 
Last edited:

Epic Threats

An Advertisement

Advertisement4

Top